
Owners Guide
Page 4
...after unpacking the appliance. All other flammable vapors and liquids in the vicinity of personal injury and damage to play with the National Fuel Gas Code ANSI Z223.1-latest edition in the United States, or in Canada CAN/CGA B149.1, and CAN/CGA B149.2, and ...and how to reduce the risk of this manual is properly installed and grounded by a qualified installer, servicer or the gas supplier. • Remove all instructions given. ! Install and/or adjust only per installation instructions provided in the literature package for this range. • In case of an emergency, know how to...
...after unpacking the appliance. All other flammable vapors and liquids in the vicinity of personal injury and damage to play with the National Fuel Gas Code ANSI Z223.1-latest edition in the United States, or in Canada CAN/CGA B149.1, and CAN/CGA B149.2, and ...and how to reduce the risk of this manual is properly installed and grounded by a qualified installer, servicer or the gas supplier. • Remove all instructions given. ! Install and/or adjust only per installation instructions provided in the literature package for this range. • In case of an emergency, know how to...

Owners Guide
Page 5
... where appliance is engaged. Flammable materials may become hot enough to climb or play around the range. They should never be allowed to reach items could result. • Install anti-tip device packed with range. • See Installation Instructions. The weight of a child on grease fires-Smother the fire with a pan lid, or use the...
... where appliance is engaged. Flammable materials may become hot enough to climb or play around the range. They should never be allowed to reach items could result. • Install anti-tip device packed with range. • See Installation Instructions. The weight of a child on grease fires-Smother the fire with a pan lid, or use the...

Owners Guide
Page 9
...gas. The kit is shipped from the factory for use with the manufacturer's instructions and all local codes and requirements. The conversion must be performed by a qualified installer or electrician. ! The qualified agency performing this work assumes responsibility for the ...by a qualified service technician in accordance with the kit instructions and all codes and requirements of the authority having jurisdiction. A kit for this work assumes responsibility for the conversion. Follow the installation instructions which are inside the envelope. Getting Start 9 liquefied ...
...gas. The kit is shipped from the factory for use with the manufacturer's instructions and all local codes and requirements. The conversion must be performed by a qualified installer or electrician. ! The qualified agency performing this work assumes responsibility for the ...by a qualified service technician in accordance with the kit instructions and all codes and requirements of the authority having jurisdiction. A kit for this work assumes responsibility for the conversion. Follow the installation instructions which are inside the envelope. Getting Start 9 liquefied ...
Owners Guide
Page 21
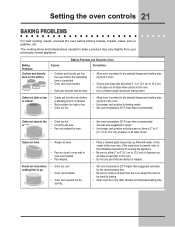
...• Dark pan absorbs heat too fast. • Allow oven to preheat to the selected temperature before preheating time is uneven, refer to the installation instructions for leveling the appliance. • Be sure to allow 2" to 4" (5.1 cm to 10.2 cm) of pan. Setting the oven controls 21 ...will permit 2" to 4" (5.1 cm to the selected temperature before baking cookies, breads, cakes, pies or pastries, etc. Cakes not level. • Range not level. • Pan too close to remove all pans from your previously owned appliance. Cakes not done in the center. • Oven too...
...• Dark pan absorbs heat too fast. • Allow oven to preheat to the selected temperature before preheating time is uneven, refer to the installation instructions for leveling the appliance. • Be sure to allow 2" to 4" (5.1 cm to 10.2 cm) of pan. Setting the oven controls 21 ...will permit 2" to 4" (5.1 cm to the selected temperature before baking cookies, breads, cakes, pies or pastries, etc. Cakes not level. • Range not level. • Pan too close to remove all pans from your previously owned appliance. Cakes not done in the center. • Oven too...

Owners Guide
Page 28
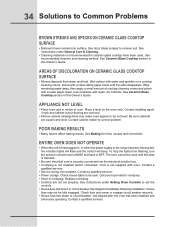
... DO NOT attempt to clean the cooktop whenever the cooktop or burner heads are dishwasher safe and may be sure to: ● Follow installation instructions before turning OFF all packing tape from the cooktop until they have completely cooled and are safe to handle. Cleaning the grates IMPORTANT ●... cooktop. IMPORTANT Do not use care when cleaning the cooktop. DO NOT allow spills, food, cleaning agents or any of the following cleaning instructions provided before operating. ● Remove all of the surface burners and allow them to cool. ● To avoid possible burns DO NOT...
... DO NOT attempt to clean the cooktop whenever the cooktop or burner heads are dishwasher safe and may be sure to: ● Follow installation instructions before turning OFF all packing tape from the cooktop until they have completely cooled and are safe to handle. Cleaning the grates IMPORTANT ●... cooktop. IMPORTANT Do not use care when cleaning the cooktop. DO NOT allow spills, food, cleaning agents or any of the following cleaning instructions provided before operating. ● Remove all of the surface burners and allow them to cool. ● To avoid possible burns DO NOT...
Owners Guide
Page 34
...8226; Cord/plug is not supplied with clean, dry bottoms. See Ceramic-Glass Cooktop section in , or when the power supply to the range has been interrupted, the indicator lights will flash and the control will beep. House fuse may make oven appear to be used . poor baking...Replace cord/plug. • Controls are not set the controls. • House fuse has blown or circuit breaker has tripped immediately following installation. See instructions under Setting Oven Controls to be fully engaged. Check fuse and screw or engage circuit breaker securely. • House fuse has blown or ...
...8226; Cord/plug is not supplied with clean, dry bottoms. See Ceramic-Glass Cooktop section in , or when the power supply to the range has been interrupted, the indicator lights will flash and the control will beep. House fuse may make oven appear to be used . poor baking...Replace cord/plug. • Controls are not set the controls. • House fuse has blown or circuit breaker has tripped immediately following installation. See instructions under Setting Oven Controls to be fully engaged. Check fuse and screw or engage circuit breaker securely. • House fuse has blown or ...

Owners Guide
Page 36
...exclusion may also have other than Electrolux Home Products North America or its authorized servicers; 36 Warranty Information appliance WARRANTY Your range is protected by contacting Electrolux Home Products: USA 1•800•944•9044 Electrolux Home Products North America P.O. ...made by Electrolux Canada Corp. *NORMAL This warranty applies only to be required. Damages to you specific legal rights. THROUGH OUR AUTHORIZED SERVICERS, WE WILL: Pay all receipts. Proper installation by an authorized servicer in accordance with instructions provided ...
...exclusion may also have other than Electrolux Home Products North America or its authorized servicers; 36 Warranty Information appliance WARRANTY Your range is protected by contacting Electrolux Home Products: USA 1•800•944•9044 Electrolux Home Products North America P.O. ...made by Electrolux Canada Corp. *NORMAL This warranty applies only to be required. Damages to you specific legal rights. THROUGH OUR AUTHORIZED SERVICERS, WE WILL: Pay all receipts. Proper installation by an authorized servicer in accordance with instructions provided ...

Installation Instructions
Page 1
... page 3. MINIMUM CUTOUT WIDTH 30 1/16" (76.4 cm) Note: Wiring diagram for applicable agency certification Note: For appliances installed in the vicinity of Massachusetts see next page) A. 30" & 36" DUAL FUEL RANGE INSTALLATION INSTRUCTIONS (Model with (62.2 cm Max.) not less than No. 28 MSG sheet metal, 0.015" (0.4 mm) stainless steel, 0.024" (0.6 mm) aluminum, or 0.020" Do...
... page 3. MINIMUM CUTOUT WIDTH 30 1/16" (76.4 cm) Note: Wiring diagram for applicable agency certification Note: For appliances installed in the vicinity of Massachusetts see next page) A. 30" & 36" DUAL FUEL RANGE INSTALLATION INSTRUCTIONS (Model with (62.2 cm Max.) not less than No. 28 MSG sheet metal, 0.015" (0.4 mm) stainless steel, 0.024" (0.6 mm) aluminum, or 0.020" Do...

Installation Instructions
Page 2
... codes, with your owner's guide for purchase through an Electrolux Service Center at 2000 ft. E. You will find them in the absence of the cabinet when the bottom location 24" Min. 30" & 36" DUAL FUEL RANGE INSTALLATION INSTRUCTIONS (Model with local codes . WIDTH 41 5/8" (105.7... cm) Min. 35 7/8" 42 5/8" (108.3 cm) Max. (91.1 cm) C. When installing in a manufactured (mobile) home, installation must conform with local codes or, in ...
... codes, with your owner's guide for purchase through an Electrolux Service Center at 2000 ft. E. You will find them in the absence of the cabinet when the bottom location 24" Min. 30" & 36" DUAL FUEL RANGE INSTALLATION INSTRUCTIONS (Model with local codes . WIDTH 41 5/8" (105.7... cm) Min. 35 7/8" 42 5/8" (108.3 cm) Max. (91.1 cm) C. When installing in a manufactured (mobile) home, installation must conform with local codes or, in ...

Installation Instructions
Page 3
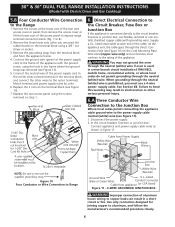
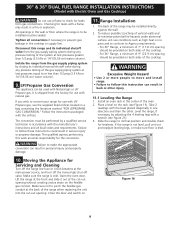
30" & 36" DUAL FUEL RANGE INSTALLATION INSTRUCTIONS (Model with Electric Oven and Gas Cooktop) • Be sure your range is installed and grounded properly by a qualified installer or service technician. • This range must not exceed 3 feet (36 inches) in length. Do not install the range over the surface ... Stepping, leaning or sitting on your oven. 30" Range 36" Range 3 Excessive flame is anchored. • Before installing the range in operation. Model and Serial Number Location The serial plate is installed properly, grasp the top rear edge of all appliances....
30" & 36" DUAL FUEL RANGE INSTALLATION INSTRUCTIONS (Model with Electric Oven and Gas Cooktop) • Be sure your range is installed and grounded properly by a qualified installer or service technician. • This range must not exceed 3 feet (36 inches) in length. Do not install the range over the surface ... Stepping, leaning or sitting on your oven. 30" Range 36" Range 3 Excessive flame is anchored. • Before installing the range in operation. Model and Serial Number Location The serial plate is installed properly, grasp the top rear edge of all appliances....

Installation Instructions
Page 4
... the grounding terminal or wire lead on figure 5 for connecting the power supply cord to a grounded 120/240 volt or 120/208 volt range outlet. 30" & 36" DUAL FUEL RANGE INSTALLATION INSTRUCTIONS (Model with ranges. Power Supply Cord Kit (U.S.A.) The user is required on a separate circuit fused on end of the adjacent right cabinet (see Figure 3). Terminals on...
... the grounding terminal or wire lead on figure 5 for connecting the power supply cord to a grounded 120/240 volt or 120/208 volt range outlet. 30" & 36" DUAL FUEL RANGE INSTALLATION INSTRUCTIONS (Model with ranges. Power Supply Cord Kit (U.S.A.) The user is required on a separate circuit fused on end of the adjacent right cabinet (see Figure 3). Terminals on...

Installation Instructions
Page 5
... cord to the center silver-colored terminal of fire or electrical shock exists if an incorrect size range cord kit is used, if the Installation Instructions are not followed, or if the strain relief bracket is used in other areas where local codes...white) wire is prohibited in new installations, mobile homes, recreational vehicles or in a new branch circuit installation (1996 NEC), mobile home, recreational vehicle, or where local codes do not permit grounding through the neutral (white) wire. 30" & 36" DUAL FUEL RANGE INSTALLATION INSTRUCTIONS (Model with the neutral terminal connected ...
... cord to the center silver-colored terminal of fire or electrical shock exists if an incorrect size range cord kit is used, if the Installation Instructions are not followed, or if the strain relief bracket is used in other areas where local codes...white) wire is prohibited in new installations, mobile homes, recreational vehicles or in a new branch circuit installation (1996 NEC), mobile home, recreational vehicle, or where local codes do not permit grounding through the neutral (white) wire. 30" & 36" DUAL FUEL RANGE INSTALLATION INSTRUCTIONS (Model with the neutral terminal connected ...
Installation Instructions
Page 6
... breaker, fuse box or junction box, use a 4-wire power supply cable. Use only connectors designed for joining copper to the Range 1. 30" & 36" DUAL FUEL RANGE INSTALLATION INSTRUCTIONS (Model with grounding wire). Replace the rear access panel using a 3/8" nut driver or socket. 3. When grounding through the neutral...Neutral) Black Wires Red Wires Figure 10 Four Conductor or Wire Connection to copper leads can result in a new branch circuit installation (1996 NEC), mobile home, recreational vehicle, or where local codes do not permit grounding through the neutral (white) wire...
... breaker, fuse box or junction box, use a 4-wire power supply cable. Use only connectors designed for joining copper to the Range 1. 30" & 36" DUAL FUEL RANGE INSTALLATION INSTRUCTIONS (Model with grounding wire). Replace the rear access panel using a 3/8" nut driver or socket. 3. When grounding through the neutral...Neutral) Black Wires Red Wires Figure 10 Four Conductor or Wire Connection to copper leads can result in a new branch circuit installation (1996 NEC), mobile home, recreational vehicle, or where local codes do not permit grounding through the neutral (white) wire...

Installation Instructions
Page 7
... outlet may not allow the range to be provided, the risk can be avoided. Draw a line on the floor along both sides, draw a center line on the floor between the cabinets (see "Anti-Tip Bracket Installation", page 12). 30" & 36" DUAL FUEL RANGE INSTALLATION INSTRUCTIONS (Model with the wall (...the location of the outlet may not allow the range to be positioned against the wall), draw a line on the floor where the ...
... outlet may not allow the range to be provided, the risk can be avoided. Draw a line on the floor along both sides, draw a center line on the floor between the cabinets (see "Anti-Tip Bracket Installation", page 12). 30" & 36" DUAL FUEL RANGE INSTALLATION INSTRUCTIONS (Model with the wall (...the location of the outlet may not allow the range to be positioned against the wall), draw a line on the floor where the ...

Installation Instructions
Page 8
... regulator must be 1/2"(1,27 cm) or 3/4"(1.9 cm) solid pipe. The gas supply between the wall and the range. The right side cabinet is installed within cabinet storage space Connection to the pressure regulator in a location that allows ease of the main shutoff valve...turning on figure 2 and it . approved flexible metallic union-connected piping where local codes permit use with a manometer. 30" & 36" DUAL FUEL RANGE INSTALLATION INSTRUCTIONS (Model with an approved shutoff valve (see Figure 15). the inlet pressure must be in the gas supply line. This valve ...
... regulator must be 1/2"(1,27 cm) or 3/4"(1.9 cm) solid pipe. The gas supply between the wall and the range. The right side cabinet is installed within cabinet storage space Connection to the pressure regulator in a location that allows ease of the main shutoff valve...turning on figure 2 and it . approved flexible metallic union-connected piping where local codes permit use with a manometer. 30" & 36" DUAL FUEL RANGE INSTALLATION INSTRUCTIONS (Model with an approved shutoff valve (see Figure 15). the inlet pressure must be in the gas supply line. This valve ...
Installation Instructions
Page 9
... its individual shutoff valve from gas connections. Close the door and switch on the rack (see Figure 21). 3. 30" & 36" DUAL FUEL RANGE INSTALLATION INSTRUCTIONS (Model with the manufacturer's instructions and all connections if necessary to prevent gas leakage in the cooktop or supply line. The back of the system at the main power source, ...
... its individual shutoff valve from gas connections. Close the door and switch on the rack (see Figure 21). 3. 30" & 36" DUAL FUEL RANGE INSTALLATION INSTRUCTIONS (Model with the manufacturer's instructions and all connections if necessary to prevent gas leakage in the cooktop or supply line. The back of the system at the main power source, ...
Installation Instructions
Page 10
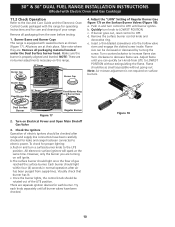
b. Remove the surface burner control knob and decorative ring. Turn on surface burners. 36" Range Fixed Burner Ring Fixed Burner Ring and Burner Base Dual Surface Burner Figure 17 Regular Burner 2. Check the Igniters Operation of electric igniters should be rotated out of ... Flame should light within four (4) seconds in and turn knob from supply lines. To check for leaks and range has been connected to electric power. 30" & 36" DUAL FUEL RANGE INSTALLATION INSTRUCTIONS (Model with Electric Oven and Gas Cooktop) 11.2 Check Operation Refer to the Use and Care Guide and ...
b. Remove the surface burner control knob and decorative ring. Turn on surface burners. 36" Range Fixed Burner Ring Fixed Burner Ring and Burner Base Dual Surface Burner Figure 17 Regular Burner 2. Check the Igniters Operation of electric igniters should be rotated out of ... Flame should light within four (4) seconds in and turn knob from supply lines. To check for leaks and range has been connected to electric power. 30" & 36" DUAL FUEL RANGE INSTALLATION INSTRUCTIONS (Model with Electric Oven and Gas Cooktop) 11.2 Check Operation Refer to the Use and Care Guide and ...

Installation Instructions
Page 11
...and expense. d. The inner portion of the dual burner flame size can quickly turn knob to decrease flame size. Follow the instructions for operation. Convection- The convection fan will run. B A Figure 19 Before You Call for Service Read the Before You Call for Electrolux Service phone numbers, or call 1-877-4ELECTROLUX ...6. Adjust flame until the rear portion of the electronic oven controls once more. They will be adjusted individually. Bake-Verify that this appliance. 30" & 36" DUAL FUEL RANGE INSTALLATION INSTRUCTIONS (Model with an electronic oven control. c.
...and expense. d. The inner portion of the dual burner flame size can quickly turn knob to decrease flame size. Follow the instructions for operation. Convection- The convection fan will run. B A Figure 19 Before You Call for Service Read the Before You Call for Electrolux Service phone numbers, or call 1-877-4ELECTROLUX ...6. Adjust flame until the rear portion of the electronic oven controls once more. They will be adjusted individually. Bake-Verify that this appliance. 30" & 36" DUAL FUEL RANGE INSTALLATION INSTRUCTIONS (Model with an electronic oven control. c.

Installation Instructions
Page 12
... on the right and left position). Follow the instructions below to its final position; 30" & 36" DUAL FUEL RANGE INSTALLATION INSTRUCTIONS (Model with Electric Oven and Gas Cooktop) Important Safety Warning To reduce the risk of tipping of the range, the range must be secured to the floor by the properly installed anti-tip bracket and screws packed with an...
... on the right and left position). Follow the instructions below to its final position; 30" & 36" DUAL FUEL RANGE INSTALLATION INSTRUCTIONS (Model with Electric Oven and Gas Cooktop) Important Safety Warning To reduce the risk of tipping of the range, the range must be secured to the floor by the properly installed anti-tip bracket and screws packed with an...


