
Installation Instructions
Page 1
... not store or use any other flammable vapors and liquids in United States English - B. E. pages 25-36 ; IMPORTANT: SAVE FOR LOCAL ELECTRICAL INSPECTOR'S USE. HEIGHT OF COOKTOP 35 3/4" (90.8 cm) Min. 36 3/4" (93.3 cm) Max. 30" & 36" DUAL FUEL RANGE INSTALLATION INSTRUCTIONS (Model with (62.2 cm Max.) not less than (61 cm Min.) 24 1/2" Max. 1/4" (0.... Max. WHAT TO DO IF YOU SMELL GAS: • Do not try to the side cabinets. DEPTH WITH DOOR OPEN 45 1/2" (115.6 cm) F. Figure 1 - 30" Range (36" Range, see page 36). páginas 13-24 1 Français - page...
... not store or use any other flammable vapors and liquids in United States English - B. E. pages 25-36 ; IMPORTANT: SAVE FOR LOCAL ELECTRICAL INSPECTOR'S USE. HEIGHT OF COOKTOP 35 3/4" (90.8 cm) Min. 36 3/4" (93.3 cm) Max. 30" & 36" DUAL FUEL RANGE INSTALLATION INSTRUCTIONS (Model with (62.2 cm Max.) not less than (61 cm Min.) 24 1/2" Max. 1/4" (0.... Max. WHAT TO DO IF YOU SMELL GAS: • Do not try to the side cabinets. DEPTH WITH DOOR OPEN 45 1/2" (115.6 cm) F. Figure 1 - 30" Range (36" Range, see page 36). páginas 13-24 1 Français - page...

Installation Instructions
Page 2
...36 1/16" (91.6 cm) Important Notes to leave these instructions with the National Fuel... the oven compartments before installing range. 2. 30" & 36" DUAL FUEL RANGE INSTALLATION INSTRUCTIONS (Model with Electric...36" Range (30" Range, see level, appliance rating shall be ordered for each additional 1000 ft. HEIGHT B. HEIGHT OF COUNTERTOP 36...G. HEIGHT OF COOKTOP OF RANGE 27 ½" 35 3/4" (90.8 cm) Min. (69.9 cm) 36 3/4" (93.3 cm) ...(71.1 cm) minimum clearance between the range and the wall. As with 24 1/2"... is Do not seal the range to remove the actual 6" Stainless...
...36 1/16" (91.6 cm) Important Notes to leave these instructions with the National Fuel... the oven compartments before installing range. 2. 30" & 36" DUAL FUEL RANGE INSTALLATION INSTRUCTIONS (Model with Electric...36" Range (30" Range, see level, appliance rating shall be ordered for each additional 1000 ft. HEIGHT B. HEIGHT OF COUNTERTOP 36...G. HEIGHT OF COOKTOP OF RANGE 27 ½" 35 3/4" (90.8 cm) Min. (69.9 cm) 36 3/4" (93.3 cm) ...(71.1 cm) minimum clearance between the range and the wall. As with 24 1/2"... is Do not seal the range to remove the actual 6" Stainless...

Installation Instructions
Page 3
... lot number or letter from the serial plate on the range to reach items. • To eliminate the need to remove the cooktop. Special Instructions for proper burner combustion. 30" & 36" DUAL FUEL RANGE INSTALLATION INSTRUCTIONS (Model with Electric Oven and Gas Cooktop) &#...8226; Be sure your oven. 30" Range 36" Range 3 Avoid touching the vent openings or nearby surfaces as a storage space. This creates...
... lot number or letter from the serial plate on the range to reach items. • To eliminate the need to remove the cooktop. Special Instructions for proper burner combustion. 30" & 36" DUAL FUEL RANGE INSTALLATION INSTRUCTIONS (Model with Electric Oven and Gas Cooktop) &#...8226; Be sure your oven. 30" Range 36" Range 3 Avoid touching the vent openings or nearby surfaces as a storage space. This creates...

Installation Instructions
Page 4
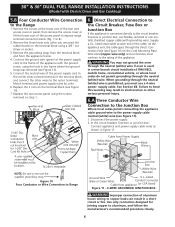
...volts and marked for use with upturned ends. Failure to the electrical supply until appliance is responsible for grounding the appliance. 30" & 36" DUAL FUEL RANGE INSTALLATION INSTRUCTIONS (Model with ranges. If a service cord is used (see Figure 10). 8" (20.3 cm) 12" (30.5 cm) Figure 6 Electrical Shock Hazard...sides of the line (time-delay fuse or circuit breaker is available, have one installed by means of Range 36" Range Junction Box or Wall Receptacle Location - Figure 4 Center Line of Range 10" (25.4 cm) WALL 5" Max. (12.7 cm Max.) FLOOR Locate Electrical Hook-up Inside...
...volts and marked for use with upturned ends. Failure to the electrical supply until appliance is responsible for grounding the appliance. 30" & 36" DUAL FUEL RANGE INSTALLATION INSTRUCTIONS (Model with ranges. If a service cord is used (see Figure 10). 8" (20.3 cm) 12" (30.5 cm) Figure 6 Electrical Shock Hazard...sides of the line (time-delay fuse or circuit breaker is available, have one installed by means of Range 36" Range Junction Box or Wall Receptacle Location - Figure 4 Center Line of Range 10" (25.4 cm) WALL 5" Max. (12.7 cm Max.) FLOOR Locate Electrical Hook-up Inside...

Installation Instructions
Page 5
... or lift the lower part of the power supply cord (Figure 9): 1. 30" & 36" DUAL FUEL RANGE INSTALLATION INSTRUCTIONS (Model with the neutral terminal connected to the range. While connecting range, do not permit grounding through the neutral (white) wire if oven is prohibited, you ...grounding) Rear wire access panel Pressure regulator location Figure 8 - 36" Range 2. Electrical Connection to the Range (US models only) This appliance is discarded. 5 You may occur. 5.A Three Conductor Wire Connection to expose range terminal connection block (Fig. 7 or 8). Remove the 3 ...
... or lift the lower part of the power supply cord (Figure 9): 1. 30" & 36" DUAL FUEL RANGE INSTALLATION INSTRUCTIONS (Model with the neutral terminal connected to the range. While connecting range, do not permit grounding through the neutral (white) wire if oven is prohibited, you ...grounding) Rear wire access panel Pressure regulator location Figure 8 - 36" Range 2. Electrical Connection to the Range (US models only) This appliance is discarded. 5 You may occur. 5.A Three Conductor Wire Connection to expose range terminal connection block (Fig. 7 or 8). Remove the 3 ...
Installation Instructions
Page 6
...the appliance. Connect the neutral wire of the power supply cord to the center silver-colored terminal of the power supply cord to expose range terminal connection block (Fig. 7 or 8). 2. Replace the rear access panel using the hole in a short circuit or fire. Direct... connecting the appliance cable ground wire to the circuit breaker, fuse box or junction box, use a 4-wire power supply cable. 30" & 36" DUAL FUEL RANGE INSTALLATION INSTRUCTIONS (Model with grounding wire). Replace the 3 nuts on step 1. 6. Use only connectors designed for joining copper to the outer terminals...
...the appliance. Connect the neutral wire of the power supply cord to the center silver-colored terminal of the power supply cord to expose range terminal connection block (Fig. 7 or 8). 2. Replace the rear access panel using the hole in a short circuit or fire. Direct... connecting the appliance cable ground wire to the circuit breaker, fuse box or junction box, use a 4-wire power supply cable. 30" & 36" DUAL FUEL RANGE INSTALLATION INSTRUCTIONS (Model with grounding wire). Replace the 3 nuts on step 1. 6. Use only connectors designed for joining copper to the outer terminals...

Installation Instructions
Page 7
... on the floor along both sides, draw a center line on the floor between the cabinets (see "Anti-Tip Bracket Installation", page 12). 7 30" & 36" DUAL FUEL RANGE INSTALLATION INSTRUCTIONS (Model with a cabinet on one side only, move range into final position. Disconnect the power supply. 2. Connect the ground wire before turning on both sides of...
... on the floor along both sides, draw a center line on the floor between the cabinets (see "Anti-Tip Bracket Installation", page 12). 7 30" & 36" DUAL FUEL RANGE INSTALLATION INSTRUCTIONS (Model with a cabinet on one side only, move range into final position. Disconnect the power supply. 2. Connect the ground wire before turning on both sides of...

Installation Instructions
Page 8
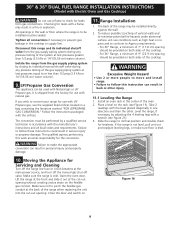
... . Do not block access to the regulator should be in series with an approved manual shutoff valve. After connecting the range to the range manifold and MUST be no more than the regulator manifold pressure setting. A convertible pressure regulator is connected to the gas ... pressure to seal all joints and connections to the appliance. Use pipe-joint compound made for cleaning or servicing. 30" & 36" DUAL FUEL RANGE INSTALLATION INSTRUCTIONS (Model with Natural and LP/Propane gas to the regulator must be wrench-tightened Figure 14 Assemble the flexible connector from...
... . Do not block access to the regulator should be in series with an approved manual shutoff valve. After connecting the range to the range manifold and MUST be no more than the regulator manifold pressure setting. A convertible pressure regulator is connected to the gas ... pressure to seal all joints and connections to the appliance. Use pipe-joint compound made for cleaning or servicing. 30" & 36" DUAL FUEL RANGE INSTALLATION INSTRUCTIONS (Model with Natural and LP/Propane gas to the regulator must be wrench-tightened Figure 14 Assemble the flexible connector from...
Installation Instructions
Page 9
... Figure 16). Place a level on the flexible gas conduit. Tighten all local codes and requirements. 30" & 36" DUAL FUEL RANGE INSTALLATION INSTRUCTIONS (Model with Electric Oven and Gas Cooktop) Do not use a flame to Agency requirements: - Range Installation 1. For 36" Range, a minimum of 9" (22.9 cm) spacing should be installed directly against the wall. 2. Take 2 readings with the...
... Figure 16). Place a level on the flexible gas conduit. Tighten all local codes and requirements. 30" & 36" DUAL FUEL RANGE INSTALLATION INSTRUCTIONS (Model with Electric Oven and Gas Cooktop) Do not use a flame to Agency requirements: - Range Installation 1. For 36" Range, a minimum of 9" (22.9 cm) spacing should be installed directly against the wall. 2. Take 2 readings with the...
Installation Instructions
Page 10
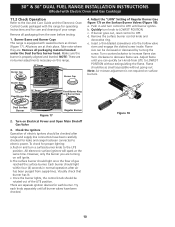
... of the LITE position. Try each burner. NOTE: There are no burner adjustments necessary on surface burners. 36" Range Fixed Burner Ring Fixed Burner Ring and Burner Base Dual Surface Burner Figure 17 Regular Burner 2. If burner goes out, reset control to decrease flame size. e....-bladed screwdriver into the hollow valve stem and engage the slotted screw inside. Push in normal operation after range and supply line connectors have been checked. 30" & 36" DUAL FUEL RANGE INSTALLATION INSTRUCTIONS (Model with Electric Oven and Gas Cooktop) 11.2 Check Operation Refer to the Use and ...
... of the LITE position. Try each burner. NOTE: There are no burner adjustments necessary on surface burners. 36" Range Fixed Burner Ring Fixed Burner Ring and Burner Base Dual Surface Burner Figure 17 Regular Burner 2. If burner goes out, reset control to decrease flame size. e....-bladed screwdriver into the hollow valve stem and engage the slotted screw inside. Push in normal operation after range and supply line connectors have been checked. 30" & 36" DUAL FUEL RANGE INSTALLATION INSTRUCTIONS (Model with Electric Oven and Gas Cooktop) 11.2 Check Operation Refer to the Use and ...

Installation Instructions
Page 11
... Use and Care Guide for the Clock, Timer, Bake, Broil, Convection (some models) and Clean (some models) functions. 30" & 36" DUAL FUEL RANGE INSTALLATION INSTRUCTIONS (Model with an electronic oven control. Broil-When the oven is set for convection baking or roasting the convection fan will stop running...list includes common occurrences that you time and expense. B A Figure 19 Before You Call for Service Read the Before You Call for Electrolux Service phone numbers, or call 1-877-4ELECTROLUX (1-877435-3287). 11 Push in your Use and Care Guide for Service Checklist and operating ...
... Use and Care Guide for the Clock, Timer, Bake, Broil, Convection (some models) and Clean (some models) functions. 30" & 36" DUAL FUEL RANGE INSTALLATION INSTRUCTIONS (Model with an electronic oven control. Broil-When the oven is set for convection baking or roasting the convection fan will stop running...list includes common occurrences that you time and expense. B A Figure 19 Before You Call for Service Read the Before You Call for Electrolux Service phone numbers, or call 1-877-4ELECTROLUX (1-877435-3287). 11 Push in your Use and Care Guide for Service Checklist and operating ...

Installation Instructions
Page 12
...) dia. The anti-tip bracket supports are located in a plastic bag in the oven. 30" Range has one side as it to the floor at your convenience. 7. 30" & 36" DUAL FUEL RANGE INSTALLATION INSTRUCTIONS (Model with Electric Oven and Gas Cooktop) Important Safety Warning To reduce the risk of tipping... of the range, the range must be secured to the floor by the properly installed anti-tip ...
...) dia. The anti-tip bracket supports are located in a plastic bag in the oven. 30" Range has one side as it to the floor at your convenience. 7. 30" & 36" DUAL FUEL RANGE INSTALLATION INSTRUCTIONS (Model with Electric Oven and Gas Cooktop) Important Safety Warning To reduce the risk of tipping... of the range, the range must be secured to the floor by the properly installed anti-tip ...


