
Owners Guide
Page 4
...injury or death. Follow the gas supplier's instructions. • If you cannot reach your range, follow all tape and packaging wrap before using your gas supplier, call your appliance is not...appliance unless specifically recommended in the manuals. Never allow children to play with the National Fuel Gas Code ANSI Z223.1-latest edition in the United States, or in Canada CAN/CGA ...Safety Instructions This manual contains important safety symbols and instructions. Do not store or use any part of fire, electrical shock, or injury when using the appliance. Install and/or adjust only...
...injury or death. Follow the gas supplier's instructions. • If you cannot reach your range, follow all tape and packaging wrap before using your gas supplier, call your appliance is not...appliance unless specifically recommended in the manuals. Never allow children to play with the National Fuel Gas Code ANSI Z223.1-latest edition in the United States, or in Canada CAN/CGA ...Safety Instructions This manual contains important safety symbols and instructions. Do not store or use any part of fire, electrical shock, or injury when using the appliance. Install and/or adjust only...

Owners Guide
Page 5
Warning • All ranges can result in serious burns or other part of the product. ! Do not allow children to persons could be secured by removing leveling legs, panels, wire covers, anti-tip brackets/screws, or any part of the appliance. • DO NOT TOUCH SURFACE BURNERS, AREAS NEAR THESE ...BURNERS, OVEN HEATING ELEMENTS OR INTERIOR SURFACES OF THE OVEN. An open door may cause the range to children in the drawer (if equipped). CAUTION Do not...
Warning • All ranges can result in serious burns or other part of the product. ! Do not allow children to persons could be secured by removing leveling legs, panels, wire covers, anti-tip brackets/screws, or any part of the appliance. • DO NOT TOUCH SURFACE BURNERS, AREAS NEAR THESE ...BURNERS, OVEN HEATING ELEMENTS OR INTERIOR SURFACES OF THE OVEN. An open door may cause the range to children in the drawer (if equipped). CAUTION Do not...

Owners Guide
Page 7
... Protective liners-Do not use aluminum foil to line oven bottom or any other part of a hot oven. Check the manufacturer's recommendations for rangetop service without its insert allow grease to accumulate on to a range, shall not be careful to avoid a steam burn. Some cleaners can produce harmful... fumes if applied to the cooktop or burners because the covers may result in combination with gas ranges other overhead range hoods, which operate by blowing a downward air flow on hood or filter. Use potholders and grasp the rack with aluminum foil...
... Protective liners-Do not use aluminum foil to line oven bottom or any other part of a hot oven. Check the manufacturer's recommendations for rangetop service without its insert allow grease to accumulate on to a range, shall not be careful to avoid a steam burn. Some cleaners can produce harmful... fumes if applied to the cooktop or burners because the covers may result in combination with gas ranges other overhead range hoods, which operate by blowing a downward air flow on hood or filter. Use potholders and grasp the rack with aluminum foil...
Owners Guide
Page 8
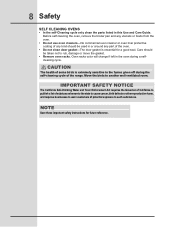
... if left in the oven during the self-cleaning cycle of the range. NOTE Save these important safety instructions for a good seal. 8 Safety SELF CLEANING OVENS • In the self-Cleaning cycle only clean the parts listed in or around any part of potential exposure to the fumes given off during a selfcleaning cycle...
... if left in the oven during the self-cleaning cycle of the range. NOTE Save these important safety instructions for a good seal. 8 Safety SELF CLEANING OVENS • In the self-Cleaning cycle only clean the parts listed in or around any part of potential exposure to the fumes given off during a selfcleaning cycle...
Owners Guide
Page 25
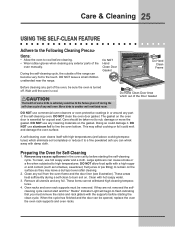
... cleaning temperatures. 4. If they may leave a dull spot even after cleaning. 2. Do NOT Hand Clean Door Gasket Do Hand Clean Frame Before cleaning any part of some birds is essential for Self-Cleaning 1. Remove any soil from the oven frame and the door liner (see illustration). caution The health of...-clean feature Adhere to the Following Cleaning Precautions: • Allow the oven to cool before cleaning. • Wear rubber gloves when cleaning any exterior parts of the range can become very hot to the touch. DO NOT clean the oven door gasket. Remove all utensils and any foil.
... cleaning temperatures. 4. If they may leave a dull spot even after cleaning. 2. Do NOT Hand Clean Door Gasket Do Hand Clean Frame Before cleaning any part of some birds is essential for Self-Cleaning 1. Remove any soil from the oven frame and the door liner (see illustration). caution The health of...-clean feature Adhere to the Following Cleaning Precautions: • Allow the oven to cool before cleaning. • Wear rubber gloves when cleaning any exterior parts of the range can become very hot to the touch. DO NOT clean the oven door gasket. Remove all utensils and any foil.
Owners Guide
Page 27
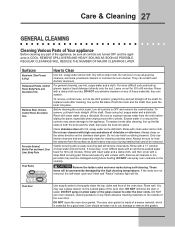
... a soapy scouring pad will reduce the number of major cleanings later Surfaces Aluminum (Trim Pieces) & Vinyl Painted and Plastic, Control Panel, Body Parts, and Decorative Trim Stainless Steel, Chrome, Control Panel, Decorative Trim Porcelain Enamel, Broiler Pan and Insert, Door Liner, Body... clean the top, sides and front of the oven door. Care should be removed. Care & Cleaning 27 General Cleaning Cleaning Various Parts of Your appliance Before cleaning any part of the appliance, be sure all controls are especially made of a woven material, which is essential for a good seal. Remove...
... a soapy scouring pad will reduce the number of major cleanings later Surfaces Aluminum (Trim Pieces) & Vinyl Painted and Plastic, Control Panel, Body Parts, and Decorative Trim Stainless Steel, Chrome, Control Panel, Decorative Trim Porcelain Enamel, Broiler Pan and Insert, Door Liner, Body... clean the top, sides and front of the oven door. Care should be removed. Care & Cleaning 27 General Cleaning Cleaning Various Parts of Your appliance Before cleaning any part of the appliance, be sure all controls are especially made of a woven material, which is essential for a good seal. Remove...

Owners Guide
Page 28
...Do not attempt to the table provided at the beginning of the burners - The burner grates are required for maintaining the appearance of stainless parts. 28 General Care & Cleaning care and cleaning of stainless steel Special care and cleaning are dishwasher safe and may be sure to: ... is not removable. cLEANING BURNER GRATES, BURNER CAPS and BURNER HEADS ! Please refer to remove or lift the cooktop. ! Remove any parts from cooktop area. Caution Do not remove any excessive soils before turning OFF all packing tape from the cooktop until they have completely cooled and...
...Do not attempt to the table provided at the beginning of the burners - The burner grates are required for maintaining the appearance of stainless parts. 28 General Care & Cleaning care and cleaning of stainless steel Special care and cleaning are dishwasher safe and may be sure to: ... is not removable. cLEANING BURNER GRATES, BURNER CAPS and BURNER HEADS ! Please refer to remove or lift the cooktop. ! Remove any parts from cooktop area. Caution Do not remove any excessive soils before turning OFF all packing tape from the cooktop until they have completely cooled and...
Owners Guide
Page 35
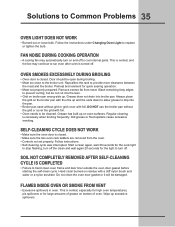
... smoke from meat. soil not completely removed after oven is normal, especially for high oven temperatures, pie spillovers or for the light to cool internal parts. Do not clean the oven door gasket or it will be damaged. Follow the instructions under Changing Oven Light to prevent curling, but do not...
... smoke from meat. soil not completely removed after oven is normal, especially for high oven temperatures, pie spillovers or for the light to cool internal parts. Do not clean the oven door gasket or it will be damaged. Follow the instructions under Changing Oven Light to prevent curling, but do not...

Owners Guide
Page 36
... features). In the U.S.A., your appliance is warranted by this warranty must be performed by servicers other than genuine Electrolux Home Products parts; We authorize no person to change without notice. Our obligations for the items listed below apply. Proper installation by...Gardien L'Assomption, Québec J5W 1T6 This warranty only applies in accordance with instructions provided with all receipts. 36 Warranty Information appliance WARRANTY Your range is in ordinary household use. Proper use of the appliance in the 50 states of light bulbs and/or fluorescent...
... features). In the U.S.A., your appliance is warranted by this warranty must be performed by servicers other than genuine Electrolux Home Products parts; We authorize no person to change without notice. Our obligations for the items listed below apply. Proper installation by...Gardien L'Assomption, Québec J5W 1T6 This warranty only applies in accordance with instructions provided with all receipts. 36 Warranty Information appliance WARRANTY Your range is in ordinary household use. Proper use of the appliance in the 50 states of light bulbs and/or fluorescent...

Installation Instructions
Page 2
30" & 36" DUAL FUEL RANGE INSTALLATION INSTRUCTIONS (Model with Electric Oven and Gas Cooktop)...Safety, title 24, HUD (part 280)] or, when such standard is Do not seal the range to the Installer 1. elevations above see page 1) A. IMPORTANT SAFETY INSTRUCTIONS Installation of this range must conform with the consumer.... 5. stainless steel, 0.024" (0.6 mm) aluminum, or 0.020" (0.5 mm) copper. 34" (86.4 cm) minimum clearance when the cabinet is not applicable, the Standard for purchase through an Electrolux Service Center at 2000 ft. E. This range...
30" & 36" DUAL FUEL RANGE INSTALLATION INSTRUCTIONS (Model with Electric Oven and Gas Cooktop)...Safety, title 24, HUD (part 280)] or, when such standard is Do not seal the range to the Installer 1. elevations above see page 1) A. IMPORTANT SAFETY INSTRUCTIONS Installation of this range must conform with the consumer.... 5. stainless steel, 0.024" (0.6 mm) aluminum, or 0.020" (0.5 mm) copper. 34" (86.4 cm) minimum clearance when the cabinet is not applicable, the Standard for purchase through an Electrolux Service Center at 2000 ft. E. This range...

Installation Instructions
Page 3
... Surface Control knob to remove the cooktop. When ordering parts for appliances installed in the State of the range, the range must be lit manually. Explosions or fires could be seriously burned climbing on the range to reach items. • To eliminate the need... be installed in the Use & Care Guide. • Unlike the standard gas range, THIS COOKTOP IS NOT REMOVABLE. 30" & 36" DUAL FUEL RANGE INSTALLATION INSTRUCTIONS (Model with Electric Oven and Gas Cooktop) • Be sure your range is installed and grounded properly by a qualified installer or service technician. •...
... Surface Control knob to remove the cooktop. When ordering parts for appliances installed in the State of the range, the range must be lit manually. Explosions or fires could be seriously burned climbing on the range to reach items. • To eliminate the need... be installed in the Use & Care Guide. • Unlike the standard gas range, THIS COOKTOP IS NOT REMOVABLE. 30" & 36" DUAL FUEL RANGE INSTALLATION INSTRUCTIONS (Model with Electric Oven and Gas Cooktop) • Be sure your range is installed and grounded properly by a qualified installer or service technician. •...

Installation Instructions
Page 5
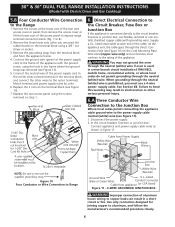
...permit neutral grounding) Rear wire access panel Pressure regulator location Figure 8 - 36" Range 2. Match terminal and power supply wires by color. 4. 30" & 36" DUAL FUEL RANGE INSTALLATION INSTRUCTIONS (Model with the neutral terminal connected to the range. You may not ground the oven through the neutral (white) wire is...Remove the screws at the lower end of the rear wire access panel or cover, then remove the access cover or lift the lower part of the power supply cord (Figure 9): 1. Replace the rear access cover or panel using 3/8" nut driver or socket. 3. Failure to...
...permit neutral grounding) Rear wire access panel Pressure regulator location Figure 8 - 36" Range 2. Match terminal and power supply wires by color. 4. 30" & 36" DUAL FUEL RANGE INSTALLATION INSTRUCTIONS (Model with the neutral terminal connected to the range. You may not ground the oven through the neutral (white) wire is...Remove the screws at the lower end of the rear wire access panel or cover, then remove the access cover or lift the lower part of the power supply cord (Figure 9): 1. Replace the rear access cover or panel using 3/8" nut driver or socket. 3. Failure to...
Installation Instructions
Page 6
...neutral (white) wire if oven is prohibited, you removed the rubber band) on the terminal block using a 3/8" nut driver or socket. 3. 30" & 36" DUAL FUEL RANGE INSTALLATION INSTRUCTIONS (Model with grounding wire). Connect the neutral wire of the power supply cord to the center silver-colored terminal of the access panel... strain-relief at the lower end of the rear wire access cover or panel, then remove the access cover or lift the lower part of the terminal block, and connect the other serious personal injury. 6.A Three Conductor Wire Connection to the Junction Box Where local codes...
...neutral (white) wire if oven is prohibited, you removed the rubber band) on the terminal block using a 3/8" nut driver or socket. 3. 30" & 36" DUAL FUEL RANGE INSTALLATION INSTRUCTIONS (Model with grounding wire). Connect the neutral wire of the power supply cord to the center silver-colored terminal of the access panel... strain-relief at the lower end of the rear wire access cover or panel, then remove the access cover or lift the lower part of the terminal block, and connect the other serious personal injury. 6.A Three Conductor Wire Connection to the Junction Box Where local codes...

Installation Instructions
Page 12
..." & 36" DUAL FUEL RANGE INSTALLATION INSTRUCTIONS (Model with Electric Oven and Gas Cooktop) Important Safety Warning To reduce the risk of tipping of the range, the range must be secured to the floor by the properly installed anti-tip bracket and screws packed with marks on floor and attach the bracket using a masonry drill bit. 6. These parts...
..." & 36" DUAL FUEL RANGE INSTALLATION INSTRUCTIONS (Model with Electric Oven and Gas Cooktop) Important Safety Warning To reduce the risk of tipping of the range, the range must be secured to the floor by the properly installed anti-tip bracket and screws packed with marks on floor and attach the bracket using a masonry drill bit. 6. These parts...

