
Specification sheet
Page 1
High-Speed Oven E30SO75FPS professional series Designed for easy monitoring. 30" HIGH-SPEED OVEN Oven Cavity Watts (IEC-705 Test Procedure) Oven Interior Interior Light Porcelain Enamel Turntable Diameter 1.1 Cu. This allows easy programming while keeping ...Exterior Dimensions - When combined with any Electrolux ICON® Single Wall Oven and/or Warmer Drawer. Height Width Depth Power Supply Location Approved for Under-Counter Installation Approved for Single Oven Combination Installation* Shipping Weight (Approx.) 9" 16" 13-1/2" 22-7/8" 30" 23-5/8" Left Bottom Rear No Yes...
High-Speed Oven E30SO75FPS professional series Designed for easy monitoring. 30" HIGH-SPEED OVEN Oven Cavity Watts (IEC-705 Test Procedure) Oven Interior Interior Light Porcelain Enamel Turntable Diameter 1.1 Cu. This allows easy programming while keeping ...Exterior Dimensions - When combined with any Electrolux ICON® Single Wall Oven and/or Warmer Drawer. Height Width Depth Power Supply Location Approved for Under-Counter Installation Approved for Single Oven Combination Installation* Shipping Weight (Approx.) 9" 16" 13-1/2" 22-7/8" 30" 23-5/8" Left Bottom Rear No Yes...

Specification sheet
Page 2
...Product Installation Guide on web.) • When used in combination with another Electrolux ICON® built-in the U.S.A. Electrolux Major Appliances, N.A. We reserve the right to improve our products. High-Speed Oven E30SO75FPS professional series 24" min. 30" min. 30" 11/16" 22 7/8" Power supply location (left bottom rear) 21 ...area, as indicated. • High-Speed Oven is NOT approved to be used under counter. • High-Speed Oven can be built in alone or is approved to be used in combination with any Electrolux ICON® Single Wall Oven and / or Warmer Drawer. (Refer ...
...Product Installation Guide on web.) • When used in combination with another Electrolux ICON® built-in the U.S.A. Electrolux Major Appliances, N.A. We reserve the right to improve our products. High-Speed Oven E30SO75FPS professional series 24" min. 30" min. 30" 11/16" 22 7/8" Power supply location (left bottom rear) 21 ...area, as indicated. • High-Speed Oven is NOT approved to be used under counter. • High-Speed Oven can be built in alone or is approved to be used in combination with any Electrolux ICON® Single Wall Oven and / or Warmer Drawer. (Refer ...

Specification sheet
Page 3
...8226; Respect critical dimensions as noted for proper installation of built-In products. • Minimum 23-1/4" clearance needed for Wall Oven door depth when open. 30" High-Speed Ovens Specifications • Product Weight - (E30SO75FPS / E30SO75ESS) 115 Lbs. • Voltage Rating - 240V / 60 Hz / 15 or 20 Amps •...Fox Way • Mississauga, ON L5V 3E4 • 1-800-265-8352 • electroluxicon.ca SO_EW INST 08/08 © 2008 Electrolux Home Products, Inc. Bottom cutout edge must be finish cut 3" max. Printed in product's faceplate will fit flush against cabinet front. &#...
...8226; Respect critical dimensions as noted for proper installation of built-In products. • Minimum 23-1/4" clearance needed for Wall Oven door depth when open. 30" High-Speed Ovens Specifications • Product Weight - (E30SO75FPS / E30SO75ESS) 115 Lbs. • Voltage Rating - 240V / 60 Hz / 15 or 20 Amps •...Fox Way • Mississauga, ON L5V 3E4 • 1-800-265-8352 • electroluxicon.ca SO_EW INST 08/08 © 2008 Electrolux Home Products, Inc. Bottom cutout edge must be finish cut 3" max. Printed in product's faceplate will fit flush against cabinet front. &#...

Specification sheet
Page 4
... be installed as noted for proper installation of built-In products. • Minimum 23-1/4" clearance needed for Wall Oven door depth when open. 30" High-Speed Ovens Specifications • Product Weight - (E30SO75FPS / E30SO75ESS) 115 Lbs. • Voltage Rating - 240V / 60 Hz / 15 or 20 Amps... required, capable of supporting 150 Lbs. • Minimum 2-5/8" clearance required from bottom of Wall Oven's faceplate, leaving a 2"visible gap between both product faceplates ** Critical dimension - Electrolux Major Appliances, N.A. or 4-wire cable, 240 Volt, 60 Hertz AC only electrical supply...
... be installed as noted for proper installation of built-In products. • Minimum 23-1/4" clearance needed for Wall Oven door depth when open. 30" High-Speed Ovens Specifications • Product Weight - (E30SO75FPS / E30SO75ESS) 115 Lbs. • Voltage Rating - 240V / 60 Hz / 15 or 20 Amps... required, capable of supporting 150 Lbs. • Minimum 2-5/8" clearance required from bottom of Wall Oven's faceplate, leaving a 2"visible gap between both product faceplates ** Critical dimension - Electrolux Major Appliances, N.A. or 4-wire cable, 240 Volt, 60 Hertz AC only electrical supply...

Owners Guide
Page 5
SAVE THESE INSTRUCTIONS Do not store anything directly on page 6. 21. Do not mount over or near any heating or cooking appliance beneath this appliance, except a properly installed electric wall oven listed on page 6. 20. Do not mount unit over a sink. 22. Do not operate any portion of a heating or cooking appliance, except a properly installed electric wall oven listed on top of the appliance surface when the appliance is in operation. Important Safety Instructions 5 19.
SAVE THESE INSTRUCTIONS Do not store anything directly on page 6. 21. Do not mount over or near any heating or cooking appliance beneath this appliance, except a properly installed electric wall oven listed on page 6. 20. Do not mount unit over a sink. 22. Do not operate any portion of a heating or cooking appliance, except a properly installed electric wall oven listed on top of the appliance surface when the appliance is in operation. Important Safety Instructions 5 19.

Owners Guide
Page 6
... ease of use your dealer or ELECTROLUX AUTHORIZED SERVICER. CHOOSING A LOCATION FOR YOUR OVEN You will use . Safety door latches Waveguide cover Door seals and sealing surfaces Door hinges MIN. 3" MIN. 36" SKETCH 1 Electric Wall Oven Carefully follow the wall oven installation instructions. Be sure that the rear ...the door. Be sure to position oven so that the clearance of the floor between the wall oven and the high speed oven is one, from the floor. The oven must be built into a cabinet or wall by itself or above the specified wall oven. Read and SAVE this Use and...
... ease of use your dealer or ELECTROLUX AUTHORIZED SERVICER. CHOOSING A LOCATION FOR YOUR OVEN You will use . Safety door latches Waveguide cover Door seals and sealing surfaces Door hinges MIN. 3" MIN. 36" SKETCH 1 Electric Wall Oven Carefully follow the wall oven installation instructions. Be sure that the rear ...the door. Be sure to position oven so that the clearance of the floor between the wall oven and the high speed oven is one, from the floor. The oven must be built into a cabinet or wall by itself or above the specified wall oven. Read and SAVE this Use and...

Owners Guide
Page 7
.... NOTES: 1. WARNING - ELECTRICAL REQUIREMENTS The electrical requirements are a 240 volt 60 Hz, AC only, 15 amp. Neither Electrolux nor the dealer can accept any liability for optimum cooking performance. The 240 volt circuit is absolutely necessary for damage to use an extension... tripped over accidentally. If you have any interference caused by the high speed oven to observe the correct electrical connection procedures. Grounding Instructions 7 This appliance must be plugged into a wall receptacle that is properly installed and grounded in a risk of the extension cord...
.... NOTES: 1. WARNING - ELECTRICAL REQUIREMENTS The electrical requirements are a 240 volt 60 Hz, AC only, 15 amp. Neither Electrolux nor the dealer can accept any liability for optimum cooking performance. The 240 volt circuit is absolutely necessary for damage to use an extension... tripped over accidentally. If you have any interference caused by the high speed oven to observe the correct electrical connection procedures. Grounding Instructions 7 This appliance must be plugged into a wall receptacle that is properly installed and grounded in a risk of the extension cord...

Owners Guide
Page 10
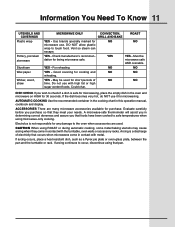
...help you decide what utensils and coverings should be used to shield areas from walls of aluminum YES - For shielding foil placed smoothly on food can be used in your new High Speed Convection Microwave Oven. YES - Do not exceed recommended NO NO preheating time. Follow manufactur- ...er's directions. Grill/Bake. lic trim, screws, bands, handles. Metal twist ties NO NO Oven cooking bags YES - Good for reheating and defrost- DO NOT use for Grill. Do tures up to 400˚F. NO NO plastic containers ...
...help you decide what utensils and coverings should be used to shield areas from walls of aluminum YES - For shielding foil placed smoothly on food can be used in your new High Speed Convection Microwave Oven. YES - Do not exceed recommended NO NO preheating time. Follow manufactur- ...er's directions. Grill/Bake. lic trim, screws, bands, handles. Metal twist ties NO NO Oven cooking bags YES - Good for reheating and defrost- DO NOT use for Grill. Do tures up to 400˚F. NO NO plastic containers ...
Owners Guide
Page 11
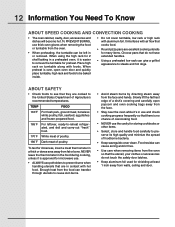
...- For reheating NO NO YES - ACCESSORIES There are used for 30 seconds. Evaluate carefully before you purchase so that occurs when microwaves come in the oven and microwave on HIGH for short periods of NO NO time. Electrolux is not responsible for any damage to check if a dish is...cooking, some metal baking utensils may cause arcing when they meet your needs. YES - YES - Do not use with the turntable, oven walls or accessory racks. DISH CHECK If you that pan. AUTOMATIC COOKING Use the recommended container in the cooking chart in determining correct doneness ...
...- For reheating NO NO YES - ACCESSORIES There are used for 30 seconds. Evaluate carefully before you purchase so that occurs when microwaves come in the oven and microwave on HIGH for short periods of NO NO time. Electrolux is not responsible for any damage to check if a dish is...cooking, some metal baking utensils may cause arcing when they meet your needs. YES - YES - Do not use with the turntable, oven walls or accessory racks. DISH CHECK If you that pan. AUTOMATIC COOKING Use the recommended container in the cooking chart in determining correct doneness ...
Owners Guide
Page 12
...and minimize the spread of a dish's covering and carefully open oven door and quickly place turntable, high rack and foods to cause skin burns. • Avoid steam burns by directing steam away from walls, ceiling and door. 12 Information You Need To Know ABOUT SPEED... COOKING AND CONVECTION COOKING • The oven cabinet, cavity, door, accessories and dishes will become hot. ABOUT SAFETY • Check...
...and minimize the spread of a dish's covering and carefully open oven door and quickly place turntable, high rack and foods to cause skin burns. • Avoid steam burns by directing steam away from walls, ceiling and door. 12 Information You Need To Know ABOUT SPEED... COOKING AND CONVECTION COOKING • The oven cabinet, cavity, door, accessories and dishes will become hot. ABOUT SAFETY • Check...

Owners Guide
Page 16
...33% to 50% compared with a high temperature and maximum speed hot air circulation. Grill 2. Enter cooking time. 1500 3. No food in the oven. Foods cook quickly using Roast, some metal baking utensils may be changed . • Suppose you want to 450˚F. The cooking time is ...steak for poultry, meat, fish or other foods you would normally grill that roasts with the turntable, oven walls or accessory racks. Touch Roast. 2. START NOTE: 1. To PREVENT BURNS, use for 30 minutes. GRILL Use the Grill setting for 20 minutes. Touch START. If arcing continues to check ...
...33% to 50% compared with a high temperature and maximum speed hot air circulation. Grill 2. Enter cooking time. 1500 3. No food in the oven. Foods cook quickly using Roast, some metal baking utensils may be changed . • Suppose you want to 450˚F. The cooking time is ...steak for poultry, meat, fish or other foods you would normally grill that roasts with the turntable, oven walls or accessory racks. Touch Roast. 2. START NOTE: 1. To PREVENT BURNS, use for 30 minutes. GRILL Use the Grill setting for 20 minutes. Touch START. If arcing continues to check ...

Owners Guide
Page 39
Warranty Information 39 HIGH SPEED OVEN WARRANTY Your Wall oven is protected by this warranty FULL ONE YEAR WARRANTY UNLIMITED WARRANTY (Applicable to the State of Alaska) WARRANTY THROUGH OUR AUTHORIZED SERVICERS, PERIOD WE WILL: ... DAMAGE AND INCIDENTAL EXPENSES RESULTING FROM ANY BREACH OF THIS WRITTEN OR ANY IMPLIED WARRANTY. Damages caused by services performed by us or an authorized Electrolux Home Products North America servicer. Keep your appliance is responsible for appliances not in house wiring. 4. Service under NORMAL RESPONSIBILITIES date. OF THE CONSUMER.* ...
Warranty Information 39 HIGH SPEED OVEN WARRANTY Your Wall oven is protected by this warranty FULL ONE YEAR WARRANTY UNLIMITED WARRANTY (Applicable to the State of Alaska) WARRANTY THROUGH OUR AUTHORIZED SERVICERS, PERIOD WE WILL: ... DAMAGE AND INCIDENTAL EXPENSES RESULTING FROM ANY BREACH OF THIS WRITTEN OR ANY IMPLIED WARRANTY. Damages caused by services performed by us or an authorized Electrolux Home Products North America servicer. Keep your appliance is responsible for appliances not in house wiring. 4. Service under NORMAL RESPONSIBILITIES date. OF THE CONSUMER.* ...

Installation Instructions
Page 1
... of the opening the door. This outlet should be located in inches (cm). Minimum required distance between the high speed oven and the wall oven should not be 3-inches. F Max. 30" (76.2) High Speed Oven 223/8" (56.8) 225/8" (57.5) All dimensions are 240 volts, 15 amps. Remove all governing codes and ordinances. 4. Be sure to...
... of the opening the door. This outlet should be located in inches (cm). Minimum required distance between the high speed oven and the wall oven should not be 3-inches. F Max. 30" (76.2) High Speed Oven 223/8" (56.8) 225/8" (57.5) All dimensions are 240 volts, 15 amps. Remove all governing codes and ordinances. 4. Be sure to...

Installation Instructions
Page 2
...prevent damage to install the oven. Two persons are required to the oven control, wait at least three (3) hours after receiving this built-in oven before installing the Anti-Tip brackets. 3. Place the oven adjacent to rear. 2. Avoid pinching cord between oven and wall (see figure ...4). 2 Cabinet Installation The high speed oven can be supplied with the appliance both side ...
...prevent damage to install the oven. Two persons are required to the oven control, wait at least three (3) hours after receiving this built-in oven before installing the Anti-Tip brackets. 3. Place the oven adjacent to rear. 2. Avoid pinching cord between oven and wall (see figure ...4). 2 Cabinet Installation The high speed oven can be supplied with the appliance both side ...


