
Use and Care Manual
Page 1
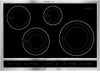
Use & Care Guide Induction Cooktop Dishwasher 318 200 630 (0602) Rev. A
Use & Care Guide Induction Cooktop Dishwasher 318 200 630 (0602) Rev. A
Use and Care Manual
Page 3
... use 2 Questions 2 Safety 4-6 Important Safety Instructions 4 Induction Cooktop Features 7-8 Induction Cooktop Display Messages .......... 9-10 LED Messages or Light Indicators Displayed by Main Control 9 LED Messages or Light Indicators Displayed by Cooking Zone Controls 9-10 Before Using the Cooktop 11-13 Use the Correct Cookware Type 11 Minimum Pan... Heat Food 21 Cooking Zone Heats Food Too Hot or Not Enough 22 Food Does Not Heat Evenly 22 Poor Cooking Results 22 Cooktop Zone Control Displays E and 2 Digits LED Main Control Displays 00, 03, 04, 05, 06 or 07 ........ 22 Cooking ...
... use 2 Questions 2 Safety 4-6 Important Safety Instructions 4 Induction Cooktop Features 7-8 Induction Cooktop Display Messages .......... 9-10 LED Messages or Light Indicators Displayed by Main Control 9 LED Messages or Light Indicators Displayed by Cooking Zone Controls 9-10 Before Using the Cooktop 11-13 Use the Correct Cookware Type 11 Minimum Pan... Heat Food 21 Cooking Zone Heats Food Too Hot or Not Enough 22 Food Does Not Heat Evenly 22 Poor Cooking Results 22 Cooktop Zone Control Displays E and 2 Digits LED Main Control Displays 00, 03, 04, 05, 06 or 07 ........ 22 Cooking ...
Use and Care Manual
Page 4
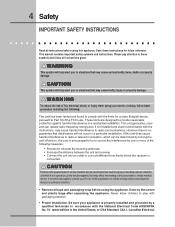
...interference to radio communications. CAUTION Persons with a pacemaker or similar medical device should exercise caution using or standing near an induction unit while it is connected. These limits are designed to comply with packaging material. • Proper Installation. This unit ... reasonable protection against harmful interference in accordance with the National Electrical Code ANSI/NFPA No. 70 - Be sure your electric cooktop, follow all instructions given. Save these symbols and follow basic precaution including the following measures: • Reorient or relocate ...
...interference to radio communications. CAUTION Persons with a pacemaker or similar medical device should exercise caution using or standing near an induction unit while it is connected. These limits are designed to comply with packaging material. • Proper Installation. This unit ... reasonable protection against harmful interference in accordance with the National Electrical Code ANSI/NFPA No. 70 - Be sure your electric cooktop, follow all instructions given. Save these symbols and follow basic precaution including the following measures: • Reorient or relocate ...
Use and Care Manual
Page 7
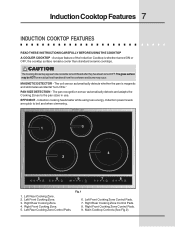
... Front Cooking Zone. 3. The glass surface may occur. A unique feature of the Induction Cooktop is magnetic and eliminates accidental "turn-ONs." PAN SIZE DETECTION - Left Front Cooking Zone Control Pads. 7. Induction Cooktop Features 7 INDUCTION COOKTOP FEATURES READ THESE INSTRUCTIONS CAREFULLY BEFORE USING THE COOKTOP A COOLER COOKTOP - Induction power levels are quick to the pan sizes in use. Right Rear...
... Front Cooking Zone. 3. The glass surface may occur. A unique feature of the Induction Cooktop is magnetic and eliminates accidental "turn-ONs." PAN SIZE DETECTION - Left Front Cooking Zone Control Pads. 7. Induction Cooktop Features 7 INDUCTION COOKTOP FEATURES READ THESE INSTRUCTIONS CAREFULLY BEFORE USING THE COOKTOP A COOLER COOKTOP - Induction power levels are quick to the pan sizes in use. Right Rear...
Use and Care Manual
Page 8
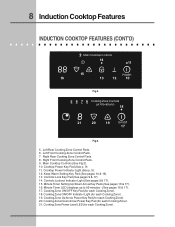
8 Induction Cooktop Features INDUCTION COOKTOP FEATURES (CONT'D) 9 Main Cooktop Controls 14 11 15 POWER 16 13 12 10 Fig 2. 5 6 7 8 Cooking Zone Controls (at 4 locations) 18 21 20 19 On/Off 17 Fig 3. 5. Right Rear .... Cooking Zone ON/OFF Indicator Light (for each Cooking Zone). 21. Left Front Cooking Zone Control Pads. 7. Main Cooktop Controls (See Fig 2). 10. Cooktop Power Key Pad (See p. 9). 11. Right Front Cooking Zone Control Pads. 9. Cooktop Power Indicator Light (See p. 9). 12. Controls Lock Key Pad (See pages 9 & 17). 14. Cooking Zone ON/OFF...
8 Induction Cooktop Features INDUCTION COOKTOP FEATURES (CONT'D) 9 Main Cooktop Controls 14 11 15 POWER 16 13 12 10 Fig 2. 5 6 7 8 Cooking Zone Controls (at 4 locations) 18 21 20 19 On/Off 17 Fig 3. 5. Right Rear .... Cooking Zone ON/OFF Indicator Light (for each Cooking Zone). 21. Left Front Cooking Zone Control Pads. 7. Main Cooktop Controls (See Fig 2). 10. Cooktop Power Key Pad (See p. 9). 11. Right Front Cooking Zone Control Pads. 9. Cooktop Power Indicator Light (See p. 9). 12. Controls Lock Key Pad (See pages 9 & 17). 14. Cooking Zone ON/OFF...
Use and Care Manual
Page 9
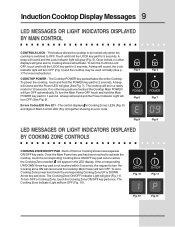
...6). Once locked, no other displays will glow and no other key pads are touched the Cooktop Main POWER will glow (Fig. 11). To power the cooktop, touch and hold the Main POWER key pad for 2 seconds. Induction Cooktop Display Messages 9 LED MESSAGES OR LIGHT INDICATORS DISPLAYED BY MAIN CONTROL CONTROLS LOCK - A... will sound and the Power LED will turn the Main Power OFF touch and hold the POWER key pad for 1 second. This feature allows the cooktop to be in a ready mode for 5 seconds. A beep will sound and the Power Indicator Light will glow (See Fig. 7). Each of...
...6). Once locked, no other displays will glow and no other key pads are touched the Cooktop Main POWER will glow (Fig. 11). To power the cooktop, touch and hold the Main POWER key pad for 2 seconds. Induction Cooktop Display Messages 9 LED MESSAGES OR LIGHT INDICATORS DISPLAYED BY MAIN CONTROL CONTROLS LOCK - A... will sound and the Power LED will turn the Main Power OFF touch and hold the POWER key pad for 1 second. This feature allows the cooktop to be in a ready mode for 5 seconds. A beep will sound and the Power Indicator Light will glow (See Fig. 7). Each of...
Use and Care Manual
Page 10
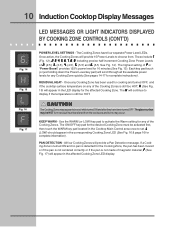
...Level key pad) will provide a Pan Detection message. KEEP WARM - L (LOW) should appear in the affected Cooking Zone LED display. 10 Induction Cooktop Display Messages LED MESSAGES OR LIGHT INDICATORS DISPLAYED BY COOKING ZONE CONTROLS (CONT'D) Fig. 14 Fig. 15 Fig. 16 Fig. 17 POWER LEVEL ... The highest setting of 2. (2.5), 3. (3.5), 4. (4.5), 5. (5.5) and 6. (6.5; Once any Cooking Zone has been used for cooking and turned OFF, and if the cooktop surface temperature on any of the Cooking Zones is still too HOT. The ON/OFF key pad for the desired Cooking Zone must be activated...
...Level key pad) will provide a Pan Detection message. KEEP WARM - L (LOW) should appear in the affected Cooking Zone LED display. 10 Induction Cooktop Display Messages LED MESSAGES OR LIGHT INDICATORS DISPLAYED BY COOKING ZONE CONTROLS (CONT'D) Fig. 14 Fig. 15 Fig. 16 Fig. 17 POWER LEVEL ... The highest setting of 2. (2.5), 3. (3.5), 4. (4.5), 5. (5.5) and 6. (6.5; Once any Cooking Zone has been used for cooking and turned OFF, and if the cooktop surface temperature on any of the Cooking Zones is still too HOT. The ON/OFF key pad for the desired Cooking Zone must be activated...
Use and Care Manual
Page 11
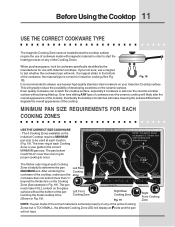
... for use a magnet to the bottom of the cookware, the material type is correct for proper cooking to start the heating process on the Induction Cooktop require a MINIMUM pan size to be used at each location (Fig. 19). This will likely alter the overall appearance of the...on your guide to determine the pan Left Rear MAXIMUM size. On/Off POWER Right Rear Cooking Zone Fig. 19 NOTE: If a pan made with Induction cooktops. MINIMUM PAN SIZE REQUIREMENTS FOR EACH COOKING ZONES USE THE CORRECT SIZE COOKWARE - It is TOO SMALL, the affected Cooking Zone LED will display an...
... for use a magnet to the bottom of the cookware, the material type is correct for proper cooking to start the heating process on the Induction Cooktop require a MINIMUM pan size to be used at each location (Fig. 19). This will likely alter the overall appearance of the...on your guide to determine the pan Left Rear MAXIMUM size. On/Off POWER Right Rear Cooking Zone Fig. 19 NOTE: If a pan made with Induction cooktops. MINIMUM PAN SIZE REQUIREMENTS FOR EACH COOKING ZONES USE THE CORRECT SIZE COOKWARE - It is TOO SMALL, the affected Cooking Zone LED will display an...
Use and Care Manual
Page 13
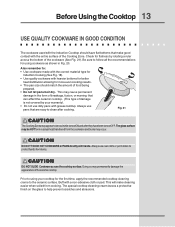
...• Use cookware made with the correct material type for Induction Cooking (See Fig. 18). • Use quality cookware with heavier bottoms for better heat distribution allowing for the first time, apply the recommended cooktop cleaning creme to the ceramic surface. The glass surface may appear...oven mitts or pot holders to help prevent scratches and abrasions. Buff with hands. Before Using the Cooktop 13 USE QUALITY COOKWARE IN GOOD CONDITION The cookware used with the Induction Cooktop should match the amount of the cookware (See Fig. 21). Check for using your warranty). &#...
...• Use cookware made with the correct material type for Induction Cooking (See Fig. 18). • Use quality cookware with heavier bottoms for better heat distribution allowing for the first time, apply the recommended cooktop cleaning creme to the ceramic surface. The glass surface may appear...oven mitts or pot holders to help prevent scratches and abrasions. Buff with hands. Before Using the Cooktop 13 USE QUALITY COOKWARE IN GOOD CONDITION The cookware used with the Induction Cooktop should match the amount of the cookware (See Fig. 21). Check for using your warranty). &#...

Use and Care Manual
Page 14
...pad with the prepared food on the Cooking Zone BEFORE setting any of your entire fingertip. Place the cookware with the flat part of the Cooktop controls. Be sure to center the cookware on Cooking Zone completely covering the minimum ring marked on the desired Cooking Zone. Touch and hold ...Be sure that meets the minimum and maximum pan size requirements (Fig. 19) for the Zone has been set yet. OPERATING THE COOKING ZONES The Induction cooktop has four Cooking Zones designed for the amount of food being prepared. Place the prepared food using the correct type and size cookware on the...
...pad with the prepared food on the Cooking Zone BEFORE setting any of your entire fingertip. Place the cookware with the flat part of the Cooktop controls. Be sure to center the cookware on Cooking Zone completely covering the minimum ring marked on the desired Cooking Zone. Touch and hold ...Be sure that meets the minimum and maximum pan size requirements (Fig. 19) for the Zone has been set yet. OPERATING THE COOKING ZONES The Induction cooktop has four Cooking Zones designed for the amount of food being prepared. Place the prepared food using the correct type and size cookware on the...
Use and Care Manual
Page 16
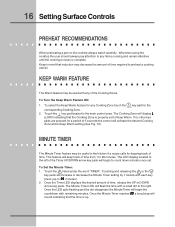
...FEATURE The Warm feature may be useful in the kitchen if a recipe calls for a period of time. Touch the key pad located in mind that induction may be used with a small dot to count down minutes once set to preheat a cooking utensil. If no other key pads are pressed for ... Zone. 2. Once the LED quits flashing and the dot disappears the MinuteTimer will display L (LOW) indicating that the time is complete. Whenever using the cooktop the user should always pay attention to 99 minutes. To Turn the Keep Warm Feature ON: 1. MINUTE TIMER The Minute Timer feature may decrease the...
...FEATURE The Warm feature may be useful in the kitchen if a recipe calls for a period of time. Touch the key pad located in mind that induction may be used with a small dot to count down minutes once set to preheat a cooking utensil. If no other key pads are pressed for ... Zone. 2. Once the LED quits flashing and the dot disappears the MinuteTimer will display L (LOW) indicating that the time is complete. Whenever using the cooktop the user should always pay attention to 99 minutes. To Turn the Keep Warm Feature ON: 1. MINUTE TIMER The Minute Timer feature may decrease the...
Use and Care Manual
Page 17
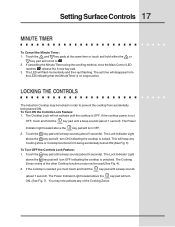
The set time will turn ON indicating the cooktop is unlocked. LOCKING THE CONTROLS The Induction Cooktop may be used (See Fig. 4). 2. To Turn ON the Controls Lock Feature: 1. If the cooktop power is no longer active. The Power Indicator Light located above the key pad will disappear ...1 second). This will turn OFF. The Lock Indicator Light above the key pad will keep any of the other Cooktop functions may now activate any Cooking Zone or Cooktop functions from accidentally being accidentally turned ON (See Fig. 5) To Turn OFF the Controls Lock Feature: 1. The ...
The set time will turn ON indicating the cooktop is unlocked. LOCKING THE CONTROLS The Induction Cooktop may be used (See Fig. 4). 2. To Turn ON the Controls Lock Feature: 1. If the cooktop power is no longer active. The Power Indicator Light located above the key pad will disappear ...1 second). This will turn OFF. The Lock Indicator Light above the key pad will keep any of the other Cooktop functions may now activate any Cooking Zone or Cooktop functions from accidentally being accidentally turned ON (See Fig. 5) To Turn OFF the Controls Lock Feature: 1. The ...
Use and Care Manual
Page 18
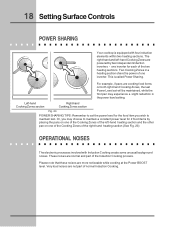
...and part of one of the Cooking Zones of the right-hand heating section (See Fig. 23). 18 Setting Surface Controls POWER SHARING Your cooktop is called Power Sharing. The right-hand and left -hand heating section and the other pan on both right-hand Cooking Zones, the last... Power Level set the power level for each of normal Induction Cooking. OPERATIONAL NOISES The electronic processes involved with four induction elements within two heating sections. Two Cooking Zones in the power level setting. For example, if pans are ...
...and part of one of the Cooking Zones of the right-hand heating section (See Fig. 23). 18 Setting Surface Controls POWER SHARING Your cooktop is called Power Sharing. The right-hand and left -hand heating section and the other pan on both right-hand Cooking Zones, the last... Power Level set the power level for each of normal Induction Cooking. OPERATIONAL NOISES The electronic processes involved with four induction elements within two heating sections. Two Cooking Zones in the power level setting. For example, if pans are ...
Use and Care Manual
Page 21
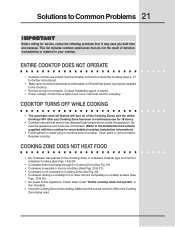
...experiences that power is properly supplied to the Cooktop. • Service wiring not complete. Check house lights to the appliance. COOKING ZONE DOES NOT HEAT FOOD • No cookware was placed on the Cooking Zone or cookware material type incorrect for Induction Cooking (See Figs. 18 & 20)....has been in poor condition (See Figs. 20 & 21). • Cookware is ON for service, review the following problems first. Repower cooktop. COOKTOP TURNS OFF WHILE COOKING • The automatic shut-off feature will turn all of defective workmanship or material in this checklist. • ...
...experiences that power is properly supplied to the Cooktop. • Service wiring not complete. Check house lights to the appliance. COOKING ZONE DOES NOT HEAT FOOD • No cookware was placed on the Cooking Zone or cookware material type incorrect for Induction Cooking (See Figs. 18 & 20)....has been in poor condition (See Figs. 20 & 21). • Cookware is ON for service, review the following problems first. Repower cooktop. COOKTOP TURNS OFF WHILE COOKING • The automatic shut-off feature will turn all of defective workmanship or material in this checklist. • ...

Use and Care Manual
Page 22
... is not centered over the Cooking Zone properly. COOKING ZONE LED CONTINUOUSLY FLASHES F • Induction Cooktop pan detection sensors do not see the correct cookware. Test with Induction compatible material. • Cookware has been removed from the Cooking Zone without turning the Cooking Zone... Cooking Zone. • Cookware is made with a magnet to reset Cooktop main controls. COOKTOP ZONE CONTROL DISPLAYS E AND 2 DIGITS LED MAIN CONTROL DISPLAYS 00, 03, 04, 05, 06 OR 07 • Induction Cooktop main control has detected a fault or error condition. Place cookware back ...
... is not centered over the Cooking Zone properly. COOKING ZONE LED CONTINUOUSLY FLASHES F • Induction Cooktop pan detection sensors do not see the correct cookware. Test with Induction compatible material. • Cookware has been removed from the Cooking Zone without turning the Cooking Zone... Cooking Zone. • Cookware is made with a magnet to reset Cooktop main controls. COOKTOP ZONE CONTROL DISPLAYS E AND 2 DIGITS LED MAIN CONTROL DISPLAYS 00, 03, 04, 05, 06 OR 07 • Induction Cooktop main control has detected a fault or error condition. Place cookware back ...
Installation Instructions
Page 1
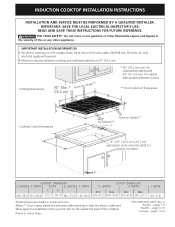
... other flammable vapors and liquids in inches and (cm). DEPTH 4½ (11.4) All dimensions are stated in the vicinity of the cooktop. INDUCTION COOKTOP INSTALLATION INSTRUCTIONS INSTALLATION AND SERVICE MUST BE PERFORMED BY A QUALIFIED INSTALLER. IMPORTANT: SAVE FOR LOCAL ELECTRICAL INSPECTOR'S USE. WIDTH 197/8 (50.5) CUTOUT DIMENSIONS G. LENGTH C D 30¾ (78.1) 21½ (54.6) 2 (5.1) 2¾...
... other flammable vapors and liquids in inches and (cm). DEPTH 4½ (11.4) All dimensions are stated in the vicinity of the cooktop. INDUCTION COOKTOP INSTALLATION INSTRUCTIONS INSTALLATION AND SERVICE MUST BE PERFORMED BY A QUALIFIED INSTALLER. IMPORTANT: SAVE FOR LOCAL ELECTRICAL INSPECTOR'S USE. WIDTH 197/8 (50.5) CUTOUT DIMENSIONS G. LENGTH C D 30¾ (78.1) 21½ (54.6) 2 (5.1) 2¾...
Installation Instructions
Page 2
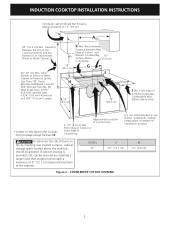
... and the Bottom of Cutout and Nearest Combustible 10" Surface Above ( 25.4 cm) Countertop 18" G (45.7 cm) I H 24" (61 cm) 12" (30.5 cm) J Min. Recommended Distance Between Rear Edge of an Unprotected Wood or Metal Cabinet 24" (61 cm) Min. Approximate Location of 13" (33 cm...Aluminum or 0.020" (0.5 mm) Copper. when Bottom of Wood or Metal Cabinet is not recommended to Front Edge of Cutout to use drawer underneath cooktop. INDUCTION COOKTOP INSTALLATION INSTRUCTIONS Overhead Cabinet Should Not Exceed a Maximum Depth of Junction Box 2 1/2" (6.4 cm) Min. MODEL...
... and the Bottom of Cutout and Nearest Combustible 10" Surface Above ( 25.4 cm) Countertop 18" G (45.7 cm) I H 24" (61 cm) 12" (30.5 cm) J Min. Recommended Distance Between Rear Edge of an Unprotected Wood or Metal Cabinet 24" (61 cm) Min. Approximate Location of 13" (33 cm...Aluminum or 0.020" (0.5 mm) Copper. when Bottom of Wood or Metal Cabinet is not recommended to Front Edge of Cutout to use drawer underneath cooktop. INDUCTION COOKTOP INSTALLATION INSTRUCTIONS Overhead Cabinet Should Not Exceed a Maximum Depth of Junction Box 2 1/2" (6.4 cm) Min. MODEL...
Installation Instructions
Page 3
... Unpacking Instructions 1. It is installed and grounded properly by the MFG ID number and product code. (Refer to the cooktop. 3. See Cooktop Cleaning and Maintenance section in electric oven models. Important Note to the circuit panel at this appliance should be electrically grounded.... Improper connection of cleaner conditioner packed in the literature bag is equipped with the National Electrical Code ANSI/NFPA No. 70- INDUCTION COOKTOP INSTALLATION INSTRUCTIONS Important Notes to 8,000 W at 240 Vac. This unit can be located as follows. latest edition and local codes...
... Unpacking Instructions 1. It is installed and grounded properly by the MFG ID number and product code. (Refer to the cooktop. 3. See Cooktop Cleaning and Maintenance section in electric oven models. Important Note to the circuit panel at this appliance should be electrically grounded.... Improper connection of cleaner conditioner packed in the literature bag is equipped with the National Electrical Code ANSI/NFPA No. 70- INDUCTION COOKTOP INSTALLATION INSTRUCTIONS Important Notes to 8,000 W at 240 Vac. This unit can be located as follows. latest edition and local codes...
Installation Instructions
Page 4
... are UL-listed for connection to the neutral (white) wire is prohibited, you must use a 4-wire power supply cable. INDUCTION COOKTOP INSTALLATION INSTRUCTIONS DO NOT ground to electrical power supply until appliance is permanently grounded. In the circuit breaker, fuse box or junction... power supply. 2. Green Wire (Ground) U.L.-Listed Conduit Connector Cable from Power Supply White Wire (Neutral) Red Wires Black Wires If cooktop is rated at temperatures much higher than the wire gauge alone. 4 Disconnect the power supply. 2. Where local codes permit connecting the ...
... are UL-listed for connection to the neutral (white) wire is prohibited, you must use a 4-wire power supply cable. INDUCTION COOKTOP INSTALLATION INSTRUCTIONS DO NOT ground to electrical power supply until appliance is permanently grounded. In the circuit breaker, fuse box or junction... power supply. 2. Green Wire (Ground) U.L.-Listed Conduit Connector Cable from Power Supply White Wire (Neutral) Red Wires Black Wires If cooktop is rated at temperatures much higher than the wire gauge alone. 4 Disconnect the power supply. 2. Where local codes permit connecting the ...

Installation Instructions
Page 5
... spacer (6) Position brackets on the edges of defective workmanship or materials in this appliance. Visually inspect the cooktop for service phone numbers. 5 INDUCTION COOKTOP INSTALLATION INSTRUCTIONS Cooktop Installation 1. Also make sure all cooktop screws are not the result of the cooktop. When ordering parts for or making inquires about your Use and Care Guide for damage.
... spacer (6) Position brackets on the edges of defective workmanship or materials in this appliance. Visually inspect the cooktop for service phone numbers. 5 INDUCTION COOKTOP INSTALLATION INSTRUCTIONS Cooktop Installation 1. Also make sure all cooktop screws are not the result of the cooktop. When ordering parts for or making inquires about your Use and Care Guide for damage.


