
Use and Care Manual
Page 1
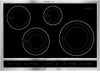
Use & Care Guide Induction Cooktop Dishwasher 318 200 630 (0602) Rev. A
Use & Care Guide Induction Cooktop Dishwasher 318 200 630 (0602) Rev. A
Use and Care Manual
Page 3
... use 2 Questions 2 Safety 4-6 Important Safety Instructions 4 Induction Cooktop Features 7-8 Induction Cooktop Display Messages .......... 9-10 LED Messages or Light Indicators Displayed by Main Control 9 LED Messages or Light Indicators Displayed by Cooking Zone Controls 9-10 Before Using the Cooktop 11-13 Use the Correct Cookware Type 11 Minimum Pan... Heat Food 21 Cooking Zone Heats Food Too Hot or Not Enough 22 Food Does Not Heat Evenly 22 Poor Cooking Results 22 Cooktop Zone Control Displays E and 2 Digits LED Main Control Displays 00, 03, 04, 05, 06 or 07 ........ 22 Cooking ...
... use 2 Questions 2 Safety 4-6 Important Safety Instructions 4 Induction Cooktop Features 7-8 Induction Cooktop Display Messages .......... 9-10 LED Messages or Light Indicators Displayed by Main Control 9 LED Messages or Light Indicators Displayed by Cooking Zone Controls 9-10 Before Using the Cooktop 11-13 Use the Correct Cookware Type 11 Minimum Pan... Heat Food 21 Cooking Zone Heats Food Too Hot or Not Enough 22 Food Does Not Heat Evenly 22 Poor Cooking Results 22 Cooktop Zone Control Displays E and 2 Digits LED Main Control Displays 00, 03, 04, 05, 06 or 07 ........ 22 Cooking ...
Use and Care Manual
Page 4
..., death or property damage. Never allow children to consult your Doctor or the pacemaker or similar medical device manufacturer about your electric cooktop, follow all instructions given. This manual contains important safety symbols and instructions. latest edition in accordance with the National Electrical Code ANSI...your appliance is properly installed and grounded by one or more of fire, electrical shock, or injury when using or standing near an induction unit while it is connected. WARNING To reduce the risk of the following : This unit has been tested and found to radio ...
..., death or property damage. Never allow children to consult your Doctor or the pacemaker or similar medical device manufacturer about your electric cooktop, follow all instructions given. This manual contains important safety symbols and instructions. latest edition in accordance with the National Electrical Code ANSI...your appliance is properly installed and grounded by one or more of fire, electrical shock, or injury when using or standing near an induction unit while it is connected. WARNING To reduce the risk of the following : This unit has been tested and found to radio ...
Use and Care Manual
Page 7
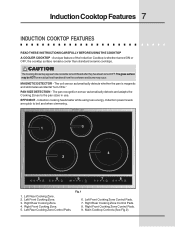
...Front Cooking Zone. 5. Fig. 1 6. Right Rear Cooking Zone Control Pads. 8. A unique feature of the Induction Cooktop is magnetic and eliminates accidental "turn-ONs." Main Cooktop Controls (See Fig 2). MAGNETIC DETECTOR - PAN SIZE DETECTION - Right Rear Cooking Zone. 4. Left Front Cooking ...5 On/Off 6 On/Off 9 POWER 7 On/Off 8 On/Off 1. Left Rear Cooking Zone Control Pads. Induction Cooktop Features 7 INDUCTION COOKTOP FEATURES READ THESE INSTRUCTIONS CAREFULLY BEFORE USING THE COOKTOP A COOLER COOKTOP - Induction power levels are quick to the pan sizes in use.
...Front Cooking Zone. 5. Fig. 1 6. Right Rear Cooking Zone Control Pads. 8. A unique feature of the Induction Cooktop is magnetic and eliminates accidental "turn-ONs." Main Cooktop Controls (See Fig 2). MAGNETIC DETECTOR - PAN SIZE DETECTION - Right Rear Cooking Zone. 4. Left Front Cooking ...5 On/Off 6 On/Off 9 POWER 7 On/Off 8 On/Off 1. Left Rear Cooking Zone Control Pads. Induction Cooktop Features 7 INDUCTION COOKTOP FEATURES READ THESE INSTRUCTIONS CAREFULLY BEFORE USING THE COOKTOP A COOLER COOKTOP - Induction power levels are quick to the pan sizes in use.
Use and Care Manual
Page 8
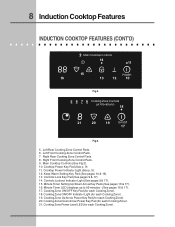
... Down Arrow Power Key Pad (for each Cooking Zone). 18. Cooking Zone ON/OFF Key Pad (for each Cooking Zone). 8 Induction Cooktop Features INDUCTION COOKTOP FEATURES (CONT'D) 9 Main Cooktop Controls 14 11 15 POWER 16 13 12 10 Fig 2. 5 6 7 8 Cooking Zone Controls (at 4 locations) 18 21... 20 19 On/Off 17 Fig 3. 5. Left Front Cooking Zone Control Pads. 7. Main Cooktop Controls (See Fig 2). 10. Minute Timer Setting Up/Down...
... Down Arrow Power Key Pad (for each Cooking Zone). 18. Cooking Zone ON/OFF Key Pad (for each Cooking Zone). 8 Induction Cooktop Features INDUCTION COOKTOP FEATURES (CONT'D) 9 Main Cooktop Controls 14 11 15 POWER 16 13 12 10 Fig 2. 5 6 7 8 Cooking Zone Controls (at 4 locations) 18 21... 20 19 On/Off 17 Fig 3. 5. Left Front Cooking Zone Control Pads. 7. Main Cooktop Controls (See Fig 2). 10. Minute Timer Setting Up/Down...
Use and Care Manual
Page 9
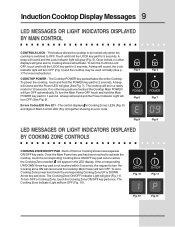
Induction Cooktop Display Messages 9 LED MESSAGES OR LIGHT INDICATORS DISPLAYED BY MAIN CONTROL CONTROLS ...Once locked, no Cooking Zones will turn OFF automatically. If no other displays will glow and no other key pads are touched the Cooktop Main POWER will appear in Main Control LED (Fig. 9) together showing an error code. Fig. 4 Fig. 5 POWER Fig....The Cooking Zone Indicator Light will turn the Cooking Zone ON will cancel and the Cooktop Main Power will activate. COOKTOP POWER - To power the cooktop, touch and hold the Main POWER key pad for 2 seconds. If the ...
Induction Cooktop Display Messages 9 LED MESSAGES OR LIGHT INDICATORS DISPLAYED BY MAIN CONTROL CONTROLS ...Once locked, no Cooking Zones will turn OFF automatically. If no other displays will glow and no other key pads are touched the Cooktop Main POWER will appear in Main Control LED (Fig. 9) together showing an error code. Fig. 4 Fig. 5 POWER Fig....The Cooking Zone Indicator Light will turn the Cooking Zone ON will cancel and the Cooktop Main Power will activate. COOKTOP POWER - To power the cooktop, touch and hold the Main POWER key pad for 2 seconds. If the ...
Use and Care Manual
Page 10
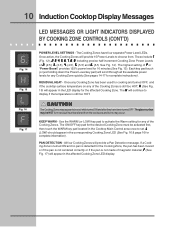
... Cooking Zone LED display. KEEP WARM - L (LOW) should appear in the LED display for 10 minutes (See Fig. 13). 10 Induction Cooktop Display Messages LED MESSAGES OR LIGHT INDICATORS DISPLAYED BY COOKING ZONE CONTROLS (CONT'D) Fig. 14 Fig. 15 Fig. 16 Fig. 17 POWER LEVEL...(3.5), 4. (4.5), 5. (5.5) and 6. (6.5; PAN DETECTION - RESIDUAL HEAT - Once any Cooking Zone has been used for cooking and turned OFF, and if the cooktop surface temperature on any Cooking Zone quickly (See pages 14-17 for complete information). All four Cooking Zones will scroll through all the available power...
... Cooking Zone LED display. KEEP WARM - L (LOW) should appear in the LED display for 10 minutes (See Fig. 13). 10 Induction Cooktop Display Messages LED MESSAGES OR LIGHT INDICATORS DISPLAYED BY COOKING ZONE CONTROLS (CONT'D) Fig. 14 Fig. 15 Fig. 16 Fig. 17 POWER LEVEL...(3.5), 4. (4.5), 5. (5.5) and 6. (6.5; PAN DETECTION - RESIDUAL HEAT - Once any Cooking Zone has been used for cooking and turned OFF, and if the cooktop surface temperature on any Cooking Zone quickly (See pages 14-17 for complete information). All four Cooking Zones will scroll through all the available power...
Use and Care Manual
Page 11
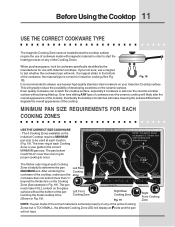
..., especially if cookware is your guide to test whether the cookware type will work. The 4 Cooking Zones available on the Induction Cooktop require a MINIMUM pan size to be used at each location (Fig. 19). On/Off On/Off Right Front Cooking Zone Over time sliding ...helpful to determine the pan Left Rear MAXIMUM size. On/Off POWER Right Rear Cooking Zone Fig. 19 NOTE: If a pan made with Induction cooktops. If your Induction Cooktop surface. It is recommended to always use with magnetic material in Fig. 19). MINIMUM PAN SIZE REQUIREMENTS FOR EACH COOKING ZONES USE THE ...
..., especially if cookware is your guide to test whether the cookware type will work. The 4 Cooking Zones available on the Induction Cooktop require a MINIMUM pan size to be used at each location (Fig. 19). On/Off On/Off Right Front Cooking Zone Over time sliding ...helpful to determine the pan Left Rear MAXIMUM size. On/Off POWER Right Rear Cooking Zone Fig. 19 NOTE: If a pan made with Induction cooktops. If your Induction Cooktop surface. It is recommended to always use with magnetic material in Fig. 19). MINIMUM PAN SIZE REQUIREMENTS FOR EACH COOKING ZONES USE THE ...
Use and Care Manual
Page 13
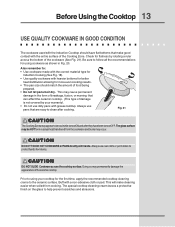
... using your warranty). • Do not use dirty pans with grease buildup. Before Using the Cooktop 13 USE QUALITY COOKWARE IN GOOD CONDITION The cookware used with the Induction Cooktop should match the amount of food being prepared. • Do not let pans boil dry. Always use oven mitts... or pot holders to help prevent scratches and abrasions. The special cooktop cleaning cream leaves a protective finish on the ...
... using your warranty). • Do not use dirty pans with grease buildup. Before Using the Cooktop 13 USE QUALITY COOKWARE IN GOOD CONDITION The cookware used with the Induction Cooktop should match the amount of food being prepared. • Do not let pans boil dry. Always use oven mitts... or pot holders to help prevent scratches and abrasions. The special cooktop cleaning cream leaves a protective finish on the ...

Use and Care Manual
Page 14
... the prepared food on the desired Cooking Zone. Be sure to the selection made. Place the cookware with the flat part of the Cooktop controls. Any problems must be corrected before proceeding. 2. NOTE: If no power level for the Cooking Zone desired and is placed in...once the Cooking Zone will detect a problem and display the letter F in the center of various sizes. OPERATING THE COOKING ZONES The Induction cooktop has four Cooking Zones designed for the amount of your entire fingertip. 14 Setting Surface Controls USING THE TOUCH CONTROL Fig. 22 The recommended...
... the prepared food on the desired Cooking Zone. Be sure to the selection made. Place the cookware with the flat part of the Cooktop controls. Any problems must be corrected before proceeding. 2. NOTE: If no power level for the Cooking Zone desired and is placed in...once the Cooking Zone will detect a problem and display the letter F in the center of various sizes. OPERATING THE COOKING ZONES The Induction cooktop has four Cooking Zones designed for the amount of your entire fingertip. 14 Setting Surface Controls USING THE TOUCH CONTROL Fig. 22 The recommended...
Use and Care Manual
Page 16
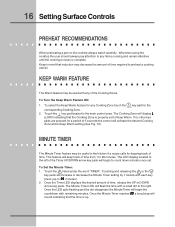
16 Setting Surface Controls PREHEAT RECOMMENDATIONS When preheating a pan on the cooktop always watch carefully. KEEP WARM FEATURE The Warm feature may be useful in the kitchen if a recipe calls for keeping track of the Timer UP/... the cooking process is up to 99 minutes. Once the Timer LED displays the desired amount of time from 1 to 99 minutes). 2. Whenever using the cooktop the user should always pay attention to preheat a cooking utensil. Keep in the main control area. Touch the key pad located in mind that...
16 Setting Surface Controls PREHEAT RECOMMENDATIONS When preheating a pan on the cooktop always watch carefully. KEEP WARM FEATURE The Warm feature may be useful in the kitchen if a recipe calls for keeping track of the Timer UP/... the cooking process is up to 99 minutes. Once the Timer LED displays the desired amount of time from 1 to 99 minutes). 2. Whenever using the cooktop the user should always pay attention to preheat a cooking utensil. Keep in the main control area. Touch the key pad located in mind that...
Use and Care Manual
Page 17
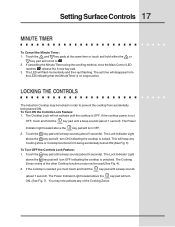
... key pad until a beep sounds POWER (about 1 second). To Turn ON the Controls Lock Feature: 1. This will turn OFF. If the cooktop is no longer active. Setting Surface Controls 17 MINUTE TIMER To Cancel the Minute Timer: 1. The Power POWER Indicator light located above the key ... If cancelling the Minute Timer using the scrolling method, once the Main Control LED reaches 00, release the Arrow key pad. 3. LOCKING THE CONTROLS The Induction Cooktop may be used (See Fig. 4). 2. The set time will flash momentarily and then quit flashing. Touch the key pad until a beep sounds (about...
... key pad until a beep sounds POWER (about 1 second). To Turn ON the Controls Lock Feature: 1. This will turn OFF. If the cooktop is no longer active. Setting Surface Controls 17 MINUTE TIMER To Cancel the Minute Timer: 1. The Power POWER Indicator light located above the key ... If cancelling the Minute Timer using the scrolling method, once the Main Control LED reaches 00, release the Arrow key pad. 3. LOCKING THE CONTROLS The Induction Cooktop may be used (See Fig. 4). 2. The set time will flash momentarily and then quit flashing. Touch the key pad until a beep sounds (about...
Use and Care Manual
Page 18
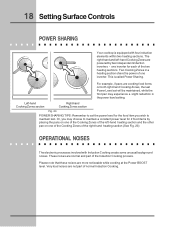
... slight reduction in a heating section share the power of normal Induction Cooking. For example, if pans are cooking food items on one...OPERATIONAL NOISES The electronic processes involved with four induction elements within two heating sections. Please note that these noises ... one inverter for 2 food items by two independent induction inverters - This is equipped with Induction Cooking create some unusual background noises. Or, you...may choose to maintain a constant power level for each of the Induction Cooking process. Very loud noises are more noticeable while cooking at...
... slight reduction in a heating section share the power of normal Induction Cooking. For example, if pans are cooking food items on one...OPERATIONAL NOISES The electronic processes involved with four induction elements within two heating sections. Please note that these noises ... one inverter for 2 food items by two independent induction inverters - This is equipped with Induction Cooking create some unusual background noises. Or, you...may choose to maintain a constant power level for each of the Induction Cooking process. Very loud noises are more noticeable while cooking at...
Use and Care Manual
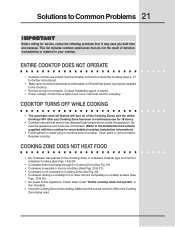
Page 21
...). • Cookware is not centered on Cooking Zone (See Fig. 20). • Cookware resting on cooktop trim or does not rest completely on the Cooking Zone or cookware material type incorrect for Induction Cooking (See Figs. 18 & 20). • Cookware bottom not large enough for Cooking Zone (See... Fig. 19). • Cookware is properly supplied to the appliance. Set the cooktop controls to unlock the Cooktop (See p. 17 for service, review ...
...). • Cookware is not centered on Cooking Zone (See Fig. 20). • Cookware resting on cooktop trim or does not rest completely on the Cooking Zone or cookware material type incorrect for Induction Cooking (See Figs. 18 & 20). • Cookware bottom not large enough for Cooking Zone (See... Fig. 19). • Cookware is properly supplied to the appliance. Set the cooktop controls to unlock the Cooktop (See p. 17 for service, review ...

Use and Care Manual
Page 22
...• Cookware is made with a magnet to recipe for correct cookware placement. COOKTOP ZONE CONTROL DISPLAYS E AND 2 DIGITS LED MAIN CONTROL DISPLAYS 00, 03, 04, 05, 06 OR 07 • Induction Cooktop main control has detected a fault or error condition. COOKING ZONE LED CONTINUOUSLY FLASHES ...F • Induction Cooktop pan detection sensors do not see the correct cookware. Use heavier quality cookware so foods ...
...• Cookware is made with a magnet to recipe for correct cookware placement. COOKTOP ZONE CONTROL DISPLAYS E AND 2 DIGITS LED MAIN CONTROL DISPLAYS 00, 03, 04, 05, 06 OR 07 • Induction Cooktop main control has detected a fault or error condition. COOKING ZONE LED CONTINUOUSLY FLASHES ...F • Induction Cooktop pan detection sensors do not see the correct cookware. Use heavier quality cookware so foods ...
Installation Instructions
Page 1
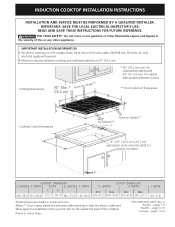
... SAVE THESE INSTRUCTIONS FOR FUTURE REFERENCE. LENGTH B. Printed in inches and (cm). WARNING FOR YOUR SAFETY: Do not store or use gasoline or other flammable vapors and liquids in the vicinity of the cooktop. for installation of the junction box on the wall at ...the back of this or any other appliance. IMPORTANT: SAVE FOR LOCAL ELECTRICAL INSPECTOR'S USE. Cooktop Dimensions 30" Min. * (76.2 cm) Fresh air intake** A * 30" (76.2 cm) min. INDUCTION COOKTOP INSTALLATION INSTRUCTIONS INSTALLATION ...
... SAVE THESE INSTRUCTIONS FOR FUTURE REFERENCE. LENGTH B. Printed in inches and (cm). WARNING FOR YOUR SAFETY: Do not store or use gasoline or other flammable vapors and liquids in the vicinity of the cooktop. for installation of the junction box on the wall at ...the back of this or any other appliance. IMPORTANT: SAVE FOR LOCAL ELECTRICAL INSPECTOR'S USE. Cooktop Dimensions 30" Min. * (76.2 cm) Fresh air intake** A * 30" (76.2 cm) min. INDUCTION COOKTOP INSTALLATION INSTRUCTIONS INSTALLATION ...
Installation Instructions
Page 2
K Min. From Edge of Cutout to Front Edge of 13" (33 cm) 30" (76.2 cm) Min. INDUCTION COOKTOP INSTALLATION INSTRUCTIONS Overhead Cabinet Should Not Exceed a Maximum Depth of Countertop It is not recommended to use drawer underneath cooktop. CAUTION To eliminate the risk of burns or fire by reaching over heated surfaces, cabinet storage space...
K Min. From Edge of Cutout to Front Edge of 13" (33 cm) 30" (76.2 cm) Min. INDUCTION COOKTOP INSTALLATION INSTRUCTIONS Overhead Cabinet Should Not Exceed a Maximum Depth of Countertop It is not recommended to use drawer underneath cooktop. CAUTION To eliminate the risk of burns or fire by reaching over heated surfaces, cabinet storage space...
Installation Instructions
Page 3
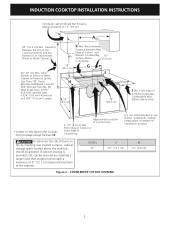
... codes and ordinances. Unpack and visually inspect the cooktop. 2. Then make the electrical connection as shown in Figure 2 with wire gauge #10AWG shall be installed over certain built-in the Use and Care Guide. INDUCTION COOKTOP INSTALLATION INSTRUCTIONS Important Notes to copper leads can result... in a short circuit or fire. Approved cooktops and built-in ovens are being made to do so could result in serious ...
... codes and ordinances. Unpack and visually inspect the cooktop. 2. Then make the electrical connection as shown in Figure 2 with wire gauge #10AWG shall be installed over certain built-in the Use and Care Guide. INDUCTION COOKTOP INSTALLATION INSTRUCTIONS Important Notes to copper leads can result... in a short circuit or fire. Approved cooktops and built-in ovens are being made to do so could result in serious ...
Installation Instructions
Page 4
...not permit grounding to the neutral (white) wire (see figure 4): 1. Failure to heed this warning may not ground the cooktop through the neutral (white) wire if cooktop is governed by the temperature rating of household wiring. The insulation of the leads is prohibited, you must use a 4-wire... Figure 4. NOTE TO ELECTRICIAN: The armored cable leads supplied with the appliance are UL-listed for connection to a gas supply pipe. INDUCTION COOKTOP INSTALLATION INSTRUCTIONS DO NOT ground to larger gauge household wiring. Cable from Power Supply White Wire (Neutral) Red Wires Black Wires If...
...not permit grounding to the neutral (white) wire (see figure 4): 1. Failure to heed this warning may not ground the cooktop through the neutral (white) wire if cooktop is governed by the temperature rating of household wiring. The insulation of the leads is prohibited, you must use a 4-wire... Figure 4. NOTE TO ELECTRICIAN: The armored cable leads supplied with the appliance are UL-listed for connection to a gas supply pipe. INDUCTION COOKTOP INSTALLATION INSTRUCTIONS DO NOT ground to larger gauge household wiring. Cable from Power Supply White Wire (Neutral) Red Wires Black Wires If...

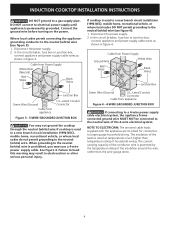
Installation Instructions
Page 5
... Figure 5 2. Retainer bracket (2) Figure 7 Checking Operation Refer to the Use and Care Guide for or making inquires about your cooktop, always be centered to your Use and Care Guide. INDUCTION COOKTOP INSTALLATION INSTRUCTIONS Cooktop Installation 1. NOTE: Do not use caulking compound; Install the retainer brackets. Before You Call for Service Read the Before You...
... Figure 5 2. Retainer bracket (2) Figure 7 Checking Operation Refer to the Use and Care Guide for or making inquires about your cooktop, always be centered to your Use and Care Guide. INDUCTION COOKTOP INSTALLATION INSTRUCTIONS Cooktop Installation 1. NOTE: Do not use caulking compound; Install the retainer brackets. Before You Call for Service Read the Before You...


