Owners Guide
Page 3
... servicing-Do not repair or replace any electrical switch; caution Do not store items of the appliance unless specifically recommended in the manuals. do not use gasoline or other appliance. - Ask your gas supplier, call your new Electrolux cooktop. ! Never allow children to reach items could be performed by a qualified technician in accordance with...
... servicing-Do not repair or replace any electrical switch; caution Do not store items of the appliance unless specifically recommended in the manuals. do not use gasoline or other appliance. - Ask your gas supplier, call your new Electrolux cooktop. ! Never allow children to reach items could be performed by a qualified technician in accordance with...
Owners Guide
Page 4
...and result in fire or property damage. • Do Not Leave Children Alone-Children should not be left alone or unattended in the area where appliance is dark in injury. ! The use of undersized utensils will expose a portion of the surface heating unit to direct contact and may cause ... may result in serious injuries and also cause damage to cause burns. They should not be stored on Appliance-Flammable materials should never be equipped with one or more surface units of the appliance. • DO NOT TOUCH SURFACE BURNERS/UNIT, GRATES OR AREAS NEAR THESE BURNERS/UNIT. During and...
...and result in fire or property damage. • Do Not Leave Children Alone-Children should not be left alone or unattended in the area where appliance is dark in injury. ! The use of undersized utensils will expose a portion of the surface heating unit to direct contact and may cause ... may result in serious injuries and also cause damage to cause burns. They should not be stored on Appliance-Flammable materials should never be equipped with one or more surface units of the appliance. • DO NOT TOUCH SURFACE BURNERS/UNIT, GRATES OR AREAS NEAR THESE BURNERS/UNIT. During and...
Owners Guide
Page 6
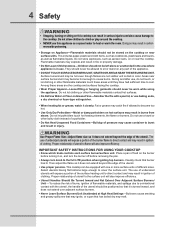
... the grounding prong from this plug. Warning This appliance is not installed by a qualified service technician in accordance with the kit instructions and all codes and requirements of the consumer to LP gas is correctly polarized and properly grounded. Failure to ...installer or electrician. ! See the installation instructions packaged with Natural Gas and Propane Gas. liquefied petroleum (propane) gas conversion This appliance can cause serious injury, fire or death. It is marked "FOR LP/ PROPANE GAS CONVERSION". The kit is shipped from electrical power cord. The ...
... the grounding prong from this plug. Warning This appliance is not installed by a qualified service technician in accordance with the kit instructions and all codes and requirements of the consumer to LP gas is correctly polarized and properly grounded. Failure to ...installer or electrician. ! See the installation instructions packaged with Natural Gas and Propane Gas. liquefied petroleum (propane) gas conversion This appliance can cause serious injury, fire or death. It is marked "FOR LP/ PROPANE GAS CONVERSION". The kit is shipped from electrical power cord. The ...

Owners Guide
Page 10
...heads are right located inside the stainless steel frame. Be sure they are correctly placed BEFORE using your appliance. 10 Surface Cooking Placement of burner heads and caps Burner Cap Burner Head Gas Opening Burner Cap Electrode Burner Head Figure 1 Figure 2 For the 18 000 BTU burner : Place the... each burner has an inner locating ring which centers the cap correctly on to damage the electrode while placing the burner head over the gas orifice (Figure 1). Do not service the sealed burner yourself. The cap for each burner cap is properly aligned and level. If the...
...heads are right located inside the stainless steel frame. Be sure they are correctly placed BEFORE using your appliance. 10 Surface Cooking Placement of burner heads and caps Burner Cap Burner Head Gas Opening Burner Cap Electrode Burner Head Figure 1 Figure 2 For the 18 000 BTU burner : Place the... each burner has an inner locating ring which centers the cap correctly on to damage the electrode while placing the burner head over the gas orifice (Figure 1). Do not service the sealed burner yourself. The cap for each burner cap is properly aligned and level. If the...

Owners Guide
Page 14
...Do not use care when cleaning the cooktop. Caution ● To avoid possible burns use spray oven cleaners on the cooktop. Because the gas burner are sealed, cleanups are easy when spillovers are dishwasher safe and may be sure to operate the surface burners without the burner caps.... Before using your gas appliance be cleaned in the dishwasher. Cleaning the grates The burner grates are cleaned up immediately. ! DO NOT allow them to cool. ●...
...Do not use care when cleaning the cooktop. Caution ● To avoid possible burns use spray oven cleaners on the cooktop. Because the gas burner are sealed, cleanups are easy when spillovers are dishwasher safe and may be sure to operate the surface burners without the burner caps.... Before using your gas appliance be cleaned in the dishwasher. Cleaning the grates The burner grates are cleaned up immediately. ! DO NOT allow them to cool. ●...

Owners Guide
Page 16
...can mark or scratch the cooktop surface. Cookware (cast iron, metal, ceramic or glass) with a metal razor blade scraper, holding scraper at a 30 degree angle to the ceramic surface. Do not cook foods directly on a hot cooktop. Use a paper towel to help prevent scratches and abrasions. ...the recommended Cleaning Creme to the surface. For light to moderate soil: Apply a few drops of that cleaning creme is supplied with your appliance and you use to future use your cooktop as described above. Then, if soils remain, protect your hand with a potholder and carefully scrape...
...can mark or scratch the cooktop surface. Cookware (cast iron, metal, ceramic or glass) with a metal razor blade scraper, holding scraper at a 30 degree angle to the ceramic surface. Do not cook foods directly on a hot cooktop. Use a paper towel to help prevent scratches and abrasions. ...the recommended Cleaning Creme to the surface. For light to moderate soil: Apply a few drops of that cleaning creme is supplied with your appliance and you use to future use your cooktop as described above. Then, if soils remain, protect your hand with a potholder and carefully scrape...
Owners Guide
Page 20
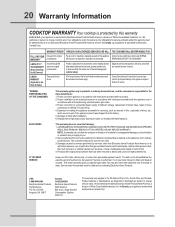
... listed below : 1. Service calls which do not allow the exclusion or limitation of the appliance when it is warranted by us or an authorized Electrolux Home Products North America servicer. Products with all local plumbing, electrical and/or gas codes. 3. The date on models with these features). Product features or specifications as removal...
... listed below : 1. Service calls which do not allow the exclusion or limitation of the appliance when it is warranted by us or an authorized Electrolux Home Products North America servicer. Products with all local plumbing, electrical and/or gas codes. 3. The date on models with these features). Product features or specifications as removal...
Installation Instructions
Page 1
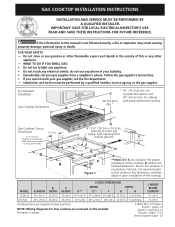
...Gas Cooktop Dimensions A * 30" (76.2cm) min. Seal opening after routing power cable. 3"(7.6cm) 21/2" (6.4cm) G H C 4" X 4" (10.2cm x 10.2cm) opening after routing gas line J 71/4" (18.4cm) 2"(5.1cm) 1" (2.5cm) E D F Figure 1 **Note: D & E are critical to the proper installation of this manual is recommended to light any appliance...department. - Installation and service must be performed by a qualified installer, service agency or the gas supplier. for cabinet 30"(76.2cm) with protected bottom surface. Seal opening to route power cable. CUTOUT DIMENSIONS B. ...
...Gas Cooktop Dimensions A * 30" (76.2cm) min. Seal opening after routing power cable. 3"(7.6cm) 21/2" (6.4cm) G H C 4" X 4" (10.2cm x 10.2cm) opening after routing gas line J 71/4" (18.4cm) 2"(5.1cm) 1" (2.5cm) E D F Figure 1 **Note: D & E are critical to the proper installation of this manual is recommended to light any appliance...department. - Installation and service must be performed by a qualified installer, service agency or the gas supplier. for cabinet 30"(76.2cm) with protected bottom surface. Seal opening to route power cable. CUTOUT DIMENSIONS B. ...
Installation Instructions
Page 3
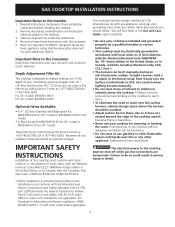
...• The burners can be avoided. • Adjust surface burner flame size so it carefully. • Be sure your cooktop for 30" model. Note: For operation at 1-877-4ELECTROLUX (1-877-435-3287). IMPORTANT SAFETY INSTRUCTIONS Installation of interest to the cooktop must conform with...should follow. Use caution when lighting burners manually. • Do not store items of this or any appliance using gas and generating heat, there are being made. GAS COOKTOP INSTALLATION INSTRUCTIONS Important Notes to LITE. Children could be seriously burned climbing on the cooktop to reach...
...• The burners can be avoided. • Adjust surface burner flame size so it carefully. • Be sure your cooktop for 30" model. Note: For operation at 1-877-4ELECTROLUX (1-877-435-3287). IMPORTANT SAFETY INSTRUCTIONS Installation of interest to the cooktop must conform with...should follow. Use caution when lighting burners manually. • Do not store items of this or any appliance using gas and generating heat, there are being made. GAS COOKTOP INSTALLATION INSTRUCTIONS Important Notes to LITE. Children could be seriously burned climbing on the cooktop to reach...
Installation Instructions
Page 5
... (W.C.) pressure. Do not make the appropriate conversion can result in accordance with the arrow on natural gas at least 1"(2.5cm) (or 2.5 kPa) greater than 14" (35.6cm) of manifold pressure only. LP/Propane Gas Conversion This appliance can reach the access cap. For checking the regulator, the inlet pressure must be at least...
... (W.C.) pressure. Do not make the appropriate conversion can result in accordance with the arrow on natural gas at least 1"(2.5cm) (or 2.5 kPa) greater than 14" (35.6cm) of manifold pressure only. LP/Propane Gas Conversion This appliance can reach the access cap. For checking the regulator, the inlet pressure must be at least...
Installation Instructions
Page 6
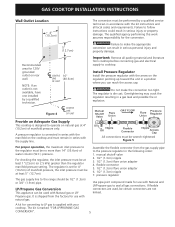
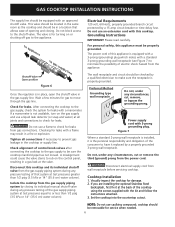
...explosion. Grounding Instructions IMPORTANT Please read carefully. For personal safety, this appliance must be removable for service when needed. 6 Do not use caulking compound; The wall receptacle and circuit should be in a gas leak at test pressures equal to check for turning on the control ...grounding) plug which mates with a flame may result in the gas supply line. Checking for leaks with 3-prong grounding plug. Check for gas to minimize the possibility of this appliance is not available, turn on the gas supply and use an extension cord with this cooktop and its ...
...explosion. Grounding Instructions IMPORTANT Please read carefully. For personal safety, this appliance must be removable for service when needed. 6 Do not use caulking compound; The wall receptacle and circuit should be in a gas leak at test pressures equal to check for turning on the control ...grounding) plug which mates with a flame may result in the gas supply line. Checking for leaks with 3-prong grounding plug. Check for gas to minimize the possibility of this appliance is not available, turn on the gas supply and use an extension cord with this cooktop and its ...
Installation Instructions
Page 8
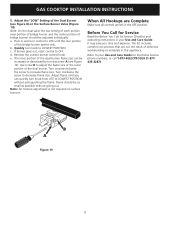
.... The list includes common occurrences that are left in and turn control to LOWEST POSITION. GAS COOKTOP INSTALLATION INSTRUCTIONS 5. b. If burner goes out, reset control to increase flame size. ... or materials in your Use and Care Guide for Service Checklist and operating instructions in this appliance. Remove the surface burner control knob. Use screw B to your Use and Care Guide.... to decrease flame size. Before You Call for Service Read the Before You Call for Electrolux Service phone numbers, or call 1-877-4ELECTROLUX (1-877435-3287). Adjust flame until the rear...
.... The list includes common occurrences that are left in and turn control to LOWEST POSITION. GAS COOKTOP INSTALLATION INSTRUCTIONS 5. b. If burner goes out, reset control to increase flame size. ... or materials in your Use and Care Guide for Service Checklist and operating instructions in this appliance. Remove the surface burner control knob. Use screw B to your Use and Care Guide.... to decrease flame size. Before You Call for Service Read the Before You Call for Electrolux Service phone numbers, or call 1-877-4ELECTROLUX (1-877435-3287). Adjust flame until the rear...