Owners Guide
Page 3
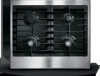
... reduce the risk of the product. ! do not use gasoline or other part of fire, electrical shock, or injury when using your gas supplier, call your new Electrolux cooktop. ! Installation and service must be seriously injured. Children climbing on the cooktop to light any appliance. • Do not touch any other flammable vapors...
... reduce the risk of the product. ! do not use gasoline or other part of fire, electrical shock, or injury when using your gas supplier, call your new Electrolux cooktop. ! Installation and service must be seriously injured. Children climbing on the cooktop to light any appliance. • Do not touch any other flammable vapors...
Owners Guide
Page 5
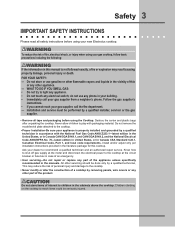
... Contact a qualified technician immediately. • Clean Cooktop Glass with Caution.-If a wet sponge or cloth is used in conjunction with gas ranges other reproductive harm, and requires businesses to warn customers of potential exposure to carbon monoxide levels above allowable current standards. NOTE The... only to the sudden change in temperature. Air will occur if the hot covers are suitable for use in a fire. ! Improper installation of these liners may result in combination with Sharp Objects. Doing so may result in risk of glass, glass/ceramic, ceramic, earthenware,...
... Contact a qualified technician immediately. • Clean Cooktop Glass with Caution.-If a wet sponge or cloth is used in conjunction with gas ranges other reproductive harm, and requires businesses to warn customers of potential exposure to carbon monoxide levels above allowable current standards. NOTE The... only to the sudden change in temperature. Air will occur if the hot covers are suitable for use in a fire. ! Improper installation of these liners may result in combination with Sharp Objects. Doing so may result in risk of glass, glass/ceramic, ceramic, earthenware,...
Owners Guide
Page 6
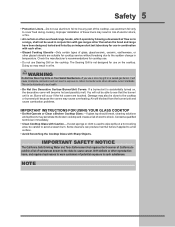
... grounding prong from this appliance to follow this cooktop for this plug. Follow the installation instructions which are inside the envelope. Warning Severe shock, or damage to LP gas is not installed by a qualified service technician in order for complete installation and grounding instructions. ! Power supply cord with 3-prong grounding plug For personal safety...
... grounding prong from this appliance to follow this cooktop for this plug. Follow the installation instructions which are inside the envelope. Warning Severe shock, or damage to LP gas is not installed by a qualified service technician in order for complete installation and grounding instructions. ! Power supply cord with 3-prong grounding plug For personal safety...

Owners Guide
Page 14
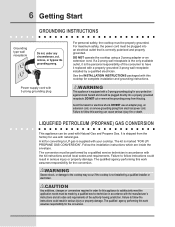
... from cooktop area. IMPORTANT ● For proper gas flow and ignition of the burners - 14 General Care & Cleaning CLEaNING THE BURNER GRATES, BURNER CAPS and BURNER HEADS The cooktop is designed to : ● Follow installation instructions before operating. ● Remove all of ...the surface burners and allow spills, food, cleaning agents or any excessive soils before placing in the correct locations. Before using your gas appliance be cleaned in the dishwasher. Caution...
... from cooktop area. IMPORTANT ● For proper gas flow and ignition of the burners - 14 General Care & Cleaning CLEaNING THE BURNER GRATES, BURNER CAPS and BURNER HEADS The cooktop is designed to : ● Follow installation instructions before operating. ● Remove all of ...the surface burners and allow spills, food, cleaning agents or any excessive soils before placing in the correct locations. Before using your gas appliance be cleaned in the dishwasher. Caution...
Owners Guide
Page 20
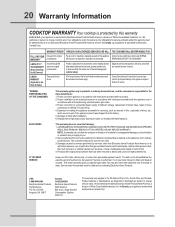
... breakage (not customer abuse). Proper installation by Electrolux Home Products North America, a division of the full and limited warranties above . Replacement of God. 4. Box 212378 Augusta, GA 30917 Canada 1•866•294•9911 Electrolux Home Products North America 802, boul... In Canada, your appliance is warranted by Electrolux Home Products North America, a division of service. *NORMAL RESPONSIBILITIES OF THE CONSUMER EXCLUSIONS IF YOU NEED SERVICE This warranty applies only to finish after installation. 6. Proper connection to you specific legal rights...
... breakage (not customer abuse). Proper installation by Electrolux Home Products North America, a division of the full and limited warranties above . Replacement of God. 4. Box 212378 Augusta, GA 30917 Canada 1•866•294•9911 Electrolux Home Products North America 802, boul... In Canada, your appliance is warranted by Electrolux Home Products North America, a division of service. *NORMAL RESPONSIBILITIES OF THE CONSUMER EXCLUSIONS IF YOU NEED SERVICE This warranty applies only to finish after installation. 6. Proper connection to you specific legal rights...
Installation Instructions
Page 1
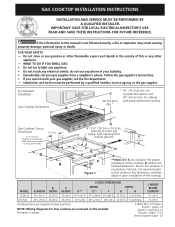
...; Do not try to light any appliance. • Do not touch any phone in countertop materials, it upon installation of the cooktop. For Standard Installation: Gas Cooktop Dimensions A * 30" (76.2cm) min. Opening to route gas supply. D reflects the finished dimension. WIDTH MODEL A. pages 17-23 Wiring Diagram page - 24 READ AND SAVE THESE INSTRUCTIONS...
...; Do not try to light any appliance. • Do not touch any phone in countertop materials, it upon installation of the cooktop. For Standard Installation: Gas Cooktop Dimensions A * 30" (76.2cm) min. Opening to route gas supply. D reflects the finished dimension. WIDTH MODEL A. pages 17-23 Wiring Diagram page - 24 READ AND SAVE THESE INSTRUCTIONS...
Installation Instructions
Page 2
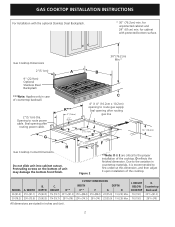
...) opening after routing power cable. Gas Cooktop Dimensions 30"(76.2cm) Min.* 2"(5.1cm) A B 9" (22.9cm) Optional Stainless Steel Backsplash ***Note: Applies only in countertop materials, it is recommended to route gas supply. G Gas Cooktop Cutout Dimensions K*** 3"(7.6cm) 21/2" (6.4cm) H Do not slide unit into cabinet cutout. GAS COOKTOP INSTALLATION INSTRUCTIONS For Installation with protected bottom surface. Due...
...) opening after routing power cable. Gas Cooktop Dimensions 30"(76.2cm) Min.* 2"(5.1cm) A B 9" (22.9cm) Optional Stainless Steel Backsplash ***Note: Applies only in countertop materials, it is recommended to route gas supply. G Gas Cooktop Cutout Dimensions K*** 3"(7.6cm) 21/2" (6.4cm) H Do not slide unit into cabinet cutout. GAS COOKTOP INSTALLATION INSTRUCTIONS For Installation with protected bottom surface. Due...
Installation Instructions
Page 3
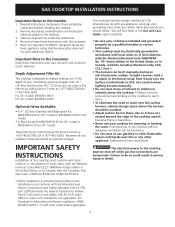
...codes or, in the absence of interest to the Installer 1. Those kits can be avoided. • Adjust surface burner flame size so it carefully. • Be sure your cooktop for 30" model. As with the Canadian Fuel Gas Code, CAN/CGA B149 and CAN/CGA B149.2. ...the consumer. 5. Children could be at 1-877-4ELECTROLUX (1-877-435-3287). IMPORTANT SAFETY INSTRUCTIONS Installation of this or any appliance using gas and generating heat, there are being made. For 36" model: #903051-9010 For 30" model: #903051-9100 Optional Items Available: • A 9" (22.9cm) Stainless Steel ...
...codes or, in the absence of interest to the Installer 1. Those kits can be avoided. • Adjust surface burner flame size so it carefully. • Be sure your cooktop for 30" model. As with the Canadian Fuel Gas Code, CAN/CGA B149 and CAN/CGA B149.2. ...the consumer. 5. Children could be at 1-877-4ELECTROLUX (1-877-435-3287). IMPORTANT SAFETY INSTRUCTIONS Installation of this or any appliance using gas and generating heat, there are being made. For 36" model: #903051-9010 For 30" model: #903051-9100 Optional Items Available: • A 9" (22.9cm) Stainless Steel ...
Installation Instructions
Page 4
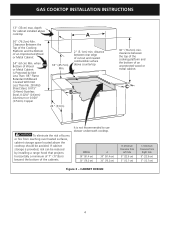
...the bottom of cutout and nearest combustible surface above countertop B 24" (61cm) 30" (76.2cm) min. It is not recommended to use drawer underneath cooktop. CABINET DESIGN 4 depth for cabinet installed above the cooktop should be reduced by Not Less Than 1/8" Flame Retardant Millboard ..., 0.015" (0.4mm) Stainless Steel, 0.024" (0.6mm) Aluminum or 0.020" (0.5mm) Copper A 18" (45.7cm) Min. 2" (5.1cm) min. GAS COOKTOP INSTALLATION INSTRUCTIONS 13" (33cm) max. clearance between rear edge of an unprotected wood or metal cabinet. C To eliminate the risk of an Unprotected Wood or Metal...
...the bottom of cutout and nearest combustible surface above countertop B 24" (61cm) 30" (76.2cm) min. It is not recommended to use drawer underneath cooktop. CABINET DESIGN 4 depth for cabinet installed above the cooktop should be reduced by Not Less Than 1/8" Flame Retardant Millboard ..., 0.015" (0.4mm) Stainless Steel, 0.024" (0.6mm) Aluminum or 0.020" (0.5mm) Copper A 18" (45.7cm) Min. 2" (5.1cm) min. GAS COOKTOP INSTALLATION INSTRUCTIONS 13" (33cm) max. clearance between rear edge of an unprotected wood or metal cabinet. C To eliminate the risk of an Unprotected Wood or Metal...
Installation Instructions
Page 5
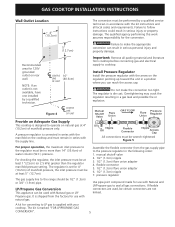
... serious personal injury and property damage. Use pipe-joint compound made for use with Natural and LP/Propane gas to cooktop. Install Pressure Regulator Install the pressure regulator with the arrow on rear wall. The regulator is shipped from cooktop before connecting..., the maximum inlet pressure to the range should be used , be certain connectors are used with Natural gas or LP/ Propane gas. NOTE: If an outlet is die cast. GAS COOKTOP INSTALLATION INSTRUCTIONS Wall Outlet Location 4" (10.2cm) The conversion must be performed by a qualified technician. Assemble ...
... serious personal injury and property damage. Use pipe-joint compound made for use with Natural and LP/Propane gas to cooktop. Install Pressure Regulator Install the pressure regulator with the arrow on rear wall. The regulator is shipped from cooktop before connecting..., the maximum inlet pressure to the range should be used , be certain connectors are used with Natural gas or LP/ Propane gas. NOTE: If an outlet is die cast. GAS COOKTOP INSTALLATION INSTRUCTIONS Wall Outlet Location 4" (10.2cm) The conversion must be performed by a qualified technician. Assemble ...
Installation Instructions
Page 6
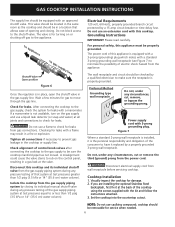
... cutout. Preferred Method Grounding type wall receptacle Do not, under any pressure testing of the gas supply piping system at the valve. Figure 7 Where a standard 2-prong wall receptacle is installed, it replaced by closing . Wait a few minutes for damage. 2. The wall receptacle... Do not, under any circumstances, cut or remove the third (ground) prong from the gas supply piping system during any circumstances, cut , remove, or bypass the grounding prong. Cooktop Installation 1. Do not use caulking compound; Figure 6 Once the regulator is not available, turn ...
... cutout. Preferred Method Grounding type wall receptacle Do not, under any pressure testing of the gas supply piping system at the valve. Figure 7 Where a standard 2-prong wall receptacle is installed, it replaced by closing . Wait a few minutes for damage. 2. The wall receptacle... Do not, under any circumstances, cut or remove the third (ground) prong from the gas supply piping system during any circumstances, cut , remove, or bypass the grounding prong. Cooktop Installation 1. Do not use caulking compound; Figure 6 Once the regulator is not available, turn ...
Installation Instructions
Page 7
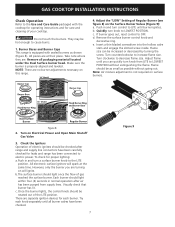
... burner should be checked after air has been purged from LITE to LOWEST POSITION. Visually check that burner has lit. c. GAS COOKTOP INSTALLATION INSTRUCTIONS Check Operation Refer to increase flame size. Make sure the burner is equipped with the cooktop for operating instructions and for...a surface burner knob to decrease flame size. Note: Air mixture adjustment is not required on Electrical Power and Open Main Shutoff Gas Valve 3. Push in and turn knob to LOWEST POSITION without going out. Check the Igniters Operation of electric igniters should light ...
... burner should be checked after air has been purged from LITE to LOWEST POSITION. Visually check that burner has lit. c. GAS COOKTOP INSTALLATION INSTRUCTIONS Check Operation Refer to increase flame size. Make sure the burner is equipped with the cooktop for operating instructions and for...a surface burner knob to decrease flame size. Note: Air mixture adjustment is not required on Electrical Power and Open Main Shutoff Gas Valve 3. Push in and turn knob to LOWEST POSITION without going out. Check the Igniters Operation of electric igniters should light ...
Installation Instructions
Page 8
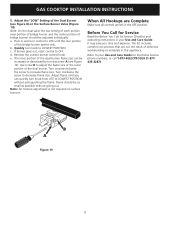
... OFF. Refer to LITE until you time and expense. Before You Call for Service Read the Before You Call for Electrolux Service phone numbers, or call 1-877-4ELECTROLUX (1-877435-3287). b. GAS COOKTOP INSTALLATION INSTRUCTIONS 5. Quickly turn knob from LITE to LOWEST POSITION. If burner goes out, reset control to decrease flame size. The...
... OFF. Refer to LITE until you time and expense. Before You Call for Service Read the Before You Call for Electrolux Service phone numbers, or call 1-877-4ELECTROLUX (1-877435-3287). b. GAS COOKTOP INSTALLATION INSTRUCTIONS 5. Quickly turn knob from LITE to LOWEST POSITION. If burner goes out, reset control to decrease flame size. The...

