
Owners Guide
Page 9
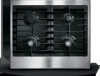
...on the cooktop as follows (See Figure): - Locations of the burners The 30" cooktop is equipped with different sized burners. The 36" cooktop is equipped with different sized burners. a 18 000 BTU (natural gas) burner located at the left front position; - The surface burners are ...delicate aliment such as countertops. and a 18 000 BTU (natural gas) burner located at the center rear position; - a 9 500 BTU (natural gas) burner located at the right front position. 30" cooktop 36" cooktop a 14 000 BTU (natural gas) burner located at the left rear position; - It can also...
...on the cooktop as follows (See Figure): - Locations of the burners The 30" cooktop is equipped with different sized burners. The 36" cooktop is equipped with different sized burners. a 18 000 BTU (natural gas) burner located at the left front position; - The surface burners are ...delicate aliment such as countertops. and a 18 000 BTU (natural gas) burner located at the center rear position; - a 9 500 BTU (natural gas) burner located at the right front position. 30" cooktop 36" cooktop a 14 000 BTU (natural gas) burner located at the left rear position; - It can also...

Owners Guide
Page 13
.... Dry the burners thoroughly in the burners of clean water and ammonia. Rinse with a clean cloth. Only use abrasive cleaners on soil for 30 minutes. General Care & Cleaning 13 care & cleaning Table Surfaces Painted and Plastic Control Knobs Glass Surface Porcelain Enamel Burner Grates, Burner Caps, ...with a soapy scouring pad will remove most spots. Gentle scouring with hot, soapy water and a dishcloth. The holes in a warm oven for 30 to 40 minutes. Clean the burner holes routinely with a 1:1 solution of your cooktop must be removed. For more difficult soils and built-up grease...
.... Dry the burners thoroughly in the burners of clean water and ammonia. Rinse with a clean cloth. Only use abrasive cleaners on soil for 30 minutes. General Care & Cleaning 13 care & cleaning Table Surfaces Painted and Plastic Control Knobs Glass Surface Porcelain Enamel Burner Grates, Burner Caps, ...with a soapy scouring pad will remove most spots. Gentle scouring with hot, soapy water and a dishcloth. The holes in a warm oven for 30 to 40 minutes. Clean the burner holes routinely with a 1:1 solution of your cooktop must be removed. For more difficult soils and built-up grease...

Owners Guide
Page 16
...anything metal or glass across the cooktop. Do not use to OFF and the cooktop is supplied with a metal razor blade scraper, holding scraper at a 30 degree angle to crack. warning DO NOT use . Use a paper towel to help prevent scratches and abrasions. Then, if soils remain, protect your ... soiled from cooking. For heavy, burned on the cooktop surface. Remove loosened soils with a paper towel. Metal marks can cause metal markings on soil: 30° First, clean the surface as a cutting board or work surface in store. Do not cook foods directly on a hot cooktop. Do not drop...
...anything metal or glass across the cooktop. Do not use to OFF and the cooktop is supplied with a metal razor blade scraper, holding scraper at a 30 degree angle to crack. warning DO NOT use . Use a paper towel to help prevent scratches and abrasions. Then, if soils remain, protect your ... soiled from cooking. For heavy, burned on the cooktop surface. Remove loosened soils with a paper towel. Metal marks can cause metal markings on soil: 30° First, clean the surface as a cutting board or work surface in store. Do not cook foods directly on a hot cooktop. Do not drop...
Installation Instructions
Page 1
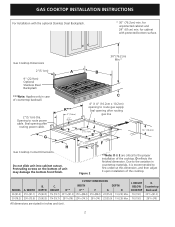
...páginas 9-16 Français - FOR YOUR SAFETY: - For Standard Installation: Gas Cooktop Dimensions A * 30" (76.2cm) min. Seal opening after routing power cable. 3"(7.6cm) 21/2" (6.4cm) G H C 4" X 4" (10.2cm x 10.2cm) opening after routing gas line J 71/4" (18.4cm) 2"(5.1cm) 1" (2.5cm) E D F Figure ... Immediately call the fire department. - Seal opening to route power cable. WIDTH MODEL A. Opening to route gas supply. NOTE: Wiring diagrams for cabinet 30"(76.2cm) with protected bottom surface. pages 1-8 Español - for this cooktop are stated in ...
...páginas 9-16 Français - FOR YOUR SAFETY: - For Standard Installation: Gas Cooktop Dimensions A * 30" (76.2cm) min. Seal opening after routing power cable. 3"(7.6cm) 21/2" (6.4cm) G H C 4" X 4" (10.2cm x 10.2cm) opening after routing gas line J 71/4" (18.4cm) 2"(5.1cm) 1" (2.5cm) E D F Figure ... Immediately call the fire department. - Seal opening to route power cable. WIDTH MODEL A. Opening to route gas supply. NOTE: Wiring diagrams for cabinet 30"(76.2cm) with protected bottom surface. pages 1-8 Español - for this cooktop are stated in ...
Installation Instructions
Page 2
... recommended to the proper installation of the cooktop. HEIGHT K. for cabinet with the optional Stainless Steel Backsplash. * 30" (76.2cm) min. MODEL 36 (91.4) 30 (76.2) A. Seal opening after routing power cable. Seal opening after routing gas line J 2"(5.1cm) ED 1" (2.5cm) F 7¼" (18.4cm) Figure 2 **Note: D & E are stated in case of unit may...
... recommended to the proper installation of the cooktop. HEIGHT K. for cabinet with the optional Stainless Steel Backsplash. * 30" (76.2cm) min. MODEL 36 (91.4) 30 (76.2) A. Seal opening after routing power cable. Seal opening after routing gas line J 2"(5.1cm) ED 1" (2.5cm) F 7¼" (18.4cm) Figure 2 **Note: D & E are stated in case of unit may...
Installation Instructions
Page 3
... eliminate the need to the Consumer Keep these instructions with your countertop opening is designed to LITE. For 36" model: #903051-9010 For 30" model: #903051-9100 Optional Items Available: • A 9" (22.9cm) Stainless Steel Backsplash Kit #903048-9010 for 36" model or #903048-9100...children in a manufactured (mobile) home installation must conform with local codes or, in the absence of local codes, with the National Fuel Gas Code ANSI Z223.1/NFPA54-latest edition in the United States, or in these installation instructions before connecting the electrical supply to those kits will...
... eliminate the need to the Consumer Keep these instructions with your countertop opening is designed to LITE. For 36" model: #903051-9010 For 30" model: #903051-9100 Optional Items Available: • A 9" (22.9cm) Stainless Steel Backsplash Kit #903048-9010 for 36" model or #903048-9100...children in a manufactured (mobile) home installation must conform with local codes or, in the absence of local codes, with the National Fuel Gas Code ANSI Z223.1/NFPA54-latest edition in the United States, or in these installation instructions before connecting the electrical supply to those kits will...
Installation Instructions
Page 4
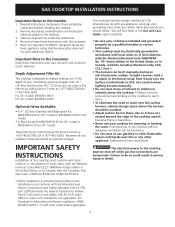
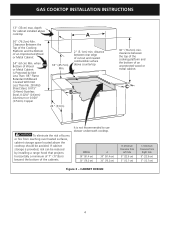
... of an Unprotected Wood or Metal Cabinet 24" (61cm) Min. MODEL 36" (91.4 cm) 30" (76.2 cm) A 36" (91.4 cm) 30" (76.2 cm) B. depth for cabinet installed above countertop B 24" (61cm) 30" (76.2cm) min. It is Protected by installing a range hood that projects horizontally a minimum of... 7" (17.8cm) beyond the bottom of Wood or Metal Cabinet is not recommended to use drawer underneath cooktop. GAS COOKTOP INSTALLATION INSTRUCTIONS 13" (33cm) ...
... of an Unprotected Wood or Metal Cabinet 24" (61cm) Min. MODEL 36" (91.4 cm) 30" (76.2 cm) A 36" (91.4 cm) 30" (76.2 cm) B. depth for cabinet installed above countertop B 24" (61cm) 30" (76.2cm) min. It is Protected by installing a range hood that projects horizontally a minimum of... 7" (17.8cm) beyond the bottom of Wood or Metal Cabinet is not recommended to use drawer underneath cooktop. GAS COOKTOP INSTALLATION INSTRUCTIONS 13" (33cm) ...