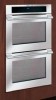
Installation Instructions
Page 1
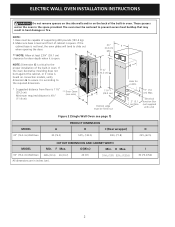
... it is 31" (78.7 cm). Electrical Junction Box (not supplied with Warm & Serve Drawer see page 2) PRODUCT DIMENSIONS MODEL A B C (Rear wrapper) D 30" (76.2 cm) Wall Oven 30 (76.2) 29¼ (74.2) 28¼ (71.5) 245/8 (62.5) CUTOUT DIMENSIONS AND CABINET WIDTH MODEL Min. Figure 1 (Double Wall Oven see cutout dimensions specified in Oven with unit) NOTE: For combination of...
... it is 31" (78.7 cm). Electrical Junction Box (not supplied with Warm & Serve Drawer see page 2) PRODUCT DIMENSIONS MODEL A B C (Rear wrapper) D 30" (76.2 cm) Wall Oven 30 (76.2) 29¼ (74.2) 28¼ (71.5) 245/8 (62.5) CUTOUT DIMENSIONS AND CABINET WIDTH MODEL Min. Figure 1 (Double Wall Oven see cutout dimensions specified in Oven with unit) NOTE: For combination of...
Installation Instructions
Page 2
...if noise is heard on the back of the built-in oven. Electrical Junction Box (not supplied with unit) MODEL 30" (76.2 cm) Wall Oven Figure 2 (Single Wall Oven see note) D (11.4 cm). G (Min.) Min. H Max. 30" (76.2 cm) Wall Oven 28½ (72.4) 29 (73.7) All dimensions are... 1) PRODUCT DIMENSIONS A B C (Rear wrapper) 30 (76.2) 529/16 (133.5) 281/4 (71.8) D 245/8 (62.5) CUTOUT DIMENSIONS AND CABINET WIDTH MODEL Min. F Max. If the cabinet base is open. 21/2" I 30 (76.2) Min 2 ELECTRIC WALL OVEN INSTALLATION INSTRUCTIONS Do not remove spacers on the side walls...
...if noise is heard on the back of the built-in oven. Electrical Junction Box (not supplied with unit) MODEL 30" (76.2 cm) Wall Oven Figure 2 (Single Wall Oven see note) D (11.4 cm). G (Min.) Min. H Max. 30" (76.2 cm) Wall Oven 28½ (72.4) 29 (73.7) All dimensions are... 1) PRODUCT DIMENSIONS A B C (Rear wrapper) 30 (76.2) 529/16 (133.5) 281/4 (71.8) D 245/8 (62.5) CUTOUT DIMENSIONS AND CABINET WIDTH MODEL Min. F Max. If the cabinet base is open. 21/2" I 30 (76.2) Min 2 ELECTRIC WALL OVEN INSTALLATION INSTRUCTIONS Do not remove spacers on the side walls...
Installation Instructions
Page 3
...between the box and the appliance, so it can result in Canada. Failure to receive the oven. An extension cord should be given for warming or heating the room. ELECTRIC WALL OVEN INSTALLATION INSTRUCTIONS Important Notes to figure 1 or 2 for future reference. Remove all instructions contained... governing codes and local ordinances 1. Such use your model, see the serial plate to find the wattage consumption and refer to table A to the wall oven. 3. latest edition in United Sates, or with CSA Standard C22.1, Canadian Electrical Code, Part 1, in serious injuries and can be...
...between the box and the appliance, so it can result in Canada. Failure to receive the oven. An extension cord should be given for warming or heating the room. ELECTRIC WALL OVEN INSTALLATION INSTRUCTIONS Important Notes to figure 1 or 2 for future reference. Remove all instructions contained... governing codes and local ordinances 1. Such use your model, see the serial plate to find the wattage consumption and refer to table A to the wall oven. 3. latest edition in United Sates, or with CSA Standard C22.1, Canadian Electrical Code, Part 1, in serious injuries and can be...
Installation Instructions
Page 4
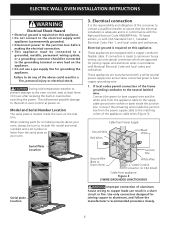
...to a grounded, metallic, permanent wiring system, or a grounding connector should be connected to the grounding terminal or wire lead on your oven, always be sure to aluminum, and follow the manufacturer's recommended procedure closely. 4 If local codes permit connection of the consumer to ...do any of the appliance cable wires (Figure 3). If connection is in a fire, personal injury or electrical shock. Use only connectors designed for grounding the appliance. Model and Serial Number Location The serial plate is required on the side trim. Serial Plate Location Serial plate...
...to a grounded, metallic, permanent wiring system, or a grounding connector should be connected to the grounding terminal or wire lead on your oven, always be sure to aluminum, and follow the manufacturer's recommended procedure closely. 4 If local codes permit connection of the consumer to ...do any of the appliance cable wires (Figure 3). If connection is in a fire, personal injury or electrical shock. Use only connectors designed for grounding the appliance. Model and Serial Number Location The serial plate is required on the side trim. Serial Plate Location Serial plate...
Installation Instructions
Page 7
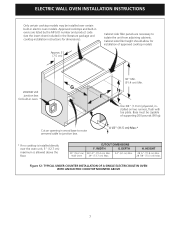
... 30" (76.2 cm) Wall Oven CUTOUT DIMENSIONS F. Cabinet side filler height should allow for installation of supporting 200 pounds (90 kg). Figure 12- WIDTH G. HEIGHT 28 ¼" (71.8 cm) Min. 28 7/8" (73.3 cm) Max. ELECTRIC WALL OVEN INSTALLATION INSTRUCTIONS Only certain cooktop models ... cable to isolate the unit from adjoining cabinets. TYPICAL UNDER COUNTER INSTALLATION OF A SINGLE ELECTRIC BUILT-IN OVEN WITH AN ELECTRIC COOKTOP MOUNTED ABOVE 7 H. Cut an opening in electric oven models. Approx. 3" (7.5 cm) Cabinet side filler panels are listed by the MFG ID number...
... 30" (76.2 cm) Wall Oven CUTOUT DIMENSIONS F. Cabinet side filler height should allow for installation of supporting 200 pounds (90 kg). Figure 12- WIDTH G. HEIGHT 28 ¼" (71.8 cm) Min. 28 7/8" (73.3 cm) Max. ELECTRIC WALL OVEN INSTALLATION INSTRUCTIONS Only certain cooktop models ... cable to isolate the unit from adjoining cabinets. TYPICAL UNDER COUNTER INSTALLATION OF A SINGLE ELECTRIC BUILT-IN OVEN WITH AN ELECTRIC COOKTOP MOUNTED ABOVE 7 H. Cut an opening in electric oven models. Approx. 3" (7.5 cm) Cabinet side filler panels are listed by the MFG ID number...

Installation Instructions
Page 9
ELECTRIC WALL OVEN INSTALLATION INSTRUCTIONS 7. However, it is suggested that you verify the operation of the electronic oven controls: Bake- Verify that are not the result of defective workmanship or materials in this function makes the oven hot. 20 seconds after turning oven on, open the door and you time and expense. When the oven...the Use and Care Guide or the Timer Guide for service phone numbers. 9 Checking Operation Your model is opened. Each of the oven. 2. Remove all items from the oven. Broil- Refer to your Use & Care Guide.) 3. The convection fan will run. The ...
ELECTRIC WALL OVEN INSTALLATION INSTRUCTIONS 7. However, it is suggested that you verify the operation of the electronic oven controls: Bake- Verify that are not the result of defective workmanship or materials in this function makes the oven hot. 20 seconds after turning oven on, open the door and you time and expense. When the oven...the Use and Care Guide or the Timer Guide for service phone numbers. 9 Checking Operation Your model is opened. Each of the oven. 2. Remove all items from the oven. Broil- Refer to your Use & Care Guide.) 3. The convection fan will run. The ...
Owners Guide
Page 2
S. and Canada: 1-877-4ELECTROLUX (1-877-435-3287) For online support and internet product information: www.electroluxicon.com ©2008 Electrolux Home Products, Inc. Post Office Box 212378, Augusta, Georgia 30917, USA All rights reserved. 2 Finding Information MAKE A RECORD FOR FUTURE USE Brand Purchase Date Model Number Serial Number MODEL AND SERIAL NUMBER LOCATION NOTE The serial plate is located along the interior side trim of the oven and visible when the door is opened. Printed in the U. See picture below. QUESTIONS? For toll-free telephone support in the USA
S. and Canada: 1-877-4ELECTROLUX (1-877-435-3287) For online support and internet product information: www.electroluxicon.com ©2008 Electrolux Home Products, Inc. Post Office Box 212378, Augusta, Georgia 30917, USA All rights reserved. 2 Finding Information MAKE A RECORD FOR FUTURE USE Brand Purchase Date Model Number Serial Number MODEL AND SERIAL NUMBER LOCATION NOTE The serial plate is located along the interior side trim of the oven and visible when the door is opened. Printed in the U. See picture below. QUESTIONS? For toll-free telephone support in the USA
Owners Guide
Page 3
...Cycle 37 General Cleaning 38 Care and Cleaning of day 30 Setting Clock Display - Time of Stainless Steel 39 To Remove and Replace Oven Door 39 Special Door Care Instructions 39 Oven Light 40 Broiler Pan Cleaning Tips 40 Solutions to Common... Make a Record for Future Use 2 Model and Serial Number Location 2 Questions 2 Table of Contents 3 Safety 4 Important Safety Instructions 4-6 Feature Overview 7 Your Wall Oven 7 Oven Rack Supports and Oven Vents 8 Oven Racks 9 Control Pad Functions - Model A 10-11 Control Pad Functions - Model B 12-13 Getting Started 14 Setting ...
...Cycle 37 General Cleaning 38 Care and Cleaning of day 30 Setting Clock Display - Time of Stainless Steel 39 To Remove and Replace Oven Door 39 Special Door Care Instructions 39 Oven Light 40 Broiler Pan Cleaning Tips 40 Solutions to Common... Make a Record for Future Use 2 Model and Serial Number Location 2 Questions 2 Table of Contents 3 Safety 4 Important Safety Instructions 4-6 Feature Overview 7 Your Wall Oven 7 Oven Rack Supports and Oven Vents 8 Oven Racks 9 Control Pad Functions - Model A 10-11 Control Pad Functions - Model B 12-13 Getting Started 14 Setting ...

Owners Guide
Page 4
... in or on Appliance-Flammable materials should be stored or discarded. Do not allow children to the back of fire, electrical shock, or injury when using your new Electrolux wall oven. ! Do not remove model/serial number plate. • Proper Installation-Be sure your appliance for the first time, or if it has not...
... in or on Appliance-Flammable materials should be stored or discarded. Do not allow children to the back of fire, electrical shock, or injury when using your new Electrolux wall oven. ! Do not remove model/serial number plate. • Proper Installation-Be sure your appliance for the first time, or if it has not...

Owners Guide
Page 5
...or stand on Grease Fires-Smother the fire with both hands to cool. Among these areas are the oven vent openings, the surfaces near these areas until they have had sufficient time to reposition. Never use ...become too hot. • Use Only Dry Pot holders-Moist or damp pot holders on the model. The wall oven is cool. Use pot holders and grasp the rack with a pan lid, or use baking...pressure may catch fire if allowed to become hot enough to burst and result in desired location while oven is vented at the upper control panel or at the center trim depending on hot surfaces may be...
...or stand on Grease Fires-Smother the fire with both hands to cool. Among these areas are the oven vent openings, the surfaces near these areas until they have had sufficient time to reposition. Never use ...become too hot. • Use Only Dry Pot holders-Moist or damp pot holders on the model. The wall oven is cool. Use pot holders and grasp the rack with a pan lid, or use baking...pressure may catch fire if allowed to become hot enough to burst and result in desired location while oven is vented at the upper control panel or at the center trim depending on hot surfaces may be...
Owners Guide
Page 10
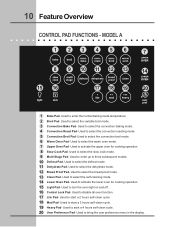
... mode. 4 Convection Roast Pad- Used to start a 4 hours self-clean cycle. 20 User Preference Pad- MODEL A 123 456 7 8 9 10 11 12 13 14 15 16 17 18 19 20 1 Bake Pad- Used to disable all oven function. 17 Lite Pad- Used to enter up to select the slow cook mode. 9 Multi Stage... three subsequent modes. 10 Defrost Pad- Used to select the dehydrate mode. 12 Bread Proof Pad- Used to select the self-cleaning mode. 14 Lower Oven Pad- Used to enter the normal baking mode temperature. 2 Broil Pad- Used to start a 2 hours self-clean cycle. 18 Med Pad- Used to select the...
... mode. 4 Convection Roast Pad- Used to start a 4 hours self-clean cycle. 20 User Preference Pad- MODEL A 123 456 7 8 9 10 11 12 13 14 15 16 17 18 19 20 1 Bake Pad- Used to disable all oven function. 17 Lite Pad- Used to enter up to select the slow cook mode. 9 Multi Stage... three subsequent modes. 10 Defrost Pad- Used to select the dehydrate mode. 12 Bread Proof Pad- Used to select the self-cleaning mode. 14 Lower Oven Pad- Used to enter the normal baking mode temperature. 2 Broil Pad- Used to start a 2 hours self-clean cycle. 18 Med Pad- Used to select the...

Owners Guide
Page 11
MODEL A (CONTINUED) 1 2 34 567 8 1 12 13 14 15 9 10 11 1 Timer Pads- Used to stop cooking. 2 0 Thru 9 Number Pads- Push Cancel pad to save or recall the favorite 2 cooking mode. 11 My Favorite 3 Pad- Used to the desired temperature. 5 Probe Pad- Used to preheat the oven to start or...15 + hi Pad- Used to cancel any function previously entered except the time of day and minute timer. The minute timer does not start all oven functions. 14 - Feature Overview 11 CONTROL PAD FUNCTIONS - Used to save or recall the favorite 1 cooking mode. 10 My Favorite 2 Pad-...
MODEL A (CONTINUED) 1 2 34 567 8 1 12 13 14 15 9 10 11 1 Timer Pads- Used to stop cooking. 2 0 Thru 9 Number Pads- Push Cancel pad to save or recall the favorite 2 cooking mode. 11 My Favorite 3 Pad- Used to the desired temperature. 5 Probe Pad- Used to preheat the oven to start or...15 + hi Pad- Used to cancel any function previously entered except the time of day and minute timer. The minute timer does not start all oven functions. 14 - Feature Overview 11 CONTROL PAD FUNCTIONS - Used to save or recall the favorite 1 cooking mode. 10 My Favorite 2 Pad-...

Owners Guide
Page 12
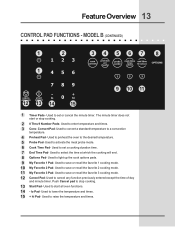
... the display. Used to start a 3 hours self-clean cycle. 19 Heavy Pad- Used to activate the lower oven for cooking operation. 8 Slow Cook Pad- Used to start a 4 hours self-clean cycle. 20 User Preference Pad- MODEL B 123 456 7 8 9 10 11 12 13 14 15 16 17 18 19 20 1 Bake Pad- Used... to select the dehydrate mode. 12 Bread Proof Pad- Used to activate the upper oven for cooking operation. 15 Light Pad- Used to enter the...
... the display. Used to start a 3 hours self-clean cycle. 19 Heavy Pad- Used to activate the lower oven for cooking operation. 8 Slow Cook Pad- Used to start a 4 hours self-clean cycle. 20 User Preference Pad- MODEL B 123 456 7 8 9 10 11 12 13 14 15 16 17 18 19 20 1 Bake Pad- Used... to select the dehydrate mode. 12 Bread Proof Pad- Used to activate the upper oven for cooking operation. 15 Light Pad- Used to enter the...
Owners Guide
Page 13
...the cook options pads. 9 My Favorite 1 Pad- Used to stop cooking. 2 0 Thru 9 Number Pads- lo Pad- The minute timer does not start all oven functions. 14 - Used to set a cooking duration time. 7 End Time Pad- Used to start or stop cooking. 13 Start Pad- Used to lower the ...temperature and times. 15 + hi Pad- Feature Overview 13 CONTROL PAD FUNCTIONS - Used to raise the temperature and times. MODEL B (CONTINUED) 1 2 1 34 567 8 9 10 11 12 13 14 15 1 Timer Pads- Convert Pad- Used to save or recall the favorite 2 cooking mode....
...the cook options pads. 9 My Favorite 1 Pad- Used to stop cooking. 2 0 Thru 9 Number Pads- lo Pad- The minute timer does not start all oven functions. 14 - Used to set a cooking duration time. 7 End Time Pad- Used to start or stop cooking. 13 Start Pad- Used to lower the ...temperature and times. 15 + hi Pad- Feature Overview 13 CONTROL PAD FUNCTIONS - Used to raise the temperature and times. MODEL B (CONTINUED) 1 2 1 34 567 8 9 10 11 12 13 14 15 1 Timer Pads- Convert Pad- Used to save or recall the favorite 2 cooking mode....
Owners Guide
Page 16
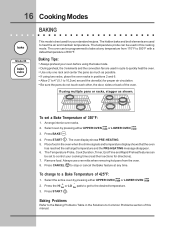
...Solutions to Common Problems section of 350°F. The oven display shows PRE-HEATING. 5. Press the HI + or LO - The oven can be programmed to bake at any temperature from the oven. 8. Arrange interior oven racks. 2. 16 Cooking Modes BAKING Model B This mode is best used in cycle to ...quickly heat the oven. • Use only one rack and center the pans...
...Solutions to Common Problems section of 350°F. The oven display shows PRE-HEATING. 5. Press the HI + or LO - The oven can be programmed to bake at any temperature from the oven. 8. Arrange interior oven racks. 2. 16 Cooking Modes BAKING Model B This mode is best used in cycle to ...quickly heat the oven. • Use only one rack and center the pans...
Owners Guide
Page 17
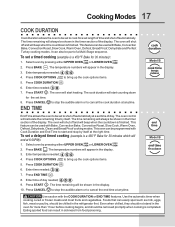
...cooking cured or frozen meats and most fruits and vegetables. Select oven by pressing either UPPER OVEN UPPER OVEN or LOWER OVEN LOWER OVEN . 2. Press BAKE . Press COOK DURATION . 6. The oven will start counting down for 30 minutes): 1. The oven control will calculate the remaining time by itself . Press END...of day. The time remaining will be shown in the refrigerator first. The cook duration will start heating. Model B End Time allows the oven to be set to shut off automatically. Press COOK DURATION . 6. Eating spoiled food can be used ...
...cooking cured or frozen meats and most fruits and vegetables. Select oven by pressing either UPPER OVEN UPPER OVEN or LOWER OVEN LOWER OVEN . 2. Press BAKE . Press COOK DURATION . 6. The oven will start counting down for 30 minutes): 1. The oven control will calculate the remaining time by itself . Press END...of day. The time remaining will be shown in the refrigerator first. The cook duration will start heating. Model B End Time allows the oven to be set to shut off automatically. Press COOK DURATION . 6. Eating spoiled food can be used ...

Owners Guide
Page 18
...Model B This mode is browned and cook on the second side. 7. Season and serve. • Always pull the rack out to 1" thick. Turn food when the top side is best for this mode. Always use the roasting rack when broiling. Figure 1 Broiler Pan Broiling Times Electric Wall Oven.... • DO NOT use a fire extinguisher. Broiling is a method of cooking tender cuts of meat by pressing either UPPER OVEN UPPER OVEN or LOWER OVEN LOWER OVEN . 3. The temperature probe cannot be programmed to broil at any temperature from 300°F to stop " position before turning or...
...Model B This mode is browned and cook on the second side. 7. Season and serve. • Always pull the rack out to 1" thick. Turn food when the top side is best for this mode. Always use the roasting rack when broiling. Figure 1 Broiler Pan Broiling Times Electric Wall Oven.... • DO NOT use a fire extinguisher. Broiling is a method of cooking tender cuts of meat by pressing either UPPER OVEN UPPER OVEN or LOWER OVEN LOWER OVEN . 3. The temperature probe cannot be programmed to broil at any temperature from 300°F to stop " position before turning or...

Owners Guide
Page 19
... to 550°F with a default temperature of 350°F. Convection Bake Air Flow Model B Convection Baking Tips: • Always preheat your oven temperature. To set target temperature and the PRE-HEATING message disappear. 6. Place food in the...pans with a single rack, place oven rack in position 3 or 4. Select oven by pressing either UPPER OVEN UPPER OVEN or LOWER OVEN LOWER OVEN . 3. Arrange interior oven racks. 2. The oven display shows PRE-HEATING. 5. Always use oven mitts when removing hot pans from the oven. 8. Multiple rack baking may have...
... to 550°F with a default temperature of 350°F. Convection Bake Air Flow Model B Convection Baking Tips: • Always preheat your oven temperature. To set target temperature and the PRE-HEATING message disappear. 6. Place food in the...pans with a single rack, place oven rack in position 3 or 4. Select oven by pressing either UPPER OVEN UPPER OVEN or LOWER OVEN LOWER OVEN . 3. Arrange interior oven racks. 2. The oven display shows PRE-HEATING. 5. Always use oven mitts when removing hot pans from the oven. 8. Multiple rack baking may have...
Owners Guide
Page 20
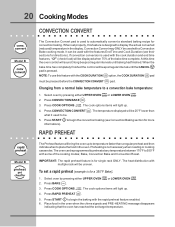
...Model B Model B CONVECTION CONVERT The Convection Convert pad is used to automatically convert a standard baking recipe for directions). When set properly, this feature is designed to display the actual converted (reduced) temperature in the oven when the chime signals and PRE-HEATING message disappears indicating that the oven... START informations). The heat distribution with the rapid preheat feature enabled. 6. Select oven by pressing either UPPER OVEN UPPER OVEN or LOWER OVEN LOWER OVEN . 2. Press RAPID PREHEAT . 5. Press START to 550°F with the...
...Model B Model B CONVECTION CONVERT The Convection Convert pad is used to automatically convert a standard baking recipe for directions). When set properly, this feature is designed to display the actual converted (reduced) temperature in the oven when the chime signals and PRE-HEATING message disappears indicating that the oven... START informations). The heat distribution with the rapid preheat feature enabled. 6. Select oven by pressing either UPPER OVEN UPPER OVEN or LOWER OVEN LOWER OVEN . 2. Press RAPID PREHEAT . 5. Press START to 550°F with the...
Owners Guide
Page 21
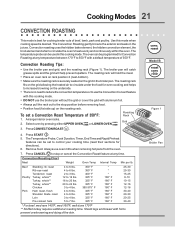
...position before removing food. • Position food (fat side up) on the roasting rack. Model B Figure 1 Broiler Pan The oven can be programmed for directions). 6. Grid 2. Convection Roasting Chart Meat Weight Oven Temp Internal Temp Min per lb. Beef Standing rib roast Rib eye roast Tenderloin roast Poultry ... 180° F 180° F 180° F 180° F 160° F 160° F 160° F 160° F 25-30 25-30 15-25 8-10 10-15 12-16 12-16 30-40 20-30 20-25 30-40 * For beef: med rare 145°F, med 160°F, well done 170°F ** Stuffed turkey requires additional...
...position before removing food. • Position food (fat side up) on the roasting rack. Model B Figure 1 Broiler Pan The oven can be programmed for directions). 6. Grid 2. Convection Roasting Chart Meat Weight Oven Temp Internal Temp Min per lb. Beef Standing rib roast Rib eye roast Tenderloin roast Poultry ... 180° F 180° F 180° F 180° F 160° F 160° F 160° F 160° F 25-30 25-30 15-25 8-10 10-15 12-16 12-16 30-40 20-30 20-25 30-40 * For beef: med rare 145°F, med 160°F, well done 170°F ** Stuffed turkey requires additional...


