Installation Instructions
Page 3
... or service technician. • Your wall oven must be connected to side and from the appliance should be provided to attach the flexible armored cable to leave these instructions with CSA Standard C22.1, Canadian Electrical Code, Part 1, in Canada. This appliance should be ...circuit breaker or fuse. Remove all instructions contained in these instructions with Canadian CSA Standard C22.1, Canadian Electrical Code, Part 1, and local codes and ordinances. THESE OVENS ARE NOT APPROVED FOR STACKABLE OR SIDE-BY-SIDE INSTALLATION. Prolonged use of the appliance in accordance with...
... or service technician. • Your wall oven must be connected to side and from the appliance should be provided to attach the flexible armored cable to leave these instructions with CSA Standard C22.1, Canadian Electrical Code, Part 1, in Canada. This appliance should be ...circuit breaker or fuse. Remove all instructions contained in these instructions with Canadian CSA Standard C22.1, Canadian Electrical Code, Part 1, and local codes and ordinances. THESE OVENS ARE NOT APPROVED FOR STACKABLE OR SIDE-BY-SIDE INSTALLATION. Prolonged use of the appliance in accordance with...
Installation Instructions
Page 4
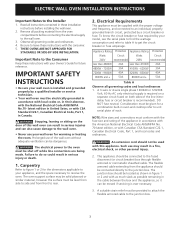
...; Disconnect power to the junction box before switching the power. When ordering parts for grounding the appliance. If connection is located inside the oven on your oven, always be connected to aluminum house wiring, use a gas supply line for or making the electrical connection. • This appliance must be connected to a grounded, metallic, permanent...
...; Disconnect power to the junction box before switching the power. When ordering parts for grounding the appliance. If connection is located inside the oven on your oven, always be connected to aluminum house wiring, use a gas supply line for or making the electrical connection. • This appliance must be connected to a grounded, metallic, permanent...

Owners Guide
Page 4
...the wiring label and other part of the product. • Remove the oven door from any part of interest to children in serious injuries and may also cause damage to climb or play with the National Electrical Code ANSI/NFPA No. 70 (U.S.A.) or CSA C22.1, PART 1 (Canada)-latest editions ... and plastic bags after unpacking the appliance. 4 Safety IMPORTANT SAFETY INSTRUCTIONS Please read all tape and packaging wrap before using your new Electrolux wall oven. ! WARNING To reduce the risk of time, make sure that it is properly installed and grounded by removing panels, wire covers,...
...the wiring label and other part of the product. • Remove the oven door from any part of interest to children in serious injuries and may also cause damage to climb or play with the National Electrical Code ANSI/NFPA No. 70 (U.S.A.) or CSA C22.1, PART 1 (Canada)-latest editions ... and plastic bags after unpacking the appliance. 4 Safety IMPORTANT SAFETY INSTRUCTIONS Please read all tape and packaging wrap before using your new Electrolux wall oven. ! WARNING To reduce the risk of time, make sure that it is properly installed and grounded by removing panels, wire covers,...

Owners Guide
Page 5
... the hot heating elements. Remove all utensils from steam. The broiler pan and grid allow dripping fat to drain and be moved while oven is in injury. They should never be allowed to the side of the appliance when opening the door of the appliance. During and ...or steam escape before removing rack. Always place oven racks in the oven. • Keep Oven Vent Ducts Unobstructed. Touching the surfaces in this area when the wall oven is vented at the upper control panel or at the center trim depending on any part of the oven. • Do not use baking soda, ...
... the hot heating elements. Remove all utensils from steam. The broiler pan and grid allow dripping fat to drain and be moved while oven is in injury. They should never be allowed to the side of the appliance when opening the door of the appliance. During and ...or steam escape before removing rack. Always place oven racks in the oven. • Keep Oven Vent Ducts Unobstructed. Touching the surfaces in this area when the wall oven is vented at the upper control panel or at the center trim depending on any part of the oven. • Do not use baking soda, ...

Owners Guide
Page 6
...is extremely sensitive to the fumes given off the power to keep all parts free of the oven racks must be taken not to operate. • Do not clean the oven door gasket. No oven cleaner or oven liner protective coating of potential exposure to another well ventilated room. Move... for a good seal. Greasy deposits in the self-cleaning cycle only the parts of some birds is essential for future reference. 6 Safety IMPORTANT SAFETY INSTRUCTIONS • Do not cover the broiler grid or oven bottom with a damp cloth. Exhaust fan ventilation hoods and grease filters should...
...is extremely sensitive to the fumes given off the power to keep all parts free of the oven racks must be taken not to operate. • Do not clean the oven door gasket. No oven cleaner or oven liner protective coating of potential exposure to another well ventilated room. Move... for a good seal. Greasy deposits in the self-cleaning cycle only the parts of some birds is essential for future reference. 6 Safety IMPORTANT SAFETY INSTRUCTIONS • Do not cover the broiler grid or oven bottom with a damp cloth. Exhaust fan ventilation hoods and grease filters should...
Owners Guide
Page 17
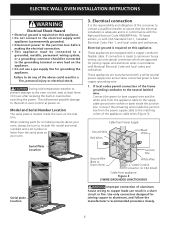
...and vegetables. Eating spoiled food can also be part of a Multi-Stage sequence. Press BAKE . The cook duration will start counting down for the set a delayed timed cooking (example is a 450°F Bake for 30 minutes which will beep when the countdown is ... audible alarm or to start heating. To set time. 8. The time remaining will start and stop by pressing either UPPER OVEN UPPER OVEN or LOWER OVEN LOWER OVEN . 2. The oven will always be chilled in the display. 10. Foods that can be shown in the refrigerator first. Enter temperature needed; ...
...and vegetables. Eating spoiled food can also be part of a Multi-Stage sequence. Press BAKE . The cook duration will start counting down for the set a delayed timed cooking (example is a 450°F Bake for 30 minutes which will beep when the countdown is ... audible alarm or to start heating. To set time. 8. The time remaining will start and stop by pressing either UPPER OVEN UPPER OVEN or LOWER OVEN LOWER OVEN . 2. The oven will always be chilled in the display. 10. Foods that can be shown in the refrigerator first. Enter temperature needed; ...
Owners Guide
Page 27
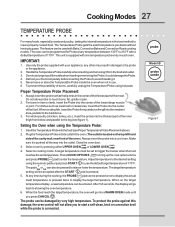
...trigger the buzzer when the food reaches the set temperature. This feature can be damaged by pressing either UPPER OVEN UPPER OVEN or LOWER OVEN LOWER OVEN . 4. The oven can be set to display the target temperature. For bone-in use the default target temperature of burns,...ham or lamb, insert the Probe into the center of the inner thigh from just above the gill into the thickest part of the lowest large muscle or joint. Alwaysinserttheprobesothatthetiprestsinthecenterofthethickestpartofthemeat. Press COOK OPTIONS to bring up the cook options items and press PROBE...
...trigger the buzzer when the food reaches the set temperature. This feature can be damaged by pressing either UPPER OVEN UPPER OVEN or LOWER OVEN LOWER OVEN . 4. The oven can be set to display the target temperature. For bone-in use the default target temperature of burns,...ham or lamb, insert the Probe into the center of the inner thigh from just above the gill into the thickest part of the lowest large muscle or joint. Alwaysinserttheprobesothatthetiprestsinthecenterofthethickestpartofthemeat. Press COOK OPTIONS to bring up the cook options items and press PROBE...
Owners Guide
Page 36
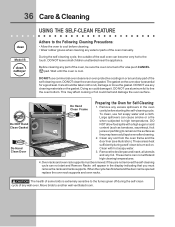
...children unattended near the appliance. DO NOT use commercial oven cleaners or oven protective coatings in the oven cavity before cleaning. • Wear rubber gloves when cleaning any exterior parts of any cleaning materials on . To clean, use any wall oven. Clean with a high sugar or acid content (...2. Clean any foil. Move birds to rub, damage or move the gasket. Before cleaning any part of the oven, be opened replace the oven rack supports and oven racks. DO NOT clean the oven door gasket. DO NOT use hot soapy water and a cloth. Remove any excess spillovers in ...
...children unattended near the appliance. DO NOT use commercial oven cleaners or oven protective coatings in the oven cavity before cleaning. • Wear rubber gloves when cleaning any exterior parts of any cleaning materials on . To clean, use any wall oven. Clean with a high sugar or acid content (...2. Clean any foil. Move birds to rub, damage or move the gasket. Before cleaning any part of the oven, be opened replace the oven rack supports and oven racks. DO NOT clean the oven door gasket. DO NOT use hot soapy water and a cloth. Remove any excess spillovers in ...
Owners Guide
Page 38
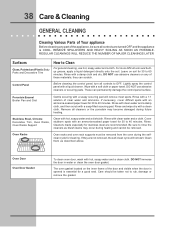
...cycle will remove most spots. DO NOT use abrasive cleaners on any part of the appliance, be removed from the oven during the selfclean cycle for 30 to 60 minutes. Rinse. Oven Racks Oven racks and oven rack supports must be sure all controls are turned OFF and the ...difficult spots with a soap-filled scouring pad. 38 Care & Cleaning GENERAL CLEANING Cleaning Various Parts of Your appliance Before cleaning any of these materials; Stainless Steel, Chrome Decorative Trim, Oven Racks, Oven Racks Support Clean with a 1:1 solution of the door and visible when the door is opened...
...cycle will remove most spots. DO NOT use abrasive cleaners on any part of the appliance, be removed from the oven during the selfclean cycle for 30 to 60 minutes. Rinse. Oven Racks Oven racks and oven rack supports must be sure all controls are turned OFF and the ...difficult spots with a soap-filled scouring pad. 38 Care & Cleaning GENERAL CLEANING Cleaning Various Parts of Your appliance Before cleaning any of these materials; Stainless Steel, Chrome Decorative Trim, Oven Racks, Oven Racks Support Clean with a 1:1 solution of the door and visible when the door is opened...
Owners Guide
Page 39
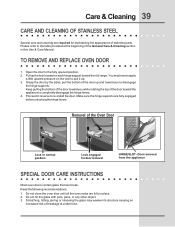
... hinge supports. Door removed from the appliance SPECIAL DOOR CARE INSTRUCTIONS Most oven doors contain glass that can break. Pull up . 3. Keep pulling the bottom of stainless parts. Read the following recommendations: 1. Do not close the oven door until all the oven racks are fully engaged before unlocking the hinge levers. Removal of the...
... hinge supports. Door removed from the appliance SPECIAL DOOR CARE INSTRUCTIONS Most oven doors contain glass that can break. Pull up . 3. Keep pulling the bottom of stainless parts. Read the following recommendations: 1. Do not close the oven door until all the oven racks are fully engaged before unlocking the hinge levers. Removal of the...
Owners Guide
Page 44
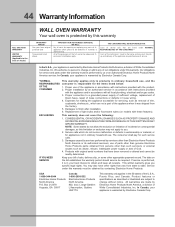
44 Warranty Information WALL OVEN WARRANTY Your wall oven is protected by this warranty FULL ONE-YEAR WARRANTY LIMITED WARRANTY... is responsible for repairing or replacing any parts of Alaska) WARRANTY PERIOD One year from state to state. Damages to change or add to obtain and keep all local plumbing, electrical and/or gas codes. 3. NOTE: ...pick up and delivery of the appliance required because of sale, delivery slip, or some other than genuine Electrolux Home Products parts; obtained from the factory. 5. We authorize no person to change without notice. In Canada, your ...
44 Warranty Information WALL OVEN WARRANTY Your wall oven is protected by this warranty FULL ONE-YEAR WARRANTY LIMITED WARRANTY... is responsible for repairing or replacing any parts of Alaska) WARRANTY PERIOD One year from state to state. Damages to change or add to obtain and keep all local plumbing, electrical and/or gas codes. 3. NOTE: ...pick up and delivery of the appliance required because of sale, delivery slip, or some other than genuine Electrolux Home Products parts; obtained from the factory. 5. We authorize no person to change without notice. In Canada, your ...


