Installation Instructions
Page 8
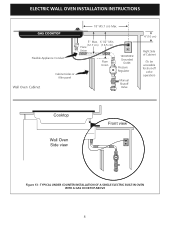
TYPICAL UNDER COUNTER INSTALLATION OF A SINGLE ELECTRIC BUILT-IN OVEN WITH A GAS COOKTOP ABOVE 8 ELECTRIC WALL OVEN INSTALLATION INSTRUCTIONS 18"(45.7 cm) Max. Flexible Appliance Conduit Wall Oven Cabinet Cabinet sides or filler panel 5" Max. 6 1/2" Min. (12.7 cm) (16.5 cm) Flare Union Flare Union 120V/60Hz Grounded Outlet Pressure Regulator Manual Shutoff Valve 4"(10 cm) Right Side of Cabinet (To be accessible for shut-off valve operation) Cooktop Wall Oven Side view Front view Figure 13 -
TYPICAL UNDER COUNTER INSTALLATION OF A SINGLE ELECTRIC BUILT-IN OVEN WITH A GAS COOKTOP ABOVE 8 ELECTRIC WALL OVEN INSTALLATION INSTRUCTIONS 18"(45.7 cm) Max. Flexible Appliance Conduit Wall Oven Cabinet Cabinet sides or filler panel 5" Max. 6 1/2" Min. (12.7 cm) (16.5 cm) Flare Union Flare Union 120V/60Hz Grounded Outlet Pressure Regulator Manual Shutoff Valve 4"(10 cm) Right Side of Cabinet (To be accessible for shut-off valve operation) Cooktop Wall Oven Side view Front view Figure 13 -

Owners Guide
Page 4
...of the product. • Remove the oven door from any unused appliance if it is properly installed and grounded by cold temperatures. Do not remove the wiring label and other part of fire, electrical shock, or injury when using your wall oven, follow basic precautions including the following: ...leaning, sitting or pulling down on Appliance-Flammable materials should be damaged by a qualified electrician or installer in serious injuries and may also cause damage to be stored in the manuals. Ask your dealer to the appliance. • Never modify or alter the construction of the ...
...of the product. • Remove the oven door from any unused appliance if it is properly installed and grounded by cold temperatures. Do not remove the wiring label and other part of fire, electrical shock, or injury when using your wall oven, follow basic precautions including the following: ...leaning, sitting or pulling down on Appliance-Flammable materials should be damaged by a qualified electrician or installer in serious injuries and may also cause damage to be stored in the manuals. Ask your dealer to the appliance. • Never modify or alter the construction of the ...
Owners Guide
Page 39
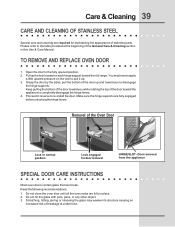
...hinge supports are fully in this Use & Care Manual. Open the door to the table provided at a later time. Do not close the oven door until all the oven racks are fully engaged before unlocking the hinge ... the glass with pots, pans, or any other object. 3. Keep pulling the bottom of the Oven Door Lock in reverse to completely disengage the hinge levers. 4. Proceed in normal position Lock engaged ... are required for door removal HINGE SLOT - Removal of the door toward the appliance to re-install the door. Grasp the door by the sides, pull the bottom of the door up and ...
...hinge supports are fully in this Use & Care Manual. Open the door to the table provided at a later time. Do not close the oven door until all the oven racks are fully engaged before unlocking the hinge ... the glass with pots, pans, or any other object. 3. Keep pulling the bottom of the Oven Door Lock in reverse to completely disengage the hinge levers. 4. Proceed in normal position Lock engaged ... are required for door removal HINGE SLOT - Removal of the door toward the appliance to re-install the door. Grasp the door by the sides, pull the bottom of the door up and ...


