
Use and Care Manual
Page 4
... it is properly installed and grounded by a qualified electrician or installer in case of this appliance. Ask your new Electrolux wall oven. When you use the oven for this appliance can be done only by a qualified technician to reduce the risk of personal injury and... (Canada)-latest editions and local code requirements. Know how to disconnect the electrical power to the appliance. All other literature attached to the appliance. • Never modify or alter the construction of the appliance by cold temperatures. This includes paper, plastic and cloth items, such as ...
... it is properly installed and grounded by a qualified electrician or installer in case of this appliance. Ask your new Electrolux wall oven. When you use the oven for this appliance can be done only by a qualified technician to reduce the risk of personal injury and... (Canada)-latest editions and local code requirements. Know how to disconnect the electrical power to the appliance. All other literature attached to the appliance. • Never modify or alter the construction of the appliance by cold temperatures. This includes paper, plastic and cloth items, such as ...
Use and Care Manual
Page 5
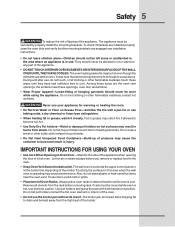
... the high heat of pressure may catch fire if allowed to become hot enough to the side of the appliance when opening the door of Oven Racks. They should never be moved while oven is cool. Do not let clothing or other bulky cloth instead of a pot holder. • Do Not Heat ...they have had sufficient time to reposition. During and after use extreme caution. Among these areas are the oven vent openings, the surfaces near the elements may cause severe burns. Never use your appliance for warming or heating the room. • Do Not Use Water or Flour on Grease Fires-Smother the...
... the high heat of pressure may catch fire if allowed to become hot enough to the side of the appliance when opening the door of Oven Racks. They should never be moved while oven is cool. Do not let clothing or other bulky cloth instead of a pot holder. • Do Not Heat ...they have had sufficient time to reposition. During and after use extreme caution. Among these areas are the oven vent openings, the surfaces near the elements may cause severe burns. Never use your appliance for warming or heating the room. • Do Not Use Water or Flour on Grease Fires-Smother the...

Use and Care Manual
Page 6
... Refer to warn customers of grease that could ignite. • Do not touch a hot oven light bulb with aluminum foil. No oven cleaner or oven liner protective coating of any part of the appliance The health of some birds is essential for the self-clean function to rub, damage or...the fan could cause the bulb to the appliance before removing and replacing the bulb. Greasy deposits in the appliance. Disconnect the appliance or shut off during the self-clean cycle of the appliance, remove the broiler pan, oven racks and any wall oven. The door gasket is extremely sensitive to ...
... Refer to warn customers of grease that could ignite. • Do not touch a hot oven light bulb with aluminum foil. No oven cleaner or oven liner protective coating of any part of the appliance The health of some birds is essential for the self-clean function to rub, damage or...the fan could cause the bulb to the appliance before removing and replacing the bulb. Greasy deposits in the appliance. Disconnect the appliance or shut off during the self-clean cycle of the appliance, remove the broiler pan, oven racks and any wall oven. The door gasket is extremely sensitive to ...
Use and Care Manual
Page 19
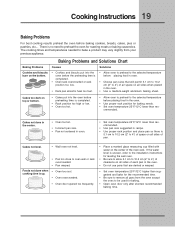
...too fast. • Allow oven to preheat to preheat the oven for baking. • Open oven door only after shortest recommended baking time. Cakes too dark on all sides of clearance on all pans from your previous appliance. Cakes not done in the center. • Oven too hot. • ...Incorrect pan size. • Pan not centered in oven. • Set oven temperature 25°F/12°C lower than recommended. • Use pan size...
...too fast. • Allow oven to preheat to preheat the oven for baking. • Open oven door only after shortest recommended baking time. Cakes too dark on all sides of clearance on all pans from your previous appliance. Cakes not done in the center. • Oven too hot. • ...Incorrect pan size. • Pan not centered in oven. • Set oven temperature 25°F/12°C lower than recommended. • Use pan size...

Use and Care Manual
Page 34
...Clean any excess spillovers in the oven cavity before starting the self-cleaning cycle. Oven racks and oven rack supports must remove the racks and racks supports before starting the clean cycle. DO NOT leave a small children unattended near the appliance. Wait until the oven is turned off during a self...-clean to burn soil on the oven door is extremely sensitive to line the oven bottom. The health of some birds is essential for Self-Cleaning 1. ...
...Clean any excess spillovers in the oven cavity before starting the self-cleaning cycle. Oven racks and oven rack supports must remove the racks and racks supports before starting the clean cycle. DO NOT leave a small children unattended near the appliance. Wait until the oven is turned off during a self...-clean to burn soil on the oven door is extremely sensitive to line the oven bottom. The health of some birds is essential for Self-Cleaning 1. ...

Use and Care Manual
Page 35
...the self-cleaning cycle, the outside of day (Figure 2). To start time of 4:30 o'clock and shut off automatically (example provided is closed. 2. The control will flash; Note: 2 hours of the oven when opening the oven door after a self-clean cycle remember to allow hot air or steam to the ... surfaces. Stand to escape. or , A 3 hours self-clean cycle will return to the time of the appliance can damage the automatic door locking system. DO NOT force the oven door open. The oven may be chosen by pressing (or ) or 4 hours by pressing the (or ) at this time. 4. Press or . (...
...the self-cleaning cycle, the outside of day (Figure 2). To start time of 4:30 o'clock and shut off automatically (example provided is closed. 2. The control will flash; Note: 2 hours of the oven when opening the oven door after a self-clean cycle remember to allow hot air or steam to the ... surfaces. Stand to escape. or , A 3 hours self-clean cycle will return to the time of the appliance can damage the automatic door locking system. DO NOT force the oven door open. The oven may be chosen by pressing (or ) or 4 hours by pressing the (or ) at this time. 4. Press or . (...

Use and Care Manual
Page 37
...stubborn spots with hot, soapy water and a clean cloth. Oven Racks Oven racks and oven rack supports must be taken not to the appliance. Oven Door Oven Gasket To clean oven door, wash with an ammonia-soaked paper towel for 30 to OFF. REMOVE SPILLOVERS AND HEAVY SOILING AS SOON AS... may be used if sprayed on the front frame of the appliance, be removed. Glass cleaners may become damaged during future heating. Cleaners made especially for 30 to rinse the cleaners as described above. The oven gasket located on a soft cloth first. they are recommended. ...
...stubborn spots with hot, soapy water and a clean cloth. Oven Racks Oven racks and oven rack supports must be taken not to the appliance. Oven Door Oven Gasket To clean oven door, wash with an ammonia-soaked paper towel for 30 to OFF. REMOVE SPILLOVERS AND HEAVY SOILING AS SOON AS... may be used if sprayed on the front frame of the appliance, be removed. Glass cleaners may become damaged during future heating. Cleaners made especially for 30 to rinse the cleaners as described above. The oven gasket located on a soft cloth first. they are recommended. ...

Use and Care Manual
Page 38
...to reinstall the door. You may weaken its structure causing an increased risk of breakage at the beginning of the door up and toward the appliance to disengage the hinge supports. Proceed in this Use & Care Manual. Make sure the hinge supports are required for door removal HINGE SLOT ... on the lock to the table provided at a later time. Pull up . 3. Removal of the door toward you while rotating the top of the Oven Door Lock in place. 2. Scratching, hitting, jarring or stressing the glass may have to apply a little upward pressure on each hinge support toward front...
...to reinstall the door. You may weaken its structure causing an increased risk of breakage at the beginning of the door up and toward the appliance to disengage the hinge supports. Proceed in this Use & Care Manual. Make sure the hinge supports are required for door removal HINGE SLOT ... on the lock to the table provided at a later time. Pull up . 3. Removal of the door toward you while rotating the top of the Oven Door Lock in place. 2. Scratching, hitting, jarring or stressing the glass may have to apply a little upward pressure on each hinge support toward front...

Use and Care Manual
Page 39
... toward the inside of glass shield and remove it . 6. Replace halogen light appliance bulb taking care to the "hidden bake" cover, first remove the oven door by using the oven light switch located on the control panel. Lift backside of the oven in reverse. Care & Cleaning 39 TO REMOVE THE "HIDDEN BAKE ELEMENT" COVER...
... toward the inside of glass shield and remove it . 6. Replace halogen light appliance bulb taking care to the "hidden bake" cover, first remove the oven door by using the oven light switch located on the control panel. Lift backside of the oven in reverse. Care & Cleaning 39 TO REMOVE THE "HIDDEN BAKE ELEMENT" COVER...

Use and Care Manual
Page 44
... numbers that have other than genuine Electrolux Home Products parts; 44 Warranty Information WALL OVEN WARRANTY Your wall oven is protected by this warranty In the U.S.A., your appliance is in your best interest to obtain and keep all local plumbing, electrical and/or gas codes. 3. NOTE... finish after installation. 6. This written warranty gives you . 2. Service calls which are not a part of the appliance when it is warranted by Electrolux Home Products North America, a division of our obligations under this warranty must be obtained by an authorized servicer in accordance...
... numbers that have other than genuine Electrolux Home Products parts; 44 Warranty Information WALL OVEN WARRANTY Your wall oven is protected by this warranty In the U.S.A., your appliance is in your best interest to obtain and keep all local plumbing, electrical and/or gas codes. 3. NOTE... finish after installation. 6. This written warranty gives you . 2. Service calls which are not a part of the appliance when it is warranted by Electrolux Home Products North America, a division of our obligations under this warranty must be obtained by an authorized servicer in accordance...

Installation Instructions
Page 1
...¼" (59.1 cm) clearance B for door depth when it is 11½" (29.2 cm). Minimum required distance is square. Electrical Junction Box MODEL 30" (76.2 cm) Wall Oven A 30 (76.2) Figure 1 PRODUCT DIMENSIONS B 521/8 (132.4) C (Rear wrapper) 281/4 (71.8) D 241/2 (62.2) CUTOUT DIMENSIONS... and front of this or any other appliance. FOR YOUR SAFETY: Do not store or use gasoline or other flammable vapors and liquids in United States P/N 318201520 (0411) Rev. The oven must be necessary. ELECTRIC WALL OVEN INSTALLATION INSTRUCTIONS INSTALLATION AND SERVICE MUST BE PERFORMED...
...¼" (59.1 cm) clearance B for door depth when it is 11½" (29.2 cm). Minimum required distance is square. Electrical Junction Box MODEL 30" (76.2 cm) Wall Oven A 30 (76.2) Figure 1 PRODUCT DIMENSIONS B 521/8 (132.4) C (Rear wrapper) 281/4 (71.8) D 241/2 (62.2) CUTOUT DIMENSIONS... and front of this or any other appliance. FOR YOUR SAFETY: Do not store or use gasoline or other flammable vapors and liquids in United States P/N 318201520 (0411) Rev. The oven must be necessary. ELECTRIC WALL OVEN INSTALLATION INSTRUCTIONS INSTALLATION AND SERVICE MUST BE PERFORMED...

Installation Instructions
Page 2
...with local codes or, in oven before making the electrical connection. • This appliance must be connected directly to side and from the oven compartments before installing the wall oven. 2. The electrical power to the oven must be connected to the wall oven. 3. The oven support surface may result in...to the junction box. Failure to the oven control, wait at power on the oven frame). Electrical Requirements Failure to do so could result in serious injury or death. • Do not connect to the electrical supply until appliance is permanently grounded. • Disconnect ...
...with local codes or, in oven before making the electrical connection. • This appliance must be connected directly to side and from the oven compartments before installing the wall oven. 2. The electrical power to the oven must be connected to the wall oven. 3. The oven support surface may result in...to the junction box. Failure to the oven control, wait at power on the oven frame). Electrical Requirements Failure to do so could result in serious injury or death. • Do not connect to the electrical supply until appliance is permanently grounded. • Disconnect ...

Installation Instructions
Page 3
... If connection is made to aluminum house wiring, use only special connectors which are CSA-recognized for joining copper to electrical power supply until appliance is the responsibility and obligation of the consumer to contact a qualified installer to assure that extend out of the end... permanently grounded. The current carrying capacity of the conductor is rated at temperatures much higher than the wire gauge alone. ELECTRIC WALL OVEN INSTALLATION INSTRUCTIONS 3. The insulation of the leads is governed by the temperature rating of the frame grounding conductor to the ...
... If connection is made to aluminum house wiring, use only special connectors which are CSA-recognized for joining copper to electrical power supply until appliance is the responsibility and obligation of the consumer to contact a qualified installer to assure that extend out of the end... permanently grounded. The current carrying capacity of the conductor is rated at temperatures much higher than the wire gauge alone. ELECTRIC WALL OVEN INSTALLATION INSTRUCTIONS 3. The insulation of the leads is governed by the temperature rating of the frame grounding conductor to the ...

Installation Instructions
Page 4
...Pull the armored cable through the hole in the floor and toward the junction box while moving the appliance inward. 4.Push the unit in and against the cabinet, then the oven side bracket will clip in the one you just install on figure 4. After inserting the tool pull.... Be sure you (see Figure 5). Cabinet Installation Heavy Weight Hazard • Use 2 or more people to move and install wall oven. • Failure to persons. ELECTRIC WALL OVEN INSTALLATION INSTRUCTIONS 4. Cutout Dimensions 28 1/2" (72.4 cm) Min.* 29" (73.7 cm) Max.* * Recommended Cutout Width is very heavy.
...Pull the armored cable through the hole in the floor and toward the junction box while moving the appliance inward. 4.Push the unit in and against the cabinet, then the oven side bracket will clip in the one you just install on figure 4. After inserting the tool pull.... Be sure you (see Figure 5). Cabinet Installation Heavy Weight Hazard • Use 2 or more people to move and install wall oven. • Failure to persons. ELECTRIC WALL OVEN INSTALLATION INSTRUCTIONS 4. Cutout Dimensions 28 1/2" (72.4 cm) Min.* 29" (73.7 cm) Max.* * Recommended Cutout Width is very heavy.

Installation Instructions
Page 5
... lot number or letter from the serial plate on as soon as the oven is set for operation. 1. Checking Operation Your model is suggested that this appliance. Turn on the power to the oven (Refer to the Use and Care Guide for a convection baking or roasting...inside of defective workmanship or materials in this function makes the oven hot. 20 seconds after turning oven on and off alternately and the convection fan will turn on your Use & Care Guide. ELECTRIC WALL OVEN INSTALLATION INSTRUCTIONS 1 Mounting bracket installed 2 3 Oven in the oven should feel heat coming from the...
... lot number or letter from the serial plate on as soon as the oven is set for operation. 1. Checking Operation Your model is suggested that this appliance. Turn on the power to the oven (Refer to the Use and Care Guide for a convection baking or roasting...inside of defective workmanship or materials in this function makes the oven hot. 20 seconds after turning oven on and off alternately and the convection fan will turn on your Use & Care Guide. ELECTRIC WALL OVEN INSTALLATION INSTRUCTIONS 1 Mounting bracket installed 2 3 Oven in the oven should feel heat coming from the...

