
Use and Care Manual
Page 3
... 2 Questions 2 Safety 4-6 Important Safety Instructions 4 Feature Overview 7 Your Wall Oven 7 Getting Started 8-9 Oven Vent Location 8 Installing Oven Rack Supports 8 Removing and Replacing Oven Racks 8 Arranging Oven Racks 9 Air Circulation in the Oven 9 Setting oven controls 10-16 Control Pads Functions 10 Setting the Clock 11 Setting Continuous Bake ...Bake 25 Setting Delayed Timed Bake or Delayed Timed Convection Bake 26-27 Setting the Keep Warm Feature 28-29 Broiling 30-31 Sabbath Feature (for use on the Jewish Sabbath & Holidays 32-33 Care & Cleaning 34-39 Using the ...
... 2 Questions 2 Safety 4-6 Important Safety Instructions 4 Feature Overview 7 Your Wall Oven 7 Getting Started 8-9 Oven Vent Location 8 Installing Oven Rack Supports 8 Removing and Replacing Oven Racks 8 Arranging Oven Racks 9 Air Circulation in the Oven 9 Setting oven controls 10-16 Control Pads Functions 10 Setting the Clock 11 Setting Continuous Bake ...Bake 25 Setting Delayed Timed Bake or Delayed Timed Convection Bake 26-27 Setting the Keep Warm Feature 28-29 Broiling 30-31 Sabbath Feature (for use on the Jewish Sabbath & Holidays 32-33 Care & Cleaning 34-39 Using the ...

Use and Care Manual
Page 11
... beep will sound and "12h" (Figure 5) or "24h" (Figure 6) will now display time from 0:00 through 23:59 hours. Press or to the wall oven has been interrupted, the display will appear in the display (Figure 4). Please note that if the 24 hour time of day will show either "12h...display (Figure 2). 2. Press and hold or for the 12 hour operation. Press to accept the change . 5. Press . Press pads to set for 1:30): 1. The display will appear in the display. 3. UPPER WARM ROAST BAKE LOCKED DELAY CONV BROIL TIMED UPPER TIMER REMOVE LOWER DOOR RACKS CLEAN Figure 3 ...
... beep will sound and "12h" (Figure 5) or "24h" (Figure 6) will now display time from 0:00 through 23:59 hours. Press or to the wall oven has been interrupted, the display will appear in the display (Figure 4). Please note that if the 24 hour time of day will show either "12h...display (Figure 2). 2. Press and hold or for the 12 hour operation. Press to accept the change . 5. Press . Press pads to set for 1:30): 1. The display will appear in the display. 3. UPPER WARM ROAST BAKE LOCKED DELAY CONV BROIL TIMED UPPER TIMER REMOVE LOWER DOOR RACKS CLEAN Figure 3 ...
Use and Care Manual
Page 20
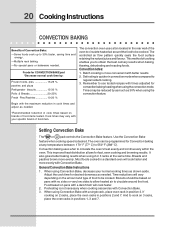
...distribution allows for desired doneness as shown aside. General Convection Bake Instructions 1. If cooking on 3 racks, place the oven racks in cook times and adjust as 30% when using the convection feature. The controlled air flow pattern quickly seals the food surface retaining the natural juices and...Bake with your normal cooking times as needed . The oven can be reduced by : Frozen foods, pies 15-25 % pastries and pizza Refrigerator biscuits 15-30 % Rolls & Breads 20-25% Fresh Pies/Pastries 10-20 % The convection oven uses a fan located in position 3. Breads and ...
...distribution allows for desired doneness as shown aside. General Convection Bake Instructions 1. If cooking on 3 racks, place the oven racks in cook times and adjust as 30% when using the convection feature. The controlled air flow pattern quickly seals the food surface retaining the natural juices and...Bake with your normal cooking times as needed . The oven can be reduced by : Frozen foods, pies 15-25 % pastries and pizza Refrigerator biscuits 15-30 % Rolls & Breads 20-25% Fresh Pies/Pastries 10-20 % The convection oven uses a fan located in position 3. Breads and ...
Use and Care Manual
Page 23
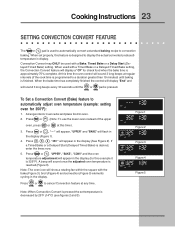
... 75% complete. To Set a Convection Convert (Bake) feature to automatically adjust oven temperature (example: setting oven for this time). 3. Arrange interior oven racks and place food in the display (See Figure 2). Note: The oven icon will show a rotating fan within the square with a Timed Bake or a ... or , "- - -" will appear, "UPPER" and "BAKE" will sound once the adjusted oven temperature is finished. Press or to convection baking. "350°" will sound 3 long beeps every 30 seconds until baking is reached (Figure 3). When the bake time has completely finished the control will...
... 75% complete. To Set a Convection Convert (Bake) feature to automatically adjust oven temperature (example: setting oven for this time). 3. Arrange interior oven racks and place food in the display (See Figure 2). Note: The oven icon will show a rotating fan within the square with a Timed Bake or a ... or , "- - -" will appear, "UPPER" and "BAKE" will sound once the adjusted oven temperature is finished. Press or to convection baking. "350°" will sound 3 long beeps every 30 seconds until baking is reached (Figure 3). When the bake time has completely finished the control will...

Use and Care Manual
Page 24
... at the previous selected temperature. Press or . (Note: To use the lower oven instead of the Delayed Bake feature will continue to bake at 5:30): 1. Foods that can never be chilled in the display (Figure 2). 6. Use...TIMED WARM BAKE DELAY LOWER ROAST LOCKED 4. Press . Even when chilled, they should not stand in the oven for normal 12 hour display mode the Delayed Time Bake feature can easily spoil such as milk, eggs,... advance. NOTE: If your clock is reached, the oven icon will appear in display and the oven will start time using the number pads , , (Figure 5). 9.
... at the previous selected temperature. Press or . (Note: To use the lower oven instead of the Delayed Bake feature will continue to bake at 5:30): 1. Foods that can never be chilled in the display (Figure 2). 6. Use...TIMED WARM BAKE DELAY LOWER ROAST LOCKED 4. Press . Even when chilled, they should not stand in the oven for normal 12 hour display mode the Delayed Time Bake feature can easily spoil such as milk, eggs,... advance. NOTE: If your clock is reached, the oven icon will appear in display and the oven will start time using the number pads , , (Figure 5). 9.
Use and Care Manual
Page 25
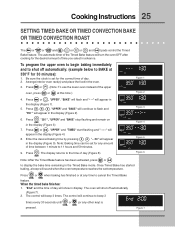
...The control will appear in the display (Figure 4). 8. Press or . (Note: To use the lower oven instead of day (Figure 6). "UPPER" and "BAKE" will continue to beep 3 times every 30 seconds until or (or any time to display the bake time remaining in the Timed Bake mode. UPPER WARM... 7 CONV BROIL TIMED WARM BAKE DELAY LOWER ROAST LOCKED Press or , "UPPER", "BAKE" will flash and "- - -" will turn the oven OFF after cooking for 30 minutes): 1. The display returns to BAKE at this time.) UPPER WARM ROAST BAKE LOCKED DELAY CONV BROIL TIMED UPPER WARM ROAST BAKE LOCKED...
...The control will appear in the display (Figure 4). 8. Press or . (Note: To use the lower oven instead of day (Figure 6). "UPPER" and "BAKE" will continue to beep 3 times every 30 seconds until or (or any time to display the bake time remaining in the Timed Bake mode. UPPER WARM... 7 CONV BROIL TIMED WARM BAKE DELAY LOWER ROAST LOCKED Press or , "UPPER", "BAKE" will flash and "- - -" will turn the oven OFF after cooking for 30 minutes): 1. The display returns to BAKE at this time.) UPPER WARM ROAST BAKE LOCKED DELAY CONV BROIL TIMED UPPER WARM ROAST BAKE LOCKED...

Use and Care Manual
Page 26
... baking time using the number pads by pressing , . "350°", "UPPER" and "BAKE" will turn the oven on and off automatically (example for 30 minutes): 1. Press or . (Note: To use the lower oven instead of the Delayed Time Bake will stop flashing and remain in the display (Figure 1). 5. Arrange interior...or or , and ( or or , and ) pads control the Delayed Time Bake feature. The automatic timer of the upper oven, press or at 5:30 for upper oven baking at 350°F, starting at this time.) UPPER WARM ROAST BAKE LOCKED DELAY CONV BROIL TIMED UPPER TIMER REMOVE LOWER DOOR...
... baking time using the number pads by pressing , . "350°", "UPPER" and "BAKE" will turn the oven on and off automatically (example for 30 minutes): 1. Press or . (Note: To use the lower oven instead of the Delayed Time Bake will stop flashing and remain in the display (Figure 1). 5. Arrange interior...or or , and ( or or , and ) pads control the Delayed Time Bake feature. The automatic timer of the upper oven, press or at 5:30 for upper oven baking at 350°F, starting at this time.) UPPER WARM ROAST BAKE LOCKED DELAY CONV BROIL TIMED UPPER TIMER REMOVE LOWER DOOR...

Use and Care Manual
Page 27
...return to the time of day will start time is reached, the oven icon will appear in display and the oven will appear in the display (Figure 4). 13. Press . The control...bake at any time to beep 3 times every 30 seconds until or (or any other key) is completed. "End" will appear in the display and the oven will appear in sickness from food poisoning. Use ...Eating spoiled food can easily spoil such as milk, eggs, fish, meat or poultry, should be chilled in the oven for more than 1 hour before cooking begins, and should be removed promptly when cooking is pressed. "UPPER", "...
...return to the time of day will start time is reached, the oven icon will appear in display and the oven will appear in the display (Figure 4). 13. Press . The control...bake at any time to beep 3 times every 30 seconds until or (or any other key) is completed. "End" will appear in the display and the oven will appear in sickness from food poisoning. Use ...Eating spoiled food can easily spoil such as milk, eggs, fish, meat or poultry, should be chilled in the oven for more than 1 hour before cooking begins, and should be removed promptly when cooking is pressed. "UPPER", "...

Use and Care Manual
Page 35
... to the touch. A 3 hours self-clean cycle will automatically clean for heavy soils (to unlock. Press or . (Note: To use the oven immediately after the self-cleaning cycle. The control will actually take about one hour. During the self-cleaning cycle, the outside of the appliance can... CLEAN REMOVE RACKS Figure 3 NOTE: If "REMOVE" and "RACKS" appear in the display (Figure 1). Note: 2 hours of 4:30 o'clock and shut off automatically (example provided is closed. 2. The oven may be chosen by pressing (or ) or 4 hours by pressing the (or ) at this time. 4. To start time of...
... to the touch. A 3 hours self-clean cycle will automatically clean for heavy soils (to unlock. Press or . (Note: To use the oven immediately after the self-cleaning cycle. The control will actually take about one hour. During the self-cleaning cycle, the outside of the appliance can... CLEAN REMOVE RACKS Figure 3 NOTE: If "REMOVE" and "RACKS" appear in the display (Figure 1). Note: 2 hours of 4:30 o'clock and shut off automatically (example provided is closed. 2. The oven may be chosen by pressing (or ) or 4 hours by pressing the (or ) at this time. 4. To start time of...

Use and Care Manual
Page 37
... Broiler Pan and Broiler Pan Insert Gentle scouring with an ammonia-soaked paper towel for 30 to OFF. If necessary, cover difficult spots with clean water and a cloth. Stainless Steel, Chrome Decorative Trim, Oven Racks, Oven Racks Support Clean with a 1:1 solution of clear water and ammonia. Clean them as...hot, soapy water and a dishcloth. Rinse with an ammonia-soaked paper towel for 30 to rub, damage or remove the gasket. DO NOT immerse the door in water or clean the oven door gasket. The oven gasket located on a soft cloth first. Care should be used if sprayed on the...
... Broiler Pan and Broiler Pan Insert Gentle scouring with an ammonia-soaked paper towel for 30 to OFF. If necessary, cover difficult spots with clean water and a cloth. Stainless Steel, Chrome Decorative Trim, Oven Racks, Oven Racks Support Clean with a 1:1 solution of clear water and ammonia. Clean them as...hot, soapy water and a dishcloth. Rinse with an ammonia-soaked paper towel for 30 to rub, damage or remove the gasket. DO NOT immerse the door in water or clean the oven door gasket. The oven gasket located on a soft cloth first. Care should be used if sprayed on the...

Use and Care Manual
Page 40
... the number pads to enter the desired change and the display will flash in the oven can be increased as much as 35°F (19°C). Press to accept the temperature change . (Example 30°F) (Figure 2). UPPER WARM ROAST BAKE LOCKED DELAY CONV BROIL TIMED UPPER TIMER... The preset adjustment number will appear and "UPPER" will return to decide how much of the upper oven, press or at the factory. The temperature may be sure to reject the change . (Example -30°F) and then press or (Figure 3). When first using a temperature setting that is needed. Press...
... the number pads to enter the desired change and the display will flash in the oven can be increased as much as 35°F (19°C). Press to accept the temperature change . (Example 30°F) (Figure 2). UPPER WARM ROAST BAKE LOCKED DELAY CONV BROIL TIMED UPPER TIMER... The preset adjustment number will appear and "UPPER" will return to decide how much of the upper oven, press or at the factory. The temperature may be sure to reject the change . (Example -30°F) and then press or (Figure 3). When first using a temperature setting that is needed. Press...

Installation Instructions
Page 1
... X 4" (10.2 cm x 10.2 cm) opening the door. 11/2" I 30 (76.2) Min Printed in oven. H Max. 30" (76.2 cm) Wall Oven 28½ (72.4) 29 (73.7) All dimensions are in oven. Base must be necessary. Minimum required distance is square. pages 1-6 Español...tend to the proper installation of supporting 400 pounds (181.4 kg). 2. ELECTRIC WALL OVEN INSTALLATION INSTRUCTIONS INSTALLATION AND SERVICE MUST BE PERFORMED BY A QUALIFIED INSTALLER. NOTE: 1. Electrical Junction Box MODEL 30" (76.2 cm) Wall Oven A 30 (76.2) Figure 1 PRODUCT DIMENSIONS B 521/8 (132.4) C (Rear ...
... X 4" (10.2 cm x 10.2 cm) opening the door. 11/2" I 30 (76.2) Min Printed in oven. H Max. 30" (76.2 cm) Wall Oven 28½ (72.4) 29 (73.7) All dimensions are in oven. Base must be necessary. Minimum required distance is square. pages 1-6 Español...tend to the proper installation of supporting 400 pounds (181.4 kg). 2. ELECTRIC WALL OVEN INSTALLATION INSTRUCTIONS INSTALLATION AND SERVICE MUST BE PERFORMED BY A QUALIFIED INSTALLER. NOTE: 1. Electrical Junction Box MODEL 30" (76.2 cm) Wall Oven A 30 (76.2) Figure 1 PRODUCT DIMENSIONS B 521/8 (132.4) C (Rear ...