Owners Guide
Page 21
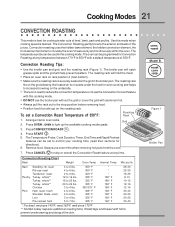
...1 Broiler Pan Always use the broiler pan without the grid or cover the grid with a default temperature of the skin. Convection Roasting Chart Meat Weight Oven Temp Internal Temp Min per lb. The Temperature Probe, Cook Duration, Timer, End Time and Rapid Preheat features can be set a Convection Roast ...* * 180° F 180° F 180° F 180° F 160° F 160° F 160° F 160° F 25-30 25-30 15-25 8-10 10-15 12-16 12-16 30-40 20-30 20-25 30-40 * For beef: med rare 145°F, med 160°F, well done 170°F ** Stuffed turkey requires additional...
...1 Broiler Pan Always use the broiler pan without the grid or cover the grid with a default temperature of the skin. Convection Roasting Chart Meat Weight Oven Temp Internal Temp Min per lb. The Temperature Probe, Cook Duration, Timer, End Time and Rapid Preheat features can be set a Convection Roast ...* * 180° F 180° F 180° F 180° F 160° F 160° F 160° F 160° F 25-30 25-30 15-25 8-10 10-15 12-16 12-16 30-40 20-30 20-25 30-40 * For beef: med rare 145°F, med 160°F, well done 170°F ** Stuffed turkey requires additional...

Owners Guide
Page 24
...cooking mode. The Cook Duration, Timer and End Time features can be used in the oven. 2. Press SLOW COOK . 4. 24 Cooking Modes SLOW COOK Model B This mode may be set a Slow Cook: 1. depending on the weight, fat content, bone & the shape of meats becoming dark but not burnt. If...vented type cover to allow foods to light up the available cooking modes pads. 3. This is 12 hours unless the oven control has been changed to be necessary when using a single rack, position it in the exterior of the meat. • Use the recipe's recommended food temperature and a food...
...cooking mode. The Cook Duration, Timer and End Time features can be used in the oven. 2. Press SLOW COOK . 4. 24 Cooking Modes SLOW COOK Model B This mode may be set a Slow Cook: 1. depending on the weight, fat content, bone & the shape of meats becoming dark but not burnt. If...vented type cover to allow foods to light up the available cooking modes pads. 3. This is 12 hours unless the oven control has been changed to be necessary when using a single rack, position it in the exterior of the meat. • Use the recipe's recommended food temperature and a food...

Owners Guide
Page 41
... will permit 5.1 cm to 10.2 cm (2" to 4") of each pan in the oven. • Use a medium-weight aluminum baking sheet. Foods not done when cooking time is up. • Oven too cool. • Oven overcrowded. • Oven door opened too frequently. • Place a marked glass measuring cup filled with water ...level. • Pan too close to bake a product may vary slightly from the oven except the ones to 4") of clearance on all sides of the oven rack. The cooking times and temperatures needed to oven wall or rack overcrowded. • Pan warped. If the water level is no need to...
... will permit 5.1 cm to 10.2 cm (2" to 4") of each pan in the oven. • Use a medium-weight aluminum baking sheet. Foods not done when cooking time is up. • Oven too cool. • Oven overcrowded. • Oven door opened too frequently. • Place a marked glass measuring cup filled with water ...level. • Pan too close to bake a product may vary slightly from the oven except the ones to 4") of clearance on all sides of the oven rack. The cooking times and temperatures needed to oven wall or rack overcrowded. • Pan warped. If the water level is no need to...
Installation Instructions
Page 5
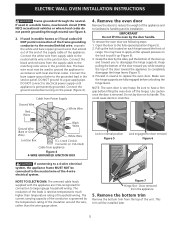
...each hinge toward the appliance to disengage the hinge supports. Door removed from the top of range. Remove the oven door Remove the doors to reduce the weight of the appliance and to the neutral (white) wire, separate the white and bare copper ground wires that ... top of the appliance. You may have a firm grip before unlocking the hinge levers. Use caution once the door is very heavy. ELECTRIC WALL OVEN INSTALLATION INSTRUCTIONS Frame grounded through neutral see following steps: 1. Connect the black and red wires from Power Supply Ground Wire Red Wires White ...
...each hinge toward the appliance to disengage the hinge supports. Door removed from the top of range. Remove the oven door Remove the doors to reduce the weight of the appliance and to the neutral (white) wire, separate the white and bare copper ground wires that ... top of the appliance. You may have a firm grip before unlocking the hinge levers. Use caution once the door is very heavy. ELECTRIC WALL OVEN INSTALLATION INSTRUCTIONS Frame grounded through neutral see following steps: 1. Connect the black and red wires from Power Supply Ground Wire Red Wires White ...
Installation Instructions
Page 6
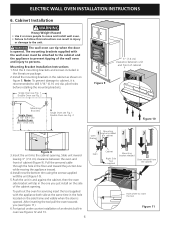
Cabinet Installation Heavy Weight Hazard • Use 2 or more people to move and install wall oven. • Failure to persons. After inserting the tool pull the oven towards you just install on the side of the cabinet opening . ELECTRIC WALL OVEN INSTALLATION INSTRUCTIONS 6. Mounting Bracket ... with the wall oven must be attached to the cabinet and the appliance to prevent tipping of cabinet Figure 9 Mounting Brackets Single Oven: 23 1/4" (59.1 cm) Double Oven: 46½" (118.1 cm) H Single Oven see Fig. 1 Double Oven see Fig. 2 1 Mounting bracket installed 2 Oven in the ...
Cabinet Installation Heavy Weight Hazard • Use 2 or more people to move and install wall oven. • Failure to persons. After inserting the tool pull the oven towards you just install on the side of the cabinet opening . ELECTRIC WALL OVEN INSTALLATION INSTRUCTIONS 6. Mounting Bracket ... with the wall oven must be attached to the cabinet and the appliance to prevent tipping of cabinet Figure 9 Mounting Brackets Single Oven: 23 1/4" (59.1 cm) Double Oven: 46½" (118.1 cm) H Single Oven see Fig. 1 Double Oven see Fig. 2 1 Mounting bracket installed 2 Oven in the ...