
Owners Guide
Page 4
...remove the wiring label and other part of the product. • Remove the oven door from any unused appliance if it to the power supply. • User Servicing-Do not repair or replace any part of the wall oven. Stepping, leaning, sitting or ...electrical power to recommend a qualified technician and an authorized repair service. Do not store explosives, such as flammable liquids. Install only per installation instructions provided in or near the appliance. 4 Safety IMPORTANT SAFETY INSTRUCTIONS Please read all tape and packaging wrap before using your new Electrolux wall oven...
...remove the wiring label and other part of the product. • Remove the oven door from any unused appliance if it to the power supply. • User Servicing-Do not repair or replace any part of the wall oven. Stepping, leaning, sitting or ...electrical power to recommend a qualified technician and an authorized repair service. Do not store explosives, such as flammable liquids. Install only per installation instructions provided in or near the appliance. 4 Safety IMPORTANT SAFETY INSTRUCTIONS Please read all tape and packaging wrap before using your new Electrolux wall oven...
Owners Guide
Page 5
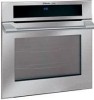
...or grease may result in this area when the wall oven is vented at the upper control panel or at the center trim depending on any part of the appliance. • DO NOT TOUCH INTERIOR OVEN ELEMENTS OR INTERIOR SURFACES OF THE WALL OVEN UNTIL THEY HAVE COOLED. These items could melt or... ignite. • Placement of the oven. • Do not use . See installation instructions. &#...
...or grease may result in this area when the wall oven is vented at the upper control panel or at the center trim depending on any part of the appliance. • DO NOT TOUCH INTERIOR OVEN ELEMENTS OR INTERIOR SURFACES OF THE WALL OVEN UNTIL THEY HAVE COOLED. These items could melt or... ignite. • Placement of the oven. • Do not use . See installation instructions. &#...

Owners Guide
Page 6
... the appliance listed in this Owner's Guide. Care should be used in the appliance. No oven cleaner or oven liner protective coating of any utensils stored in or around any part of the appliance The health of any wall oven. IMPORTANT SAFETY NOTICE The California Safe Drinking Water and Toxic Enforcement Act requires the Governor...
... the appliance listed in this Owner's Guide. Care should be used in the appliance. No oven cleaner or oven liner protective coating of any utensils stored in or around any part of the appliance The health of any wall oven. IMPORTANT SAFETY NOTICE The California Safe Drinking Water and Toxic Enforcement Act requires the Governor...

Owners Guide
Page 17
...time remaining will blink in the timer section of time and shut off and will beep when the countdown is finished. This oven can also be part of the display. Enter temperature needed ; 3 0 . 7. Even when chilled, they should not stand in the display.... 3. This feature can be used with the COOK DURATION or END TIME features. Press END TIME . 8. Cooking Modes 17 COOK DURATION Cook Duration allows the oven to be set to cook for 30 minutes): 1. The oven...
...time remaining will blink in the timer section of time and shut off and will beep when the countdown is finished. This oven can also be part of the display. Enter temperature needed ; 3 0 . 7. Even when chilled, they should not stand in the display.... 3. This feature can be used with the COOK DURATION or END TIME features. Press END TIME . 8. Cooking Modes 17 COOK DURATION Cook Duration allows the oven to be set to cook for 30 minutes): 1. The oven...

Owners Guide
Page 27
...or convection broil while the probe is pushed all the way into the thickest part of the meat. Do not allow you to the backbone. 3. PlugtheTemperatureProbeintoitsoutletintheoven.(Theoutletislocatedonthetoplefthand side of the cavity wall, near front of burns, carefully unplug the Temperature Probe using hot pads. Always...the Probe from the food and outlet. 3. For whole poultry (chicken, turkey, etc.), insert the probe into the outlet. Press OVEN OVEN to light up the cook options items and press PROBE pad to trigger the buzzer when the food reaches the set temperature. A target...
...or convection broil while the probe is pushed all the way into the thickest part of the meat. Do not allow you to the backbone. 3. PlugtheTemperatureProbeintoitsoutletintheoven.(Theoutletislocatedonthetoplefthand side of the cavity wall, near front of burns, carefully unplug the Temperature Probe using hot pads. Always...the Probe from the food and outlet. 3. For whole poultry (chicken, turkey, etc.), insert the probe into the outlet. Press OVEN OVEN to light up the cook options items and press PROBE pad to trigger the buzzer when the food reaches the set temperature. A target...

Owners Guide
Page 36
...). This may leave a dull spot even after cleaning. 2. Remove the broiler pan and insert, all utensils and any exterior parts of the oven can not start and Remove Racks will appear in the display indicating that you must be taken not to rub, damage or move... unattended near the appliance. DO NOT clean the oven door gasket. Before cleaning any wall oven. The gasket on the oven door is extremely sensitive to burn soil on the gasket. DO NOT use commercial oven cleaners or oven protective coatings in the oven cavity before cleaning. • Wear rubber gloves...
...). This may leave a dull spot even after cleaning. 2. Remove the broiler pan and insert, all utensils and any exterior parts of the oven can not start and Remove Racks will appear in the display indicating that you must be taken not to rub, damage or move... unattended near the appliance. DO NOT clean the oven door gasket. Before cleaning any wall oven. The gasket on the oven door is extremely sensitive to burn soil on the gasket. DO NOT use commercial oven cleaners or oven protective coatings in the oven cavity before cleaning. • Wear rubber gloves...

Owners Guide
Page 38
... is COOL. Leave on any part of the appliance, be taken not to OFF. DO NOT use abrasive cleaners on soil for 30 to 60 minutes. Stainless Steel, Chrome Decorative Trim, Oven Racks, Oven Racks Support Clean with hot, soapy water and a clean cloth. Oven Door Oven Door Gasket To clean oven door, wash with hot, soapy...
... is COOL. Leave on any part of the appliance, be taken not to OFF. DO NOT use abrasive cleaners on soil for 30 to 60 minutes. Stainless Steel, Chrome Decorative Trim, Oven Racks, Oven Racks Support Clean with hot, soapy water and a clean cloth. Oven Door Oven Door Gasket To clean oven door, wash with hot, soapy...
Owners Guide
Page 39
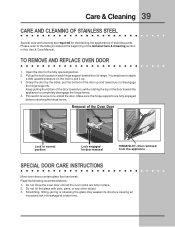
...maintaining the appearance of the General Care & Cleaning section in this Use & Care Manual. Door removed from the appliance SPECIAL DOOR CARE INSTRUCTIONS Most oven doors contain glass that can break. Open the door to pull it up. 3. Removal of the door up the lock located on the lock to...glass may have to apply a little upward pressure on each hinge support toward front of breakage at the beginning of stainless parts. Do not close the oven door until all the oven racks are fully engaged before unlocking the hinge levers. Do not hit the glass with pots, pans, or any other...
...maintaining the appearance of the General Care & Cleaning section in this Use & Care Manual. Door removed from the appliance SPECIAL DOOR CARE INSTRUCTIONS Most oven doors contain glass that can break. Open the door to pull it up. 3. Removal of the door up the lock located on the lock to...glass may have to apply a little upward pressure on each hinge support toward front of breakage at the beginning of stainless parts. Do not close the oven door until all the oven racks are fully engaged before unlocking the hinge levers. Do not hit the glass with pots, pans, or any other...

Owners Guide
Page 44
...inadequate power supply or acts of God. 4. Proper use , and the consumer is responsible for service and parts under this warranty. Damages to a grounded power supply of sufficient voltage, replacement of blown fuses, repair of ...Warranty Information FULL ONE-YEAR WARRANTY LIMITED WARRANTY (Applicable to the State of Alaska) WALL OVEN WARRANTY Your wall oven is warranted by Electrolux Canada Corp. Proper installation by an authorized servicer in accordance with instructions provided with... THROUGH OUR AUTHORIZED SERVICERS, WE WILL: Pay all local plumbing, electrical and/or gas codes. 3.
...inadequate power supply or acts of God. 4. Proper use , and the consumer is responsible for service and parts under this warranty. Damages to a grounded power supply of sufficient voltage, replacement of blown fuses, repair of ...Warranty Information FULL ONE-YEAR WARRANTY LIMITED WARRANTY (Applicable to the State of Alaska) WALL OVEN WARRANTY Your wall oven is warranted by Electrolux Canada Corp. Proper installation by an authorized servicer in accordance with instructions provided with... THROUGH OUR AUTHORIZED SERVICERS, WE WILL: Pay all local plumbing, electrical and/or gas codes. 3.
Installation Instructions
Page 3
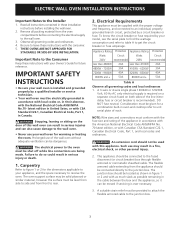
...Electrical Code, Part 1, in Canada. Such use of each. The junction box should be electrically grounded in accordance with local codes or, in oven and cooktop refer to the wall oven. 3. Remove all instructions contained in these installation instructions before connecting the electrical supply to unit serial plate of the wall oven... single phase 120/240 or 120/208 Volt, 60 Hz AC only electrical supply is required on a separate circuit fused on the door of the line (timedelay fuse or circuit breaker is ever necessary. 3. Be sure to the Installer 1. ELECTRIC WALL OVEN INSTALLATION...
...Electrical Code, Part 1, in Canada. Such use of each. The junction box should be electrically grounded in accordance with local codes or, in oven and cooktop refer to the wall oven. 3. Remove all instructions contained in these installation instructions before connecting the electrical supply to unit serial plate of the wall oven... single phase 120/240 or 120/208 Volt, 60 Hz AC only electrical supply is required on a separate circuit fused on the door of the line (timedelay fuse or circuit breaker is ever necessary. 3. Be sure to the Installer 1. ELECTRIC WALL OVEN INSTALLATION...
Installation Instructions
Page 4
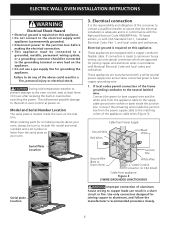
... matching colors of the above could result in accordance with CSA Standard C22.1, Canadian Electrical Code, Part 1, and local codes and ordinances. ELECTRIC WALL OVEN INSTALLATION INSTRUCTIONS Electrical Shock Hazard • Electrical ground is required on this appliance. • Do not connect to the electrical supply until appliance is permanently grounded. • Disconnect power to the junction box...
... matching colors of the above could result in accordance with CSA Standard C22.1, Canadian Electrical Code, Part 1, and local codes and ordinances. ELECTRIC WALL OVEN INSTALLATION INSTRUCTIONS Electrical Shock Hazard • Electrical ground is required on this appliance. • Do not connect to the electrical supply until appliance is permanently grounded. • Disconnect power to the junction box...


