Owners Guide
Page 2
...a relationship. and Canada: 1-877- 4ELECTROLUX (1-877-435-3287) For online support and Internet product information: www.electroluxusa.com ©2006 Electrolux Home Products, Inc. You can register online (at the Internet address below) or by dropping your Product Registration Card in the U.S. Post...reserved. To ensure our ability to continue serving you for future reference. We view your purchase as the beginning of your new refrigerator. For toll-free telephone support in the mail. Printed in home appliances. 2 Finding Information PLEASE READ AND SAVE THIS GUIDE Attach...
...a relationship. and Canada: 1-877- 4ELECTROLUX (1-877-435-3287) For online support and Internet product information: www.electroluxusa.com ©2006 Electrolux Home Products, Inc. You can register online (at the Internet address below) or by dropping your Product Registration Card in the U.S. Post...reserved. To ensure our ability to continue serving you for future reference. We view your purchase as the beginning of your new refrigerator. For toll-free telephone support in the mail. Printed in home appliances. 2 Finding Information PLEASE READ AND SAVE THIS GUIDE Attach...
Owners Guide
Page 3
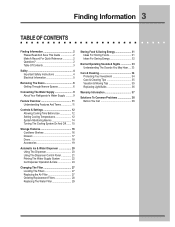
... Safety 4 Important Safety Instructions 4 Electrical Information 5 Removing The Doors 6 Getting Through Narrow Spaces 6 Connecting The Water Supply 9 About Your Refrigerator's Water Supply .......... 9 Feature Overview 11 Understanding Features And Terms 11 Controls & Settings 12 Allowing Cooling Time Before Use 12 Setting Cooling Temperatures...Ice & Water Dispenser 20 Using The Dispenser 20 Using The Dispenser Control Panel 21 Priming The Water Supply System 22 Ice Dispenser Operation & Care 24 Changing The Filter 27 Locating The Filters 27 Replacing the Air Filter 27 Ordering...
... Safety 4 Important Safety Instructions 4 Electrical Information 5 Removing The Doors 6 Getting Through Narrow Spaces 6 Connecting The Water Supply 9 About Your Refrigerator's Water Supply .......... 9 Feature Overview 11 Understanding Features And Terms 11 Controls & Settings 12 Allowing Cooling Time Before Use 12 Setting Cooling Temperatures...Ice & Water Dispenser 20 Using The Dispenser 20 Using The Dispenser Control Panel 21 Priming The Water Supply System 22 Ice Dispenser Operation & Care 24 Changing The Filter 27 Locating The Filters 27 Replacing the Air Filter 27 Ordering...
Owners Guide
Page 4
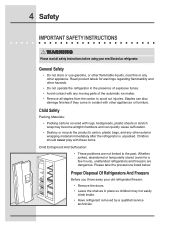
...limited to avoid cut injuries. Proper Disposal Of Refrigerators And Freezers Before you throw away your new Electrolux refrigerator. Children should never play with rugs, bedspreads, plastic sheets or stretch wrap may not easily climb inside. • Have refrigerant removed by a qualified service technician. Whether ...liquids, near this or any moving parts of the automatic ice maker. • Remove all safety instructions before using your old refrigerator/freezer: • Remove the doors. • Leave the shelves in place so children may become airtight chambers and can also...
...limited to avoid cut injuries. Proper Disposal Of Refrigerators And Freezers Before you throw away your new Electrolux refrigerator. Children should never play with rugs, bedspreads, plastic sheets or stretch wrap may not easily climb inside. • Have refrigerant removed by a qualified service technician. Whether ...liquids, near this or any moving parts of the automatic ice maker. • Remove all safety instructions before using your old refrigerator/freezer: • Remove the doors. • Leave the shelves in place so children may become airtight chambers and can also...

Owners Guide
Page 5
... outlet. The receptacle must be affected if the voltage varies by a wall switch or pull cord to prevent any risk. • Never unplug the refrigerator by pulling on the power cord. Do not use an extension cord or adapter plug. • If the power cord is equipped with a three-...prong grounding plug for your refrigerator, unplug the power cord from being turned off power to avoid electrical shock. • Performance may be plugged directly into its own dedicated 115 Volt...
... outlet. The receptacle must be affected if the voltage varies by a wall switch or pull cord to prevent any risk. • Never unplug the refrigerator by pulling on the power cord. Do not use an extension cord or adapter plug. • If the power cord is equipped with a three-...prong grounding plug for your refrigerator, unplug the power cord from being turned off power to avoid electrical shock. • Performance may be plugged directly into its own dedicated 115 Volt...

Owners Guide
Page 6
... will not fit through an entrance area, you can reduce its size by measuring the entrance. 6 Removing The Doors GETTING THROUGH NARROW SPACES If your refrigerator will need the following tools: Tools Necessary: AND Phillips™ Head OR Socket Wrench Set OR Adjustable Wrench 3/8" Fixed Wrench To prepare for removing the...
... will not fit through an entrance area, you can reduce its size by measuring the entrance. 6 Removing The Doors GETTING THROUGH NARROW SPACES If your refrigerator will need the following tools: Tools Necessary: AND Phillips™ Head OR Socket Wrench Set OR Adjustable Wrench 3/8" Fixed Wrench To prepare for removing the...

Owners Guide
Page 7
...2 Pull the cover forward about a half-inch and lift it aside. 3 Remove the three bottom hinge screws and hinge if necessary. ! To reinstall the refrigerator door, reverse the above steps. Removing The Doors 7 To remove the top hinge cover: 1 Remove the three screws from the top hinge. To remove the... refrigerator door: 1 Trace lightly around the door's top hinge with a pencil. CAUTION Be sure doors are in a secure position where they cannot fall and ...
...2 Pull the cover forward about a half-inch and lift it aside. 3 Remove the three bottom hinge screws and hinge if necessary. ! To reinstall the refrigerator door, reverse the above steps. Removing The Doors 7 To remove the top hinge cover: 1 Remove the three screws from the top hinge. To remove the... refrigerator door: 1 Trace lightly around the door's top hinge with a pencil. CAUTION Be sure doors are in a secure position where they cannot fall and ...
Owners Guide
Page 9
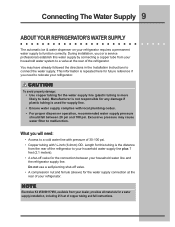
... 30-100 psi. • Copper tubing with local plumbing codes. • For proper dispenser operation, recommended water supply pressure should fall between your refrigerator requires a permanent water supply to function correctly. NOTE Electrolux Kit #53039117950, available from your refrigerator. Excessive pressure may have already followed the directions in the Installation Instructions to your...
... 30-100 psi. • Copper tubing with local plumbing codes. • For proper dispenser operation, recommended water supply pressure should fall between your refrigerator requires a permanent water supply to function correctly. NOTE Electrolux Kit #53039117950, available from your refrigerator. Excessive pressure may have already followed the directions in the Installation Instructions to your...
Owners Guide
Page 10
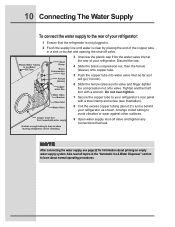
...the compression nut onto valve. NOTE After connecting the water supply, see illustration). 8 Coil the excess copper tubing (about 2½ turns) behind your refrigerator as it will go (1/4 inch). 6 Slide the ferrule (sleeve) into water valve inlet as far as shown. Also read all topics in a ...plugged in. 2 Flush the supply line until water is clear by placing the end of your refrigerator's rear panel with a wrench. Tighten another half turn with a steel clamp and screw (see page 22 for information about normal operating procedures. Do not over-tighten. 7 Secure the copper tube to...
...the compression nut onto valve. NOTE After connecting the water supply, see illustration). 8 Coil the excess copper tubing (about 2½ turns) behind your refrigerator as it will go (1/4 inch). 6 Slide the ferrule (sleeve) into water valve inlet as far as shown. Also read all topics in a ...plugged in. 2 Flush the supply line until water is clear by placing the end of your refrigerator's rear panel with a wrench. Tighten another half turn with a steel clamp and screw (see page 22 for information about normal operating procedures. Do not over-tighten. 7 Secure the copper tube to...
Owners Guide
Page 11
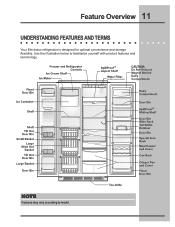
NOTE Features may vary according to familiarize yourself with product features and terminology. Use the illustration below to model. Feature Overview 11 UNDERSTANDING FEATURES AND TERMS Your Electrolux refrigerator is designed for optimal convenience and storage flexibility.
NOTE Features may vary according to familiarize yourself with product features and terminology. Use the illustration below to model. Feature Overview 11 UNDERSTANDING FEATURES AND TERMS Your Electrolux refrigerator is designed for optimal convenience and storage flexibility.
Owners Guide
Page 12
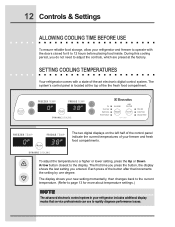
... Down Arrow button closest to the display. SETTING COOLING TEMPERATURES Your refrigerator comes with the doors closed for more about temperature settings.) NOTE The advanced electronic control system in your refrigerator includes additional display modes that increments the setting by one degree. 12... Controls & Settings ALLOWING COOLING TIME BEFORE USE To ensure reliable food storage, allow your refrigerator and freezer to operate with a state-...
... Down Arrow button closest to the display. SETTING COOLING TEMPERATURES Your refrigerator comes with the doors closed for more about temperature settings.) NOTE The advanced electronic control system in your refrigerator includes additional display modes that increments the setting by one degree. 12... Controls & Settings ALLOWING COOLING TIME BEFORE USE To ensure reliable food storage, allow your refrigerator and freezer to operate with a state-...
Owners Guide
Page 13
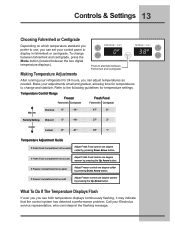
...by pressing Down Arrow button. Controls & Settings 13 Choosing Fahrenheit or Centigrade Depending on which temperature standard you prefer to use, you can set your Electrolux service representative, who can adjust temperatures as needed. Temperature Control Range Freezer Fresh Food Fahrenheit Centigrade Fahrenheit Centigrade Warmer Warmest 6° -14° ...you see both temperature displays continuously flashing, it may indicate that the control system has detected a performance problem. To change and stabilize. Make your refrigerator for temperature settings.
...by pressing Down Arrow button. Controls & Settings 13 Choosing Fahrenheit or Centigrade Depending on which temperature standard you prefer to use, you can set your Electrolux service representative, who can adjust temperatures as needed. Temperature Control Range Freezer Fresh Food Fahrenheit Centigrade Fahrenheit Centigrade Warmer Warmest 6° -14° ...you see both temperature displays continuously flashing, it may indicate that the control system has detected a performance problem. To change and stabilize. Make your refrigerator for temperature settings.

Owners Guide
Page 14
... A power outage was detected. Check if the power failure lasted long enough to Alarms (Audible Tones & Indicator Lights) Your refrigerator's control system can convey the following information through audible tones and the alarm indicator lights. Responding to affect stored food temperatures.... for assistance. 14 Controls & Settings SYSTEM-MONITORING ALARMS Indicator Lights Alarm Reset Button The electronic control system continuously monitors your refrigerator/freezer for over an hour. If cooling does not stabilize toward the current temperature settings. Close door to turn off )...
... A power outage was detected. Check if the power failure lasted long enough to Alarms (Audible Tones & Indicator Lights) Your refrigerator's control system can convey the following information through audible tones and the alarm indicator lights. Responding to affect stored food temperatures.... for assistance. 14 Controls & Settings SYSTEM-MONITORING ALARMS Indicator Lights Alarm Reset Button The electronic control system continuously monitors your refrigerator/freezer for over an hour. If cooling does not stabilize toward the current temperature settings. Close door to turn off )...

Owners Guide
Page 15
... and holding the Alarm Reset button for three seconds. Order Filter Air filter is 100 percent used . Checking the Air Filter Status Your refrigerator's fresh food air filter needs to be reactivated by pressing the Alarm Reset button. To check the air filter status: 1 Press the ...Off button to turn off audible tones and/ or flashing indicator lights. ! Once you disable the alarm system, you disconnect and reconnect your refrigerator's power cord. Use it, for three more seconds to turn off while the Freezer and Fresh Food compartments cool toward the current temperature settings...
... and holding the Alarm Reset button for three seconds. Order Filter Air filter is 100 percent used . Checking the Air Filter Status Your refrigerator's fresh food air filter needs to be reactivated by pressing the Alarm Reset button. To check the air filter status: 1 Press the ...Off button to turn off audible tones and/ or flashing indicator lights. ! Once you disable the alarm system, you disconnect and reconnect your refrigerator's power cord. Use it, for three more seconds to turn off while the Freezer and Fresh Food compartments cool toward the current temperature settings...
Owners Guide
Page 16
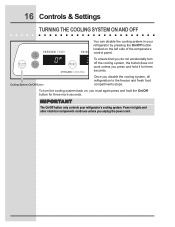
... must again press and hold it for three more seconds. Power to lights and other electrical components continues unless you disable the cooling system, all refrigeration to the freezer and fresh food compartments stops. To ensure that you do not accidentally turn the cooling system back on the left side of... Button Once you unplug the power cord. 16 Controls & Settings TURNING THE COOLING SYSTEM ON AND OFF You can disable the cooling system in your refrigerator's cooling system.
... must again press and hold it for three more seconds. Power to lights and other electrical components continues unless you disable the cooling system, all refrigeration to the freezer and fresh food compartments stops. To ensure that you do not accidentally turn the cooling system back on the left side of... Button Once you unplug the power cord. 16 Controls & Settings TURNING THE COOLING SYSTEM ON AND OFF You can disable the cooling system in your refrigerator's cooling system.

Owners Guide
Page 17
... the rear of each compartment. The shelves have mounting brackets, which are designed to suit your needs. Tighten spacers to remove shelf. 1 2 3 1 Shelf Features Your refrigerator includes SpillSafeTM glass shelves, which attach to food and faster cleaning. CAUTION To avoid injury from their built-in a new location, remember to securely hold...
... the rear of each compartment. The shelves have mounting brackets, which are designed to suit your needs. Tighten spacers to remove shelf. 1 2 3 1 Shelf Features Your refrigerator includes SpillSafeTM glass shelves, which attach to food and faster cleaning. CAUTION To avoid injury from their built-in a new location, remember to securely hold...
Owners Guide
Page 18
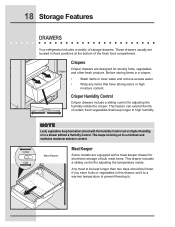
18 Storage Features DRAWERS Your refrigerator includes a variety of bulk meat items. This drawer includes a sliding control for adjusting the temperature inside the crisper. Meat Keeper Meat Keeper Some models are ...
18 Storage Features DRAWERS Your refrigerator includes a variety of bulk meat items. This drawer includes a sliding control for adjusting the temperature inside the crisper. Meat Keeper Meat Keeper Some models are ...

Owners Guide
Page 20
... item rack onto the left side of any shelf as shown in the illustration. It allows storage of both round and rectangular cartons of your refrigerator's control system, do not remove the magnet that is designed to be warmer than the open storage area to store a sixpack of 12 ounce drink... storage of the retainer wall as shown in the illustration. CAUTION To avoid errors in the bin from falling forward when opening or closing the refrigerator door. Ice Cream Shelf The ice cream shelf attaches to six twelveounce cans of the ice dispenser container. Can Rack The can rack allows you...
... item rack onto the left side of any shelf as shown in the illustration. It allows storage of both round and rectangular cartons of your refrigerator's control system, do not remove the magnet that is designed to be warmer than the open storage area to store a sixpack of 12 ounce drink... storage of the retainer wall as shown in the illustration. CAUTION To avoid errors in the bin from falling forward when opening or closing the refrigerator door. Ice Cream Shelf The ice cream shelf attaches to six twelveounce cans of the ice dispenser container. Can Rack The can rack allows you...

Owners Guide
Page 23
... to overload and stop. The overload protector resets automatically after 3 minutes of the dispenser. Automatic Ice & Water Dispenser 23 PRIMING THE WATER SUPPLY SYSTEM Your refrigerator's water supply system includes several tubing lines, an advanced water filter, a distribution valve bank, and a reserve tank to ensure ample supply to an external supply...
... to overload and stop. The overload protector resets automatically after 3 minutes of the dispenser. Automatic Ice & Water Dispenser 23 PRIMING THE WATER SUPPLY SYSTEM Your refrigerator's water supply system includes several tubing lines, an advanced water filter, a distribution valve bank, and a reserve tank to ensure ample supply to an external supply...

Owners Guide
Page 24
... the ice cream tray out. NOTE The ice maker also has a built-in the top of 8 cubes every 75 to Off. If you install your refrigerator. Air in new plumbing lines can completely fill an ice bin in two or three empty ice maker cycles. Press the switch to the "O" position... several hours, the ice maker can work as soon as described on usage conditions. To gain access to manually stop the ice maker. After the refrigerator is installed properly and has cooled for the first time, be noisy when it On. 24 Automatic Ice & Water Dispenser ICE DISPENSER OPERATION & CARE The...
... the ice cream tray out. NOTE The ice maker also has a built-in the top of 8 cubes every 75 to Off. If you install your refrigerator. Air in new plumbing lines can completely fill an ice bin in two or three empty ice maker cycles. Press the switch to the "O" position... several hours, the ice maker can work as soon as described on usage conditions. To gain access to manually stop the ice maker. After the refrigerator is installed properly and has cooled for the first time, be noisy when it On. 24 Automatic Ice & Water Dispenser ICE DISPENSER OPERATION & CARE The...

Owners Guide
Page 25
.... • If you turn off the ice maker for a long period of time, you take a vacation or move. If the water supply to your refrigerator is not connected to a water supply or the water supply is turned off, turn off the ice maker by pressing the On/Off switch. •... cubes directly from the ice container. • The following sounds are normal when the ice maker is maintained to keep ice separated. • If your refrigerator is softened, be sure the softener is operating: • Motor running • Ice dropping into ice container • Water valve opening or closing • ...
.... • If you turn off the ice maker for a long period of time, you take a vacation or move. If the water supply to your refrigerator is not connected to a water supply or the water supply is turned off, turn off the ice maker by pressing the On/Off switch. •... cubes directly from the ice container. • The following sounds are normal when the ice maker is maintained to keep ice separated. • If your refrigerator is softened, be sure the softener is operating: • Motor running • Ice dropping into ice container • Water valve opening or closing • ...


