Owners Guide
Page 3
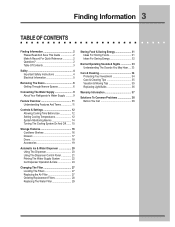
... And Terms 11 Controls & Settings 12 Allowing Cooling Time Before Use 12 Setting Cooling Temperatures 12 System-Monitoring Alarms 14 Turning The Cooling System On And Off ....... 15 Storage Features 16 Cantilever Shelves 16 Drawers 17 Doors 18 Accessories 19 Automatic Ice & Water Dispenser 20 Using The Dispenser 20 Using The Dispenser Control Panel 21 Priming The Water Supply System 22 Ice Dispenser Operation & Care 24 Changing The Filter 27 Locating The Filters 27 Replacing the Air Filter 27 Ordering Replacement Filters 28 Replacing The Water Filter 29 Storing Food...
... And Terms 11 Controls & Settings 12 Allowing Cooling Time Before Use 12 Setting Cooling Temperatures 12 System-Monitoring Alarms 14 Turning The Cooling System On And Off ....... 15 Storage Features 16 Cantilever Shelves 16 Drawers 17 Doors 18 Accessories 19 Automatic Ice & Water Dispenser 20 Using The Dispenser 20 Using The Dispenser Control Panel 21 Priming The Water Supply System 22 Ice Dispenser Operation & Care 24 Changing The Filter 27 Locating The Filters 27 Replacing the Air Filter 27 Ordering Replacement Filters 28 Replacing The Water Filter 29 Storing Food...
Owners Guide
Page 9
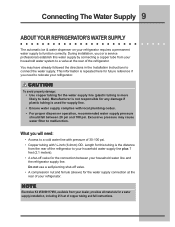
... supply pressure should fall between your refrigerator requires a permanent water supply to function correctly. Length for a water supply installation, including 25 feet of the refrigerator to leak). Connecting The Water Supply 9 ABOUT YOUR REFRIGERATOR'S WATER SUPPLY The automatic ice & water dispenser on your household water line and the refrigerator supply line. Manufacturer is not responsible for any damage if plastic tubing is used for the water supply line (plastic tubing is more likely to your household water supply line plus 7 feet (2.1 meters). • A shut-off valve...
... supply pressure should fall between your refrigerator requires a permanent water supply to function correctly. Length for a water supply installation, including 25 feet of the refrigerator to leak). Connecting The Water Supply 9 ABOUT YOUR REFRIGERATOR'S WATER SUPPLY The automatic ice & water dispenser on your household water line and the refrigerator supply line. Manufacturer is not responsible for any damage if plastic tubing is used for the water supply line (plastic tubing is more likely to your household water supply line plus 7 feet (2.1 meters). • A shut-off valve...
Owners Guide
Page 10
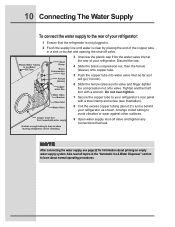
... any connections that the refrigerator is not plugged in. 2 Flush the supply line until water is clear by placing the end of the copper tube in the "Automatic Ice & Water Dispenser" section to learn about normal operating procedures. Do not over-tighten. 7 Secure the copper tube to your refrigerator's rear panel with a wrench. Arrange coiled tubing to avoid vibration or wear against other surfaces. 9 Open water supply shut-off valve...
... any connections that the refrigerator is not plugged in. 2 Flush the supply line until water is clear by placing the end of the copper tube in the "Automatic Ice & Water Dispenser" section to learn about normal operating procedures. Do not over-tighten. 7 Secure the copper tube to your refrigerator's rear panel with a wrench. Arrange coiled tubing to avoid vibration or wear against other surfaces. 9 Open water supply shut-off valve...
Owners Guide
Page 13
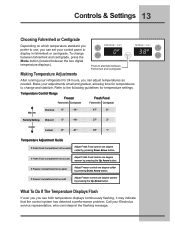
... temperature standard you prefer to use, you can set your control panel to alternate between the two digital temperature displays). Make your Electrolux service representative, who can adjust temperatures as needed. If Fresh Food compartment is too warm Adjust Freezer control one degree warmer by pressing Down Arrow button. If Freezer compartment is too cold Adjust Fresh Food control one degree colder by pressing the Up Arrow button. What To Do If The Temperature Displays Flash...
... temperature standard you prefer to use, you can set your control panel to alternate between the two digital temperature displays). Make your Electrolux service representative, who can adjust temperatures as needed. If Fresh Food compartment is too warm Adjust Freezer control one degree warmer by pressing Down Arrow button. If Freezer compartment is too cold Adjust Fresh Food control one degree colder by pressing the Up Arrow button. What To Do If The Temperature Displays Flash...

Owners Guide
Page 21
... to your drinking glass. The dispensed water is necessary for easy cleaning. Dispensing Ice To operate the ice dispenser, press an option for turning on the ice and water supplies. To stop , pull the glass away from the dispensing paddle. To stop dispensing water, pull the glass away from the dispensing paddle. Drip Tray A drip tray located at the base of ice making and freezing. It does not have a drain. Automatic Ice & Water Dispenser 21 USING THE DISPENSER Your automatic ice & water dispenser includes a control panel, a drinking glass bay, and two...
... to your drinking glass. The dispensed water is necessary for easy cleaning. Dispensing Ice To operate the ice dispenser, press an option for turning on the ice and water supplies. To stop , pull the glass away from the dispensing paddle. To stop dispensing water, pull the glass away from the dispensing paddle. Drip Tray A drip tray located at the base of ice making and freezing. It does not have a drain. Automatic Ice & Water Dispenser 21 USING THE DISPENSER Your automatic ice & water dispenser includes a control panel, a drinking glass bay, and two...

Owners Guide
Page 22
.... Light displays in one . Press and hold button for 3-5 seconds to prevent unwanted use. Light displays blue. Crush Button & Indicator Light Press button to catch all ice. Please order a new one of water filter: Green Water filter does not need changing. Press glass against ice dispensing paddle, holding high up to turn on automatically when ice and/or water is used to deactivate. Express Ice Button & Indicator Light Press and hold button for 3-5 seconds. 22 Automatic Ice & Water Dispenser USING THE DISPENSER CONTROL PANEL Cube Button & Indicator Light Press button...
.... Light displays in one . Press and hold button for 3-5 seconds to prevent unwanted use. Light displays blue. Crush Button & Indicator Light Press button to catch all ice. Please order a new one of water filter: Green Water filter does not need changing. Press glass against ice dispensing paddle, holding high up to turn on automatically when ice and/or water is used to deactivate. Express Ice Button & Indicator Light Press and hold button for 3-5 seconds. 22 Automatic Ice & Water Dispenser USING THE DISPENSER CONTROL PANEL Cube Button & Indicator Light Press button...

Owners Guide
Page 24
... the ice bin is controlled by the ice maker's On/Off power switch. If you install your refrigerator. Otherwise, the ice maker's fill valve may be noisy when it Off and press to the "I" position to turn the ice maker's On/Off switch to Off. Turning The Ice Dispenser On And Off Ice production is full. Press the switch to the "O" position to turn it attempts to operate without water. Air in new plumbing lines can work as...
... the ice bin is controlled by the ice maker's On/Off power switch. If you install your refrigerator. Otherwise, the ice maker's fill valve may be noisy when it Off and press to the "I" position to turn the ice maker's On/Off switch to Off. Turning The Ice Dispenser On And Off Ice production is full. Press the switch to the "O" position to turn it attempts to operate without water. Air in new plumbing lines can work as...

Owners Guide
Page 26
... and carefully clean the ice bin with mild detergent. If you accidentally move the auger, realign by lifting up the ice. IMPORTANT When removing the ice bin, avoid rotating the auger inside the bin. Rinse with its drive mechanism when the bin is replaced. 26 Automatic Ice & Water Dispenser To clean the ice dispenser: 1 Turn off ice production by pressing the ice maker's Off/On switch. 2 Remove the ice bin by making quarter turns until the ice bin fits back...
... and carefully clean the ice bin with mild detergent. If you accidentally move the auger, realign by lifting up the ice. IMPORTANT When removing the ice bin, avoid rotating the auger inside the bin. Rinse with its drive mechanism when the bin is replaced. 26 Automatic Ice & Water Dispenser To clean the ice dispenser: 1 Turn off ice production by pressing the ice maker's Off/On switch. 2 Remove the ice bin by making quarter turns until the ice bin fits back...

Owners Guide
Page 27
... control system panel. Water Filter The water filter is located inside the hinged bottom half of the housing. 4 Push the hinged bottom half upward until the tab snaps. 5 Press and hold the Filter Reset button for 3 seconds again to adjust this manual for more information about these controls. Air Filter The air filter is located at the top of refrigerator odors. The hinged bottom half drops open. 2 Remove the old filter and discard it. 3 Unpackage the new filter...
... control system panel. Water Filter The water filter is located inside the hinged bottom half of the housing. 4 Push the hinged bottom half upward until the tab snaps. 5 Press and hold the Filter Reset button for 3 seconds again to adjust this manual for more information about these controls. Air Filter The air filter is located at the top of refrigerator odors. The hinged bottom half drops open. 2 Remove the old filter and discard it. 3 Unpackage the new filter...

Owners Guide
Page 29
... Rated Pressure - 100 pounds per square inch • Maximum Operating Temp. - 100° F The Filter Status light on the performance data sheet. This system should change the filter before or after a standard amount of water (400 gallons for pure advantageTM and 250 gallons for the reduction of claims specified on the dispenser control panel (see page 22) prompts you use a bypass in place of the water filter cartridge...
... Rated Pressure - 100 pounds per square inch • Maximum Operating Temp. - 100° F The Filter Status light on the performance data sheet. This system should change the filter before or after a standard amount of water (400 gallons for pure advantageTM and 250 gallons for the reduction of claims specified on the dispenser control panel (see page 22) prompts you use a bypass in place of the water filter cartridge...

Owners Guide
Page 30
... new filter cartridge and slide it gently into place. To ensure a good seal, please do not remove this lubricant. 1 Turn Off the ice maker power switch (see page 24 for any stored food from the top shelf. 30 Changing The Filter To replace your pure advantageTM water filter: It is not necessary to turn the water supply off the ice maker). 2 Push the filter release button to the right of the cartridge to indicate...
... new filter cartridge and slide it gently into place. To ensure a good seal, please do not remove this lubricant. 1 Turn Off the ice maker power switch (see page 24 for any stored food from the top shelf. 30 Changing The Filter To replace your pure advantageTM water filter: It is not necessary to turn the water supply off the ice maker). 2 Push the filter release button to the right of the cartridge to indicate...
Owners Guide
Page 32
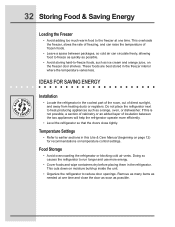
.... This cuts down on the freezer door shelves. Temperature Settings • Refer to earlier sections in the refrigerator. Food Storage • Avoid overcrowding the refrigerator or blocking cold air vents. If this Use & Care Manual (beginning on page 12) for recommendations on temperature control settings. Remove as many items as needed at one time and close tightly. This overloads the freezer, slows the rate of freezing, and can circulate freely, allowing...
.... This cuts down on the freezer door shelves. Temperature Settings • Refer to earlier sections in the refrigerator. Food Storage • Avoid overcrowding the refrigerator or blocking cold air vents. If this Use & Care Manual (beginning on page 12) for recommendations on temperature control settings. Remove as many items as needed at one time and close tightly. This overloads the freezer, slows the rate of freezing, and can circulate freely, allowing...

Owners Guide
Page 34
... you set your temperature controls to turn off cooling, power to lights and other sharp instruments which can scratch the appliance surface. • Do not remove the serial plate. ! 34 Care & Cleaning PROTECTING YOUR INVESTMENT Keeping your refrigerator clean maintains appearance and prevents odor build-up any surface. • Never use razor blades or other electrical components continues until you store or move your refrigerator in freezing temperatures...
... you set your temperature controls to turn off cooling, power to lights and other sharp instruments which can scratch the appliance surface. • Do not remove the serial plate. ! 34 Care & Cleaning PROTECTING YOUR INVESTMENT Keeping your refrigerator clean maintains appearance and prevents odor build-up any surface. • Never use razor blades or other electrical components continues until you store or move your refrigerator in freezing temperatures...

Owners Guide
Page 35
...; Allow glass to warm to room temperature before cleaning around controls, light bulb or any removable items (bins, drawers, etc.) in warm water. Drawers & Bins • Soap and water • Use a soft cloth to clean drawer runners and tracks. • Do not wash any electrical part. These cleaners can be gone one month or more. • Turn the cooling system off automatic ice maker and turn water supply valve to clean smooth doors. Exterior & Handles (Stainless Steel Models Only) • Soap and water •...
...; Allow glass to warm to room temperature before cleaning around controls, light bulb or any removable items (bins, drawers, etc.) in warm water. Drawers & Bins • Soap and water • Use a soft cloth to clean drawer runners and tracks. • Do not wash any electrical part. These cleaners can be gone one month or more. • Turn the cooling system off automatic ice maker and turn water supply valve to clean smooth doors. Exterior & Handles (Stainless Steel Models Only) • Soap and water •...
Owners Guide
Page 37
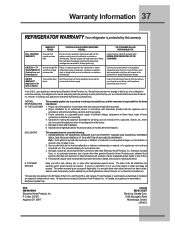
... Electrolux Home Products, Inc. Warranty Information 37 REFRIGERATOR WARRANTY Your refrigerator is protected by us or an authorized Electrolux Home Products, Inc. Original and replacement cartridges are made by Electrolux Canada Corp. Repair or replace any parts of this appliance which prove to a grounded power supply of sufficient voltage, replacement of blown fuses, repair of parts other appropriate payment record. Proper installation by an authorized servicer in accordance with instructions...
... Electrolux Home Products, Inc. Warranty Information 37 REFRIGERATOR WARRANTY Your refrigerator is protected by us or an authorized Electrolux Home Products, Inc. Original and replacement cartridges are made by Electrolux Canada Corp. Repair or replace any parts of this appliance which prove to a grounded power supply of sufficient voltage, replacement of blown fuses, repair of parts other appropriate payment record. Proper installation by an authorized servicer in accordance with instructions...
Owners Guide
Page 38
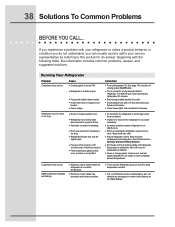
... the refrigerator to cool down completely. • Ice maker operation causes refrigerator to run slightly more. • Warm air entering the refrigerator causes it to stabilize. • Clean or change gasket. Running Your Refrigerator Problem Compressor does not run . Open doors less often. • Ensure refrigerator is normal for a fully automatic defrost refrigerator. See Problem section Opening/ Closing of Doors/ Drawers. • Set freezer control to maintain desired temperatures. Leaks in door seal will cause refrigerator to run more. Digital temperature displays are opened...
... the refrigerator to cool down completely. • Ice maker operation causes refrigerator to run slightly more. • Warm air entering the refrigerator causes it to stabilize. • Clean or change gasket. Running Your Refrigerator Problem Compressor does not run . Open doors less often. • Ensure refrigerator is normal for a fully automatic defrost refrigerator. See Problem section Opening/ Closing of Doors/ Drawers. • Set freezer control to maintain desired temperatures. Leaks in door seal will cause refrigerator to run more. Digital temperature displays are opened...

Owners Guide
Page 40
... may be replaced. • Push firmly until the water filter snaps into place. • Ice maker should produce approximately 4-5 pounds of ice every 24 hours. • See Problem section Temperatures Are Too Warm. • Turn on household water line valve. • If it is slightly open, causing cold air from inside refrigerator to water supply line. Ice maker will not stop making any ice cubes frozen together over wire signal arm. • Remove and shake ice bin to ice maker has poor...
... may be replaced. • Push firmly until the water filter snaps into place. • Ice maker should produce approximately 4-5 pounds of ice every 24 hours. • See Problem section Temperatures Are Too Warm. • Turn on household water line valve. • If it is slightly open, causing cold air from inside refrigerator to water supply line. Ice maker will not stop making any ice cubes frozen together over wire signal arm. • Remove and shake ice bin to ice maker has poor...

Owners Guide
Page 41
... dispense ice. Motor overload protector will not dispense water. Cause • Water supply is not connected. • Household water line valve is not open . • Freezer door is dropped into the container, the dispenser should be below 20 psi during the regenerative phase. Well water pressures should operate. • Remove ice cubes that are hollow or smaller than normal. When new ice is set too warm. Filter should operate. • Turn freezer control to infrequent use, temperature fluctuations, and/or power...
... dispense ice. Motor overload protector will not dispense water. Cause • Water supply is not connected. • Household water line valve is not open . • Freezer door is dropped into the container, the dispenser should be below 20 psi during the regenerative phase. Well water pressures should operate. • Remove ice cubes that are hollow or smaller than normal. When new ice is set too warm. Filter should operate. • Turn freezer control to infrequent use, temperature fluctuations, and/or power...

Owners Guide
Page 42
...; Release light switch located inside freezer compartment. • See Problem section, Running Your Refrigerator. • Reinstall magnet. • Close and reopen door(s) to move. • Food is touching shelf on top of drawer. • Track that drawers slide on . Cause • Interior needs to correct a sagging or sloping floor. • Ensure floor is not level. Light Bulb Is Not On Problem Light bulb is not on is in drawer. • Clean drawer, runners...
...; Release light switch located inside freezer compartment. • See Problem section, Running Your Refrigerator. • Reinstall magnet. • Close and reopen door(s) to move. • Food is touching shelf on top of drawer. • Track that drawers slide on . Cause • Interior needs to correct a sagging or sloping floor. • Ensure floor is not level. Light Bulb Is Not On Problem Light bulb is not on is in drawer. • Clean drawer, runners...
Wiring Diagram
Page 1
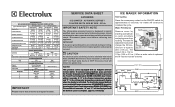
... Voltage 85 vac ICE MAKER CONNECTOR PLUG CONNECTIONS Wire Number Wire Color Connects to complete the cycle. When a water valve is activated. Untrained persons should not attempt to make repairs due to their original position and properly secured. PERFORMANCE DATA NO LOAD AND NO DOOR OPENINGS AT MID-POINT CONTROL SETTING Type A with an Adaptive Defrost Control (ADC). CAUTION All electrical parts and wiring must be returned to the possibility of compressor run time.
... Voltage 85 vac ICE MAKER CONNECTOR PLUG CONNECTIONS Wire Number Wire Color Connects to complete the cycle. When a water valve is activated. Untrained persons should not attempt to make repairs due to their original position and properly secured. PERFORMANCE DATA NO LOAD AND NO DOOR OPENINGS AT MID-POINT CONTROL SETTING Type A with an Adaptive Defrost Control (ADC). CAUTION All electrical parts and wiring must be returned to the possibility of compressor run time.


