
Use and Care Guide
Page 2
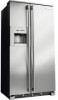
... & Water Dispenser 18 Safety 3 Important Safety Instructions 3 Electrical Information 4 Installation 5 Location 5 installing Clearances 5 To Level the Cabinet Using the Front Rollers 5 To Level the Doors Using the Lower Hinge 6 Using The Dispenser 18 Using The Dispenser Control Panel 19 Priming The Water Supply System 20 Ice Dispenser Operation & Care 21 Changing The Filter 22 Locating The Filters 22 Replacing the Air Filter 22 Ordering Replacement Filters 22 Replacing The Water Filter 23 RemovingThe Doors 7 Storing Food & Saving Energy 24 Getting...
... & Water Dispenser 18 Safety 3 Important Safety Instructions 3 Electrical Information 4 Installation 5 Location 5 installing Clearances 5 To Level the Cabinet Using the Front Rollers 5 To Level the Doors Using the Lower Hinge 6 Using The Dispenser 18 Using The Dispenser Control Panel 19 Priming The Water Supply System 20 Ice Dispenser Operation & Care 21 Changing The Filter 22 Locating The Filters 22 Replacing the Air Filter 22 Ordering Replacement Filters 22 Replacing The Water Filter 23 RemovingThe Doors 7 Storing Food & Saving Energy 24 Getting...
Use and Care Guide
Page 3
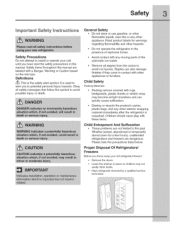
... attempt to install or operate your old refrigerator/freezer: • Remove the doors. Child Safety Packing Materials: • Packing cartons covered with other hazards. Definitions This is unpacked. Leave the shelves in contact with rugs, bedspreads, plastic sheets or stretch wrap may not easily climb inside. Please take the precautions listed below. Read product labels for a few hours), unattended refrigerators and freezers are...
... attempt to install or operate your old refrigerator/freezer: • Remove the doors. Child Safety Packing Materials: • Packing cartons covered with other hazards. Definitions This is unpacked. Leave the shelves in contact with rugs, bedspreads, plastic sheets or stretch wrap may not easily climb inside. Please take the precautions listed below. Read product labels for a few hours), unattended refrigerators and freezers are...
Use and Care Guide
Page 5
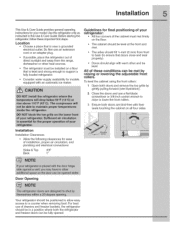
... plumbing and electrical connections: Sides & Top 3/8" Back 1" _!i!i!i!i!i!i!i!i!i!i!i!i!i!i!i!i!i!i!i!i!i!i!i!i!i!i!i!i!i!i!i!i!i!i!i!i!i!i!i!i!i!i!i!i!i!i!i!i!i!i!i!i!i!i Door Opening Your refrigerator should be installed on a floor that is level and strong enough to a counter when removing food. The cabinet should tilt 1A-inch (6 mm) from the range, dishwasher or other and be in this Use & Care Guide. Doors should be level. For best use of drawers and freezer baskets, the refrigerator should align with an automatic ice maker. Location = Choose...
... plumbing and electrical connections: Sides & Top 3/8" Back 1" _!i!i!i!i!i!i!i!i!i!i!i!i!i!i!i!i!i!i!i!i!i!i!i!i!i!i!i!i!i!i!i!i!i!i!i!i!i!i!i!i!i!i!i!i!i!i!i!i!i!i!i!i!i!i Door Opening Your refrigerator should be installed on a floor that is level and strong enough to a counter when removing food. The cabinet should tilt 1A-inch (6 mm) from the range, dishwasher or other and be in this Use & Care Guide. Doors should be level. For best use of drawers and freezer baskets, the refrigerator should align with an automatic ice maker. Location = Choose...

Use and Care Guide
Page 7
... doors. Removing The Doors Getting Through Narrow Spaces If your refrigerator will need the following tools: Tool_ Neces_er¢:: _D _ OR To prepare for removing the doors: 1 Make sure the electrical power cord is unplugged from the wall outlet. 2 Open both doors are in the Installation Instructions that came with a pencil. Lift the door off of the bottom hinge and set it off. 2 Remove the two screws from the cover...
... doors. Removing The Doors Getting Through Narrow Spaces If your refrigerator will need the following tools: Tool_ Neces_er¢:: _D _ OR To prepare for removing the doors: 1 Make sure the electrical power cord is unplugged from the wall outlet. 2 Open both doors are in the Installation Instructions that came with a pencil. Lift the door off of the bottom hinge and set it off. 2 Remove the two screws from the cover...

Use and Care Guide
Page 9
... water valve inlet as far as shown. 6. Turn ON water supply and flush supply line until water is clear. Remove plastic cap from electric power source. 2. A shutoff valve to connect the water supply line to a household cold water line with water pressure between 30 and 100 psi. Slide brass compression nut, then ferrule (sleeve) onto water supply line. Tighten another half turn ice maker on the tubing. if you use a self-piercing type shutoff valve. Connecting The Water Supply Before Installing The Water Supply Line, You Will Need...
... water valve inlet as far as shown. 6. Turn ON water supply and flush supply line until water is clear. Remove plastic cap from electric power source. 2. A shutoff valve to connect the water supply line to a household cold water line with water pressure between 30 and 100 psi. Slide brass compression nut, then ferrule (sleeve) onto water supply line. Tighten another half turn ice maker on the tubing. if you use a self-piercing type shutoff valve. Connecting The Water Supply Before Installing The Water Supply Line, You Will Need...

Use and Care Guide
Page 12
... is too cold Adjust Fresh Foodcontrol one degreewarmer by pressingthe Up (Cold) button. Making Temperature Adjustments After running your refrigerator for 8 to 12 hours before placing food inside. Controls & Settings Allowing Cooling Time Before Use To ensure reliable food storage, allow your refrigerator and freezer to operate with a state-of-the-art electronic digital control system. During this cooling period, you can adjust temperatures as needed. Setting Cooling Temperatures Your refrigerator comes with the doors closed for...
... is too cold Adjust Fresh Foodcontrol one degreewarmer by pressingthe Up (Cold) button. Making Temperature Adjustments After running your refrigerator for 8 to 12 hours before placing food inside. Controls & Settings Allowing Cooling Time Before Use To ensure reliable food storage, allow your refrigerator and freezer to operate with a state-of-the-art electronic digital control system. During this cooling period, you can adjust temperatures as needed. Setting Cooling Temperatures Your refrigerator comes with the doors closed for...
Use and Care Guide
Page 13
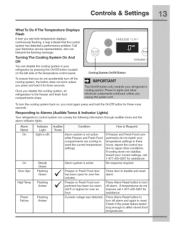
... temperature control panel. Call your Electrolux service representative, who can disable the cooling system in your temperature settings in three hours, expect the control system to Alarms (Audible Tones & Indicator Lights) Your refrigerator's control system can convey the following information through audible tones and the alarm indicator lights. To ensure that the control system has detected a performance problem. On On Door Ajar High Temp Powe r Failure IndicatOr' Light (light is off alarm and again to reset. Freezer...
... temperature control panel. Call your Electrolux service representative, who can disable the cooling system in your temperature settings in three hours, expect the control system to Alarms (Audible Tones & Indicator Lights) Your refrigerator's control system can convey the following information through audible tones and the alarm indicator lights. To ensure that the control system has detected a performance problem. On On Door Ajar High Temp Powe r Failure IndicatOr' Light (light is off alarm and again to reset. Freezer...

Use and Care Guide
Page 18
... the ice dispenser but not the water dispenser. Drip Tray A drip tray located at the base of ice making and freezing. Press a drinking glass against the dispensing paddle. To stop , pull the glass away from the dispensing paddle. This drip tray is not cold. The control panel also includes options for easy cleaning. [] Electrolux Cube Crush Light _ut_r E_Df_SS " St_l_, _ocK Fr_z_ .X_SS D©©© The dispensed water is removable for lighting, filter monitoring, and increasing the rates of the dispenser...
... the ice dispenser but not the water dispenser. Drip Tray A drip tray located at the base of ice making and freezing. Press a drinking glass against the dispensing paddle. To stop , pull the glass away from the dispensing paddle. This drip tray is not cold. The control panel also includes options for easy cleaning. [] Electrolux Cube Crush Light _ut_r E_Df_SS " St_l_, _ocK Fr_z_ .X_SS D©©© The dispensed water is removable for lighting, filter monitoring, and increasing the rates of the dispenser...

Use and Care Guide
Page 19
... Button & Indicator Light Express Ice Button & Indicator Light Press and hold button for 3-5 seconds again to deactivate. Automatic ice & Water Dispenser Using The Dispenser Control Pane[ Cube Button & Indicator Light Crush Button & Indicator Light Press button to activate faster rate for freezing food (preserving freshness). Amber Water filter is about 80 percent used . Please change as soon as possible. Press and hold button for 10-15 seconds. Light displays blue. Please order new one of water filter: Green Water filter does not need changing. Red Water filter is used...
... Button & Indicator Light Express Ice Button & Indicator Light Press and hold button for 3-5 seconds again to deactivate. Automatic ice & Water Dispenser Using The Dispenser Control Pane[ Cube Button & Indicator Light Crush Button & Indicator Light Press button to activate faster rate for freezing food (preserving freshness). Amber Water filter is about 80 percent used . Please change as soon as possible. Press and hold button for 10-15 seconds. Light displays blue. Please order new one of water filter: Green Water filter does not need changing. Red Water filter is used...

Use and Care Guide
Page 20
... ice maker can produce ice within 24 hours. Using The Ice Dispenser After Installation Before making ice for several tubing lines, an advanced water filter, a distribution valve bank, and a reserve tank to ensure ample supply to the ice and water dispenser at a rate of 8 cubes every 75 to 6 pounds of any impurities (stopping to empty the glass as the system pushes air out through the system and dispenser nozzle. After the refrigerator is controlled by...
... ice maker can produce ice within 24 hours. Using The Ice Dispenser After Installation Before making ice for several tubing lines, an advanced water filter, a distribution valve bank, and a reserve tank to ensure ample supply to the ice and water dispenser at a rate of 8 cubes every 75 to 6 pounds of any impurities (stopping to empty the glass as the system pushes air out through the system and dispenser nozzle. After the refrigerator is controlled by...

Use and Care Guide
Page 21
... use the ice dispenser frequently. To clean the ice dispenser: 1 Turn off the ice maker for a long period of ice at regular intervals, particularly before replacing in the freezer. 5 Remove ice chips and clean the ice bin shelf and the freezer door chute. 6 Replace the ice bin. Remove and empty the ice storage bin if: = An extended power failure (one time, it is best to a water supply or the water supply is turned off, turn off ice production by pressing the ice maker's Off/On switch. 2 Remove the ice bin...
... use the ice dispenser frequently. To clean the ice dispenser: 1 Turn off the ice maker for a long period of ice at regular intervals, particularly before replacing in the freezer. 5 Remove ice chips and clean the ice bin shelf and the freezer door chute. 6 Replace the ice bin. Remove and empty the ice storage bin if: = An extended power failure (one time, it is best to a water supply or the water supply is turned off, turn off ice production by pressing the ice maker's Off/On switch. 2 Remove the ice bin...

Use and Care Guide
Page 22
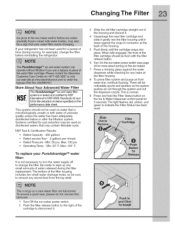
... types and amounts of food you to the electronic control system panel. Ordering Replacement Filters Order new filters through the system. Here is the product number to produce ice. Changing The Filter Locating The Fi ters Your refrigerator is equipped with separate water and air filtering systems. The water filter system filters all dispensed drinking water, as well as the water used to request when ordering: Water Filter Air Filter FC-IO0 PureAdvantage TM replacement cartridge Replacement cartridge, part # 241504902 Air Filter (some models) The air filter...
... types and amounts of food you to the electronic control system panel. Ordering Replacement Filters Order new filters through the system. Here is the product number to produce ice. Changing The Filter Locating The Fi ters Your refrigerator is equipped with separate water and air filtering systems. The water filter system filters all dispensed drinking water, as well as the water used to request when ordering: Water Filter Air Filter FC-IO0 PureAdvantage TM replacement cartridge Replacement cartridge, part # 241504902 Air Filter (some models) The air filter...
Use and Care Guide
Page 23
... the cartridge to remove any stored food from water line, continue flushing. The bottom of the filter housing includes two small water drainage holes, so be flush with water of unknown quality unless the water has been adequately disinfected before reinstalling the refrigerator. The light flashes red, amber, and green to indicate the Filter Status has been reset. 1 Turn Off the ice maker power switch. 2 Push the filter release button to...
... the cartridge to remove any stored food from water line, continue flushing. The bottom of the filter housing includes two small water drainage holes, so be flush with water of unknown quality unless the water has been adequately disinfected before reinstalling the refrigerator. The light flashes red, amber, and green to indicate the Filter Status has been reset. 1 Turn Off the ice maker power switch. 2 Push the filter release button to...

Use and Care Guide
Page 24
... of insulation between the two appliances will help the refrigerator operate more energy, Cover foods and wipe containers dry before placing them tightly. Force as much warm food to freezing. This cuts down on the freezer door shelves. Leave a space between packages, so cold air can raise the temperature of the packages as needed at one time. These foods are best stored in...
... of insulation between the two appliances will help the refrigerator operate more energy, Cover foods and wipe containers dry before placing them tightly. Force as much warm food to freezing. This cuts down on the freezer door shelves. Leave a space between packages, so cold air can raise the temperature of the packages as needed at one time. These foods are best stored in...

Use and Care Guide
Page 27
... for location of On/Off button) and disconnect power cord. • Turn off automatic ice maker and turn water supply valve to closed position. • Clean interior thoroughly. • Leaveboth doors open if necessary. • Removeall food and ice. • If using handcart, load from side. • Adjust rollers all the way up . Do not use CHLORIDEor cleanerswith bleach to room temperature before cleaning around controls, light bulb or any electrical part. • Wipe gaskets with a clean...
... for location of On/Off button) and disconnect power cord. • Turn off automatic ice maker and turn water supply valve to closed position. • Clean interior thoroughly. • Leaveboth doors open if necessary. • Removeall food and ice. • If using handcart, load from side. • Adjust rollers all the way up . Do not use CHLORIDEor cleanerswith bleach to room temperature before cleaning around controls, light bulb or any electrical part. • Wipe gaskets with a clean...

Use and Care Guide
Page 29
... not in ordinary household use of light bulbs and/or fluorescent tubes (on the bill establishes the warranty period should service be readily determined. Damages to the cabinet liner or Sealed Refrigeration System. If service is performed, it was shipped from the factory. 5. IF YOU NEED SERVICE Keep your bill of the full warranties above . Excludes original and replacement Ice & Water filter cartridges (if equipped). Note...
... not in ordinary household use of light bulbs and/or fluorescent tubes (on the bill establishes the warranty period should service be readily determined. Damages to the cabinet liner or Sealed Refrigeration System. If service is performed, it was shipped from the factory. 5. IF YOU NEED SERVICE Keep your bill of the full warranties above . Excludes original and replacement Ice & Water filter cartridges (if equipped). Note...
Use and Care Guide
Page 30
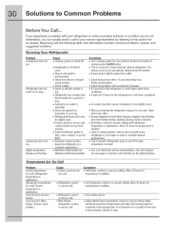
... to work longer under these conditions. Reset circuit breaker. Leaks in door seal will cause refrigerator to stabilize. • Clean or change gasket. Meat should be slightly open. Food stored in drawers freezes, Food stored in Meat Keeper freezes(some models), Cause • Freezercontrol is set too cold. • Refrigerator control is set too cold. • Refrigerator control is set too cold. • Meat Keeper temperature control is set too cold (control found in fresh food section), Freshfood/freezer gasket...
... to work longer under these conditions. Reset circuit breaker. Leaks in door seal will cause refrigerator to stabilize. • Clean or change gasket. Meat should be slightly open. Food stored in drawers freezes, Food stored in Meat Keeper freezes(some models), Cause • Freezercontrol is set too cold. • Refrigerator control is set too cold. • Refrigerator control is set too cold. • Meat Keeper temperature control is set too cold (control found in fresh food section), Freshfood/freezer gasket...
Use and Care Guide
Page 31
.... • This is set too warm. Freezer _erature is too warm (some models) Problem Cause Display does not illuminate • Connector not or shows "CE". Perfect TemDDrawer (some models). Display shows "LOG" when • Drawer in the Meat Keeper is satisfacto% Temperature in control buttons are kept past their prime • Weather is humid. • Door is slightly open, causing cold air from outside of refrigerator or between...
.... • This is set too warm. Freezer _erature is too warm (some models) Problem Cause Display does not illuminate • Connector not or shows "CE". Perfect TemDDrawer (some models). Display shows "LOG" when • Drawer in the Meat Keeper is satisfacto% Temperature in control buttons are kept past their prime • Weather is humid. • Door is slightly open, causing cold air from outside of refrigerator or between...

Use and Care Guide
Page 32
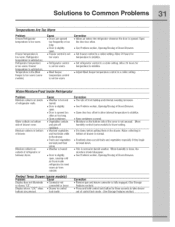
... e. Ice maker is not completely seated. Cause = Ice maker power switch is Off. • Water supply is not connected to pass through. Turn off household water line valve. If it may be replaced. Coverfoods tightly. Freezeris not cold enough. See Problem section, Temperatures Are Too Warm. Remove and shake ice bin to see if the water dispenser is dispensing water. Remove any ice. Icenot usedfrequently enough. Ice maker wire signal arm is being used frequently enough. Turn on power switch. Discard stale ice. Remove valve. Ice maker will not stop making...
... e. Ice maker is not completely seated. Cause = Ice maker power switch is Off. • Water supply is not connected to pass through. Turn off household water line valve. If it may be replaced. Coverfoods tightly. Freezeris not cold enough. See Problem section, Temperatures Are Too Warm. Remove and shake ice bin to see if the water dispenser is dispensing water. Remove any ice. Icenot usedfrequently enough. Ice maker wire signal arm is being used frequently enough. Turn on power switch. Discard stale ice. Remove valve. Ice maker will not stop making...
Use and Care Guide
Page 34
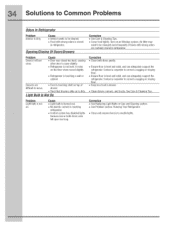
... electric current is level and solid, and can adequately support the refrigerator. Air filter may need to be cleaned. • Food with strong odors are difficult to open too long. Turn on the floor when moved slightly. • Refrigerator is dirty. Drawers are routinely stored in refriqerator. SeeCare & CleaninqTips. Correction • SeeReplacing Light Bulbs in Careand Cleaning section. • SeeProblem section, Running Your Refrigerator. ,, Closeand reopen door(s) to...
... electric current is level and solid, and can adequately support the refrigerator. Air filter may need to be cleaned. • Food with strong odors are difficult to open too long. Turn on the floor when moved slightly. • Refrigerator is dirty. Drawers are routinely stored in refriqerator. SeeCare & CleaninqTips. Correction • SeeReplacing Light Bulbs in Careand Cleaning section. • SeeProblem section, Running Your Refrigerator. ,, Closeand reopen door(s) to...


