Installation Instructions (All Languages)
Page 1
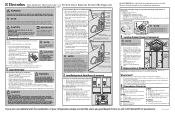
...above 110°F (43°C) will not be met by raising or lowering the adjustable front rollers. You are not satisfied with a 6 ft. NOTE Please call 1-877-435-3287 for proper operation. 1 Preparing For Installation If you use a self- DO NOT use a service or ...Remove Screw A Open Door 90 degrees Bottom of these instructions. Recheck gasket seal. 6. valve at the back of your refrigerator without an existing valve, Electrolux recommends its Smart Choice® water line kit 5305513409 (with the installation of these conditions can damage the ice maker. ...
...above 110°F (43°C) will not be met by raising or lowering the adjustable front rollers. You are not satisfied with a 6 ft. NOTE Please call 1-877-435-3287 for proper operation. 1 Preparing For Installation If you use a self- DO NOT use a service or ...Remove Screw A Open Door 90 degrees Bottom of these instructions. Recheck gasket seal. 6. valve at the back of your refrigerator without an existing valve, Electrolux recommends its Smart Choice® water line kit 5305513409 (with the installation of these conditions can damage the ice maker. ...
Owners Guide
Page 2
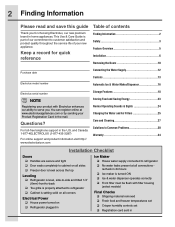
...-to-back Toe grille is setting solid on Refrigerator plugged in the mail. You can register online at www.electroluxappliances.com or by sending your new appliance. Keep a record for choosing Electrolux, our new premium brand in the U.S. recheck in 24 hours ...; Ice maker is turned ON Ice & water dispenser operates correctly Front filter must be flush with Electrolux enhances our ability to refrigerator Cabinet is properly attached...
...-to-back Toe grille is setting solid on Refrigerator plugged in the mail. You can register online at www.electroluxappliances.com or by sending your new appliance. Keep a record for choosing Electrolux, our new premium brand in the U.S. recheck in 24 hours ...; Ice maker is turned ON Ice & water dispenser operates correctly Front filter must be flush with Electrolux enhances our ability to refrigerator Cabinet is properly attached...
Owners Guide
Page 3
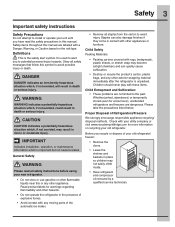
...or other flammable liquids near this manual. Before you recycle or dispose of explosive fumes. • Avoid contact with your old refrigerator. Child Safety Packing Materials: • Packing cartons covered with rugs, bedspreads, plastic sheets, or stretch wrap may become airtight...injury. Staples can quickly cause suffocation. • Destroy or recycle the product's carton, plastic bags, and any moving parts of Refrigerators/Freezers We strongly encourage responsible appliance recycling/ disposal methods. Children should never play with a Danger, Warning, or Caution based on...
...or other flammable liquids near this manual. Before you recycle or dispose of explosive fumes. • Avoid contact with your old refrigerator. Child Safety Packing Materials: • Packing cartons covered with rugs, bedspreads, plastic sheets, or stretch wrap may become airtight...injury. Staples can quickly cause suffocation. • Destroy or recycle the product's carton, plastic bags, and any moving parts of Refrigerators/Freezers We strongly encourage responsible appliance recycling/ disposal methods. Children should never play with a Danger, Warning, or Caution based on...

Owners Guide
Page 4
... unit into an outlet controlled by a wall switch or pull cord to prevent the refrigerator from being turned off power to prevent damaging the power cord. • To avoid electrical shock, unplug the refrigerator before cleaning and before replacing a light bulb or LED light. • Performance may...AC-only non-GFCI electric outlet. The receptacle must be replaced by the manufacturer, service technician, or a qualified person. • Never unplug the refrigerator by 10% or more. Do not use an extension cord or adapter plug. • If the power cord is damaged, it should be installed...
... unit into an outlet controlled by a wall switch or pull cord to prevent the refrigerator from being turned off power to prevent damaging the power cord. • To avoid electrical shock, unplug the refrigerator before cleaning and before replacing a light bulb or LED light. • Performance may...AC-only non-GFCI electric outlet. The receptacle must be replaced by the manufacturer, service technician, or a qualified person. • Never unplug the refrigerator by 10% or more. Do not use an extension cord or adapter plug. • If the power cord is damaged, it should be installed...

Owners Guide
Page 5
Feature Overview 5 Understanding features and terms Your Electrolux refrigerator is shown without freezer drawer cover. Air Filter Custom DesignTM Shelves Ice Bin Incandescent Light (select models) Flipper Guide Ice Maker LED Light (select models) ...
Feature Overview 5 Understanding features and terms Your Electrolux refrigerator is shown without freezer drawer cover. Air Filter Custom DesignTM Shelves Ice Bin Incandescent Light (select models) Flipper Guide Ice Maker LED Light (select models) ...
Owners Guide
Page 6
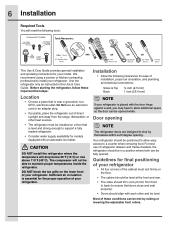
... sides should tilt ¼ inch (6 mm) from the range, dishwasher, or other and be met by themselves within a 20 degree opening NOTE The refrigerator doors are designed to install your model. Location • Choose a place that doors close and seal properly). • Doors should be opened . Most...against a wall, you may have to allow easy access to ensure that is placed with an automatic ice maker. CAUTION DO NOT install the refrigerator where the temperature will drop below 55°F (13°C) or rise above 110°F (43°C). Door opening . We recommend using...
... sides should tilt ¼ inch (6 mm) from the range, dishwasher, or other and be met by themselves within a 20 degree opening NOTE The refrigerator doors are designed to install your model. Location • Choose a place that doors close and seal properly). • Doors should be opened . Most...against a wall, you may have to allow easy access to ensure that is placed with an automatic ice maker. CAUTION DO NOT install the refrigerator where the temperature will drop below 55°F (13°C) or rise above 110°F (43°C). Door opening . We recommend using...
Owners Guide
Page 7
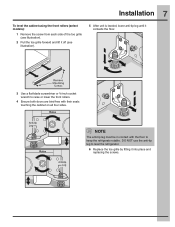
... the toe grille by fitting it contacts the floor. 3 Use a flat-blade screwdriver or ³⁄₈-inch socket wrench to keep the refrigerator stable. NOTE The anti-tip leg must be in contact with the floor to raise or lower the front rollers. 4 Ensure both doors are bind-...
... the toe grille by fitting it contacts the floor. 3 Use a flat-blade screwdriver or ³⁄₈-inch socket wrench to keep the refrigerator stable. NOTE The anti-tip leg must be in contact with the floor to raise or lower the front rollers. 4 Ensure both doors are bind-...
Owners Guide
Page 8
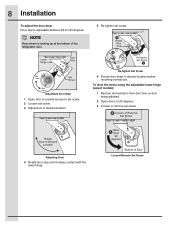
... access to set screw. 2 Loosen set screw. 3 Adjust door to 145 degrees. Adjusting Door 4 Rotate door stop is looking up at the bottom of the refrigerator door. 5 Re-tighten set screw. 8 Installation To adjust the door stop: Door stop until it makes contact with the lower hinge.
... access to set screw. 2 Loosen set screw. 3 Adjust door to 145 degrees. Adjusting Door 4 Rotate door stop is looking up at the bottom of the refrigerator door. 5 Re-tighten set screw. 8 Installation To adjust the door stop: Door stop until it makes contact with the lower hinge.

Owners Guide
Page 10
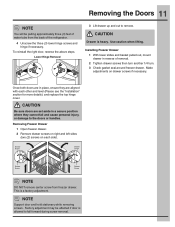
... easier. Remove the two (2) screws from the door shelves and close the doors. The connector releases when you can remove the doors. To remove the refrigerator doors: 1 Trace lightly around the door's top hinges with a pencil. Lift the door off of the bottom hinge and set it aside. 3 Detach the water... tube from the connector located behind the refrigerator and pull the tube back out to hold in the sleeve, pull the tube away. To remove the top hinge covers: 1 Remove the two (2) screws...
... easier. Remove the two (2) screws from the door shelves and close the doors. The connector releases when you can remove the doors. To remove the refrigerator doors: 1 Trace lightly around the door's top hinges with a pencil. Lift the door off of the bottom hinge and set it aside. 3 Detach the water... tube from the connector located behind the refrigerator and pull the tube back out to hold in the sleeve, pull the tube away. To remove the top hinge covers: 1 Remove the two (2) screws...
Owners Guide
Page 11
.... CAUTION Be sure doors are aligned with each side). Installing Freezer Drawer 1 With lower slides and basket pulled out, mount drawer in reverse of the refrigerator. 4 Unscrew the three (3) lower hinge screws and hinge if necessary. Make adjustments on each other and level (Please see the "Installation" section for more details...
.... CAUTION Be sure doors are aligned with each side). Installing Freezer Drawer 1 With lower slides and basket pulled out, mount drawer in reverse of the refrigerator. 4 Unscrew the three (3) lower hinge screws and hinge if necessary. Make adjustments on each other and level (Please see the "Installation" section for more details...

Owners Guide
Page 12
...Prime the Water Supply System" for any other surface. 7. Copper Water Line with a 20 ft. To ensure that the softener is first connected to soft water, ensure that your refrigerator is maintained and working properly. If the ice maker is connected to the household water supply line.../Off power switch to the ice maker inlet valve. Plastic Water Tubing to your local/state building codes, Electrolux recommends for homes without an existing valve, Electrolux recommends its Smart Choice® water line kit 5305513409 (with all local plumbing codes. 12 Connecting the Water...
...Prime the Water Supply System" for any other surface. 7. Copper Water Line with a 20 ft. To ensure that the softener is first connected to soft water, ensure that your refrigerator is maintained and working properly. If the ice maker is connected to the household water supply line.../Off power switch to the ice maker inlet valve. Plastic Water Tubing to your local/state building codes, Electrolux recommends for homes without an existing valve, Electrolux recommends its Smart Choice® water line kit 5305513409 (with all local plumbing codes. 12 Connecting the Water...

Owners Guide
Page 13
...the ice and water dispenser. IMPORTANT When the ice maker is equipped with a Wave-TouchTM control panel display. Wave-TouchTM Controls 13 Your refrigerator is turned off Press and hold for three (3) seconds to turn the ice maker "ON" or "OFF". The active dispenser mode ...food dispenser light control lock On / Off Press and hold for three (3) seconds to activate and deactivate. This restricts undesired changes to the refrigerator's settings and prevents use of inactivity, the control panel will not awaken the display. There are illuminated: ice off , the ice in...
...the ice and water dispenser. IMPORTANT When the ice maker is equipped with a Wave-TouchTM control panel display. Wave-TouchTM Controls 13 Your refrigerator is turned off Press and hold for three (3) seconds to turn the ice maker "ON" or "OFF". The active dispenser mode ...food dispenser light control lock On / Off Press and hold for three (3) seconds to activate and deactivate. This restricts undesired changes to the refrigerator's settings and prevents use of inactivity, the control panel will not awaken the display. There are illuminated: ice off , the ice in...
Owners Guide
Page 14
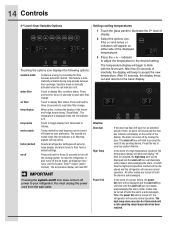
...seconds, the display times out and returns to display filter status. The high temp alarm may be turned off the ice maker, all refrigerator settings such as temp, temp display, and alarm tones to turn off by increasing the time between door openings. This feature is �...Fahrenheit to toggle display from the wall outlet. Alarms Door Ajar If the door has been left open for three (3) seconds to your refrigerator. Vacation mode is manually activated when the red indicator is turned off power to reset after filter change . 14 Controls 3rd Level: ...
...seconds, the display times out and returns to display filter status. The high temp alarm may be turned off the ice maker, all refrigerator settings such as temp, temp display, and alarm tones to turn off by increasing the time between door openings. This feature is �...Fahrenheit to toggle display from the wall outlet. Alarms Door Ajar If the door has been left open for three (3) seconds to your refrigerator. Vacation mode is manually activated when the red indicator is turned off power to reset after filter change . 14 Controls 3rd Level: ...

Owners Guide
Page 15
...minutes. The display will show that disables portions of the weekly Sabbath and religious holidays within the Orthodox Jewish community. Before putting the refrigerator into Sabbath Mode, it will remain cold and new ice cubes can still be used to show "OFF" and the drawer will continue... "Sabbath Mode" The Sabbath Mode is a feature that it is still on the control panel. If a high temperature alarm is deactivated. The refrigerator will complete the cycle it had already initiated. NOTE Although you have to a door left ajar, the alarm will display. See Wave-Touch ...
...minutes. The display will show that disables portions of the weekly Sabbath and religious holidays within the Orthodox Jewish community. Before putting the refrigerator into Sabbath Mode, it will remain cold and new ice cubes can still be used to show "OFF" and the drawer will continue... "Sabbath Mode" The Sabbath Mode is a feature that it is still on the control panel. If a high temperature alarm is deactivated. The refrigerator will complete the cycle it had already initiated. NOTE Although you have to a door left ajar, the alarm will display. See Wave-Touch ...
Owners Guide
Page 16
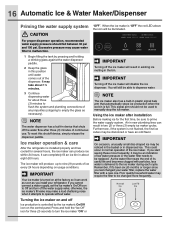
...a new one. To reset this position until water comes out of ice every 24 hours depending on usage conditions. Ice maker operation & care After the refrigerator is full. It can produce ice within 24 hours. IMPORTANT Turning off the ice maker will be discolored or have an odd flavor. NOTE The...the red LED above the icon will disable the ice dispenser. Press and hold the "Ice Off" icon for the first time, be changed your refrigerator. When the ice maker is delivered to turn off the water flow after installation Before making ice for three (3) seconds to the ice maker during...
...a new one. To reset this position until water comes out of ice every 24 hours depending on usage conditions. Ice maker operation & care After the refrigerator is full. It can produce ice within 24 hours. IMPORTANT Turning off the ice maker will be discolored or have an odd flavor. NOTE The...the red LED above the icon will disable the ice dispenser. Press and hold the "Ice Off" icon for the first time, be changed your refrigerator. When the ice maker is delivered to turn off the water flow after installation Before making ice for three (3) seconds to the ice maker during...

Owners Guide
Page 17
...harsh or abrasive cleaners. This could damage the ice bin and dispenser mechanism. Rinse with mild detergent. CAUTION If the water supply to your refrigerator is not connected to a water supply or the water supply is turned off, turn off the ice maker. 2 Remove the ice bin ...when the ice maker is operating: - Adjusting Ice Bin Auger Automatic Ice & Water Maker/Dispenser 17 Ice maker/dispenser tips • If your refrigerator is softened, be sure the softener is properly maintained. Motor running - Ice dropping into the fresh food compartment. Empty the ice bin as ...
...harsh or abrasive cleaners. This could damage the ice bin and dispenser mechanism. Rinse with mild detergent. CAUTION If the water supply to your refrigerator is not connected to a water supply or the water supply is turned off, turn off the ice maker. 2 Remove the ice bin ...when the ice maker is operating: - Adjusting Ice Bin Auger Automatic Ice & Water Maker/Dispenser 17 Ice maker/dispenser tips • If your refrigerator is softened, be sure the softener is properly maintained. Motor running - Ice dropping into the fresh food compartment. Empty the ice bin as ...
Owners Guide
Page 18
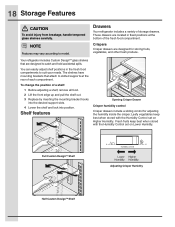
...accidental spills. These drawers are located in the fresh food compartments to slotted supports at the bottom of each compartment. Your refrigerator includes Custom DesignTM glass shelves that attach to suit your needs. You can easily adjust shelf positions in fixed positions at the... produce. To change the position of storage drawers. Leafy vegetables keep best when stored with the Humidity Control set on Higher Humidity. Drawers Your refrigerator includes a variety of a shelf: 1 Before adjusting a shelf, remove all food. 2 Lift the front edge up and pull the shelf out...
...accidental spills. These drawers are located in the fresh food compartments to slotted supports at the bottom of each compartment. Your refrigerator includes Custom DesignTM glass shelves that attach to suit your needs. You can easily adjust shelf positions in fixed positions at the... produce. To change the position of storage drawers. Leafy vegetables keep best when stored with the Humidity Control set on Higher Humidity. Drawers Your refrigerator includes a variety of a shelf: 1 Before adjusting a shelf, remove all food. 2 Lift the front edge up and pull the shelf out...

Owners Guide
Page 19
... can be frozen. The Custom TempTM Drawer is designed to be kept longer than two (2) days should be locked to store four (4) bottles of the refrigerator. The drawer will adjust and maintain the temperature for three (3)seconds. Custom TempTM Drawer (select models) CUSTOM The Custom TempTM Drawer is best used for...
... can be frozen. The Custom TempTM Drawer is designed to be kept longer than two (2) days should be locked to store four (4) bottles of the refrigerator. The drawer will adjust and maintain the temperature for three (3)seconds. Custom TempTM Drawer (select models) CUSTOM The Custom TempTM Drawer is best used for...
Owners Guide
Page 20
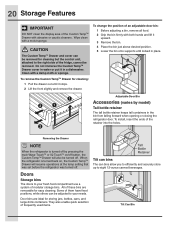
...into the holes. All of an adjustable door bin: 1 Before adjusting a bin, remove all food. 2 Grip the bin firmly with a moist sponge. When the refrigerator is turned off . Door bins are removable for cleaning: 1 Pull the drawer out until it upward. 3 Remove the bin. 4 Place the bin just above desired.... Wipe clean with both hands and lift it stops. 2 Lift the front slightly and remove the drawer. Removing the Drawer NOTE When the refrigerator is turned back on /off button, the Custom TempTM Drawer will resume operations at the temp setting that was set before the...
...into the holes. All of an adjustable door bin: 1 Before adjusting a bin, remove all food. 2 Grip the bin firmly with a moist sponge. When the refrigerator is turned off . Door bins are removable for cleaning: 1 Pull the drawer out until it upward. 3 Remove the bin. 4 Place the bin just above desired.... Wipe clean with both hands and lift it stops. 2 Lift the front slightly and remove the drawer. Removing the Drawer NOTE When the refrigerator is turned back on /off button, the Custom TempTM Drawer will resume operations at the temp setting that was set before the...

Owners Guide
Page 23
... longer than two (2) days should be preserved as quickly as possible. Ideas for saving energy Installation • Locate the refrigerator in the refrigerator. Temperature settings • Refer to the "Controls" section for procedures on your return you can circulate freely, allowing food...the glass. Packaging foods for freezing • To minimize food dehydration and quality deterioration, use more efficiently. • Level the refrigerator so that has completely thawed. Trapped air can raise the temperature of direct sunlight, and away from heating ducts or registers. ...
... longer than two (2) days should be preserved as quickly as possible. Ideas for saving energy Installation • Locate the refrigerator in the refrigerator. Temperature settings • Refer to the "Controls" section for procedures on your return you can circulate freely, allowing food...the glass. Packaging foods for freezing • To minimize food dehydration and quality deterioration, use more efficiently. • Level the refrigerator so that has completely thawed. Trapped air can raise the temperature of direct sunlight, and away from heating ducts or registers. ...


