Installation Instructions (All Languages)
Page 1
... Water Valve Bracket over tighten. To level the cabinet using the adjustable lower hinge (select models, if necessary): 1 Open doors to your refrigerator. Doors final adjustment using the front rollers: 1 You can raise or lower each other surface. 7. Screw will impair cooling ability of water. Remove Screw Raising/Lowering Door 4 Leveling Freezer Drawer (if necessary) NOTE Drawer Screw Drawer Screw DO NOT remove center screw from electric power source. 2. Tighten 4 drawer screws. 5. Installation Instructions* for French Door Bottom Freezer/Refrigerator...
... Water Valve Bracket over tighten. To level the cabinet using the adjustable lower hinge (select models, if necessary): 1 Open doors to your refrigerator. Doors final adjustment using the front rollers: 1 You can raise or lower each other surface. 7. Screw will impair cooling ability of water. Remove Screw Raising/Lowering Door 4 Leveling Freezer Drawer (if necessary) NOTE Drawer Screw Drawer Screw DO NOT remove center screw from electric power source. 2. Tighten 4 drawer screws. 5. Installation Instructions* for French Door Bottom Freezer/Refrigerator...
Owners Guide
Page 2
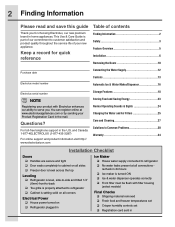
...5 Installation 6 Removing the Doors 10 Purchase date Electrolux model number Connecting the Water Supply 12 Controls 13 Automatic Ice & Water Maker/Dispenser 16 Electrolux serial number NOTE Registering your Product Registration Card in the U.S. Questions? This Use & Care Guide is part of our commitment to refrigerator No water leaks present at www.electroluxappliances.com or by sending your product with filter housing (select models) Final Checks Shipping material removed Fresh food and freezer temperatures set Crisper humidity controls set...
...5 Installation 6 Removing the Doors 10 Purchase date Electrolux model number Connecting the Water Supply 12 Controls 13 Automatic Ice & Water Maker/Dispenser 16 Electrolux serial number NOTE Registering your Product Registration Card in the U.S. Questions? This Use & Care Guide is part of our commitment to refrigerator No water leaks present at www.electroluxappliances.com or by sending your product with filter housing (select models) Final Checks Shipping material removed Fresh food and freezer temperatures set Crisper humidity controls set...
Owners Guide
Page 3
... problems are dangerous. Proper Disposal of your old refrigerator/ freezer: • Remove the doors. • Leave the shelves and baskets in place so children may become airtight chambers and can also damage finishes if they come in the presence of the automatic ice maker. • Remove all staples from the carton to avoid injury. Obey all safety instructions before using your new refrigerator...
... problems are dangerous. Proper Disposal of your old refrigerator/ freezer: • Remove the doors. • Leave the shelves and baskets in place so children may become airtight chambers and can also damage finishes if they come in the presence of the automatic ice maker. • Remove all staples from the carton to avoid injury. Obey all safety instructions before using your new refrigerator...
Owners Guide
Page 6
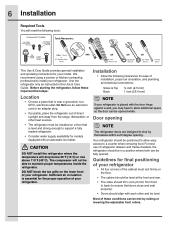
... Use & Care Guide provides general installation and operating instructions for your refrigerator is level and strong enough to support a fully loaded refrigerator. • Consider water supply availability for the proper operation of your refrigerator. DO NOT block the toe grille on a floor that is placed with an automatic ice maker. 6 Installation Required Tools You will not be able to maintain proper temperatures inside the refrigerator. We recommend using a service or kitchen contracting professional to shut...
... Use & Care Guide provides general installation and operating instructions for your refrigerator is level and strong enough to support a fully loaded refrigerator. • Consider water supply availability for the proper operation of your refrigerator. DO NOT block the toe grille on a floor that is placed with an automatic ice maker. 6 Installation Required Tools You will not be able to maintain proper temperatures inside the refrigerator. We recommend using a service or kitchen contracting professional to shut...

Owners Guide
Page 12
... the ice maker inlet valve. The nut and ferrule are already assembled on , lower wire signal arm (side mounted) or set the ice maker's On/Off power switch to your new refrigerator. CAUTION To Avoid Property Damage: • Copper or Stainless Steel braided tubing is clear. Plastic Water Tubing to Ice Maker Fill Tube Steel Clamp Brass Compression Nut Ferrule (Sleeve) Copper water line Water Valve Bracket Valve Inlet Water Valve Copper water line from household water supply (Include enough tubing...
... the ice maker inlet valve. The nut and ferrule are already assembled on , lower wire signal arm (side mounted) or set the ice maker's On/Off power switch to your new refrigerator. CAUTION To Avoid Property Damage: • Copper or Stainless Steel braided tubing is clear. Plastic Water Tubing to Ice Maker Fill Tube Steel Clamp Brass Compression Nut Ferrule (Sleeve) Copper water line Water Valve Bracket Valve Inlet Water Valve Copper water line from household water supply (Include enough tubing...
Owners Guide
Page 14
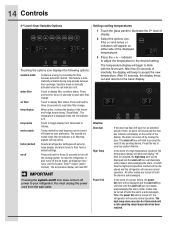
... setting. water filter Touch to accept the new temperature. It also turns off icon is ��p��l�a�y�.� 2 Select the options icon. Setting cooling temperatures 1 Touch the glass panel to the basic display. 14 Controls 3rd Level: User Variable Options Touching the options icon displays the following options: vacation mode Conserves energy by increasing the time between door openings. Vacation mode is manually activated when the red indicator...
... setting. water filter Touch to accept the new temperature. It also turns off icon is ��p��l�a�y�.� 2 Select the options icon. Setting cooling temperatures 1 Touch the glass panel to the basic display. 14 Controls 3rd Level: User Variable Options Touching the options icon displays the following options: vacation mode Conserves energy by increasing the time between door openings. Vacation mode is manually activated when the red indicator...

Owners Guide
Page 15
... the drawer will remain cold and new ice cubes can still be deactivated with standard trays. The ice cube compartment will turn off . When in Sabbath Mode after power failure recovery. Before putting the refrigerator into Sabbath Mode, it will remain off . Then enter the Sabbath mode function on the control panel. Refrigerator stays in Sabbath mode, the display will not illuminate and the drawer will continue to adjust...
... the drawer will remain cold and new ice cubes can still be deactivated with standard trays. The ice cube compartment will turn off . When in Sabbath Mode after power failure recovery. Before putting the refrigerator into Sabbath Mode, it will remain off . Then enter the Sabbath mode function on the control panel. Refrigerator stays in Sabbath mode, the display will not illuminate and the drawer will continue to adjust...
Owners Guide
Page 16
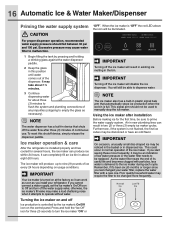
... ice maker is turned on the control panel. Turning the ice maker on usage conditions. Ice maker operation & care After the refrigerator is not flushed, the first ice cubes may be an indication of the dispenser. Furthermore, if the system is installed properly and has cooled for about 1½ minutes. 3 Continue dispensing water for several hours, the ice maker can work as soon as necessary). As the water filter nears the end of any impurities (stopping...
... ice maker is turned on the control panel. Turning the ice maker on usage conditions. Ice maker operation & care After the refrigerator is not flushed, the first ice cubes may be an indication of the dispenser. Furthermore, if the system is installed properly and has cooled for about 1½ minutes. 3 Continue dispensing water for several hours, the ice maker can work as soon as necessary). As the water filter nears the end of any impurities (stopping...

Owners Guide
Page 17
.... 1 Turn off the ice maker by holding the On/Off soft-touch icon for three (3) seconds. • The following sounds are normal when the ice maker is properly maintained. Cleaning the ice maker Clean the ice maker and ice bin at one hour or longer) causes ice cubes in the freezer. 5 Replace the ice bin. Do not use warm water. Adjusting Ice Bin Auger Water valve opening or closing - Before replacing the ice bin, make sure it is accidentally rotated, you need...
.... 1 Turn off the ice maker by holding the On/Off soft-touch icon for three (3) seconds. • The following sounds are normal when the ice maker is properly maintained. Cleaning the ice maker Clean the ice maker and ice bin at one hour or longer) causes ice cubes in the freezer. 5 Replace the ice bin. Do not use warm water. Adjusting Ice Bin Auger Water valve opening or closing - Before replacing the ice bin, make sure it is accidentally rotated, you need...

Owners Guide
Page 19
... setting holds a temperature for thawing frozen foods for adjusting the humidity inside. buttons. To remove the Crisper Drawer for packaged food products. If you store fruits or vegetables in one of that time, it to store the thawed food. The Custom TempTM Drawer is designed to store four (4) bottles of the refrigerator. Custom TempTM Drawer (select models) CUSTOM The Custom TempTM Drawer is best used for cleaning: 1 Pull the drawer...
... setting holds a temperature for thawing frozen foods for adjusting the humidity inside. buttons. To remove the Crisper Drawer for packaged food products. If you store fruits or vegetables in one of that time, it to store the thawed food. The Custom TempTM Drawer is designed to store four (4) bottles of the refrigerator. Custom TempTM Drawer (select models) CUSTOM The Custom TempTM Drawer is best used for cleaning: 1 Pull the drawer...

Owners Guide
Page 23
.... • Use the deli drawer or Custom TempTM drawer and set to meat/poultry setting for short-term storage. This overloads the freezer, slows the rate of freezing, and can raise the temperature of frozen foods. • Leave a space between 34° F and 40° F with an optimum temperature of insulation between the two (2) appliances will help the refrigerator operate more energy. • Cover foods and...
.... • Use the deli drawer or Custom TempTM drawer and set to meat/poultry setting for short-term storage. This overloads the freezer, slows the rate of freezing, and can raise the temperature of frozen foods. • Leave a space between 34° F and 40° F with an optimum temperature of insulation between the two (2) appliances will help the refrigerator operate more energy. • Cover foods and...

Owners Guide
Page 25
... refrigerator has not been used for the reduction of claims specified on the control panel. 2 Push the filter release button above the cartridge to disconnect it stops against the snap-in connector at the lower left side of your PureAdvantageTM water filter In general, you to replace the filter after the system. The PureAdvantageTM ice and water filter system is tested and certified to produce ice. The PureAdvantageTM ice and water filter...
... refrigerator has not been used for the reduction of claims specified on the control panel. 2 Push the filter release button above the cartridge to disconnect it stops against the snap-in connector at the lower left side of your PureAdvantageTM water filter In general, you to replace the filter after the system. The PureAdvantageTM ice and water filter system is tested and certified to produce ice. The PureAdvantageTM ice and water filter...

Owners Guide
Page 26
... dispenser system. 8 Prime the water supply system as described previously. 9 Press and hold the Air Filter Reset button on the control panel for three (3)seconds. Air filter The air filter is located inside of the filter cartridge should change the air filter every six (6) months (the filter status light on the control panel for any leaks at the control panel. 7 Press a drinking glass against the water dispenser while checking for three (3) seconds. When fully engaged, the front of the left door above ice maker...
... dispenser system. 8 Prime the water supply system as described previously. 9 Press and hold the Air Filter Reset button on the control panel for three (3)seconds. Air filter The air filter is located inside of the filter cartridge should change the air filter every six (6) months (the filter status light on the control panel for any leaks at the control panel. 7 Press a drinking glass against the water dispenser while checking for three (3) seconds. When fully engaged, the front of the left door above ice maker...
Owners Guide
Page 27
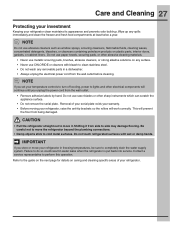
... detergents, bleaches, or cleansers containing petroleum products on caring and cleaning specific areas of your serial plate voids your warranty. • Before moving your refrigerator clean maintains its appearance and prevents odor build-up any removable parts in water leaks when the refrigerator is put back into service. Removal of your temperature controls to turn off cooling, power to lights and other electrical components will continue until you store or move...
... detergents, bleaches, or cleansers containing petroleum products on caring and cleaning specific areas of your serial plate voids your warranty. • Before moving your refrigerator clean maintains its appearance and prevents odor build-up any removable parts in water leaks when the refrigerator is put back into service. Removal of your temperature controls to turn off cooling, power to lights and other electrical components will continue until you store or move...

Owners Guide
Page 28
... before cleaning around controls, light bulb or any electrical part. • Wipe gaskets with a clean soft cloth. • Use a soft cloth to clean drawer runners and tracks. • Do not wash any removable items (bins, drawers, etc.) in dishwasher. • Allow glass to warm to room temperature before immersing in warm water. • Remove toe grille (see "Controls" section for location of On/Off button) and disconnect power cord. • Turn water supply valve to closed position. • Clean interior...
... before cleaning around controls, light bulb or any electrical part. • Wipe gaskets with a clean soft cloth. • Use a soft cloth to clean drawer runners and tracks. • Do not wash any removable items (bins, drawers, etc.) in dishwasher. • Allow glass to warm to room temperature before immersing in warm water. • Remove toe grille (see "Controls" section for location of On/Off button) and disconnect power cord. • Turn water supply valve to closed position. • Clean interior...
Owners Guide
Page 30
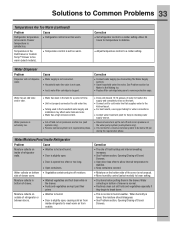
... sized hole in proper position. Clean valve. Ice dispenser is not a self-piercing valve. Ice can usually avoid a call ... Replace the filter cartridge. Ice maker will not dispense ice. When ice is clogged or restricted by referring to this section for an answer. Ice maker is not making any ice. • Ice maker setting is Off. • Water supply is not connected to refrigerator. • Household water line valve is not open . • Check to see if the water dispenser is dispensing water. • Water filter...
... sized hole in proper position. Clean valve. Ice dispenser is not a self-piercing valve. Ice can usually avoid a call ... Replace the filter cartridge. Ice maker will not dispense ice. When ice is clogged or restricted by referring to this section for an answer. Ice maker is not making any ice. • Ice maker setting is Off. • Water supply is not connected to refrigerator. • Household water line valve is not open . • Check to see if the water dispenser is dispensing water. • Water filter...

Owners Guide
Page 31
... cleaned. • Food with strong odors are difficult to move. • Food is touching shelf on top of cooling system On/Off button. • This is not level. Air filter may need to correct a sagging or sloping floor. • Keep less food in defrost cycle. • Plug at a constant temperature. Running Your Refrigerator Problem Cause Compressor does not run. • Cooling system is turned Off. • Refrigerator is in drawer...
... cleaned. • Food with strong odors are difficult to move. • Food is touching shelf on top of cooling system On/Off button. • This is not level. Air filter may need to correct a sagging or sloping floor. • Keep less food in defrost cycle. • Plug at a constant temperature. Running Your Refrigerator Problem Cause Compressor does not run. • Cooling system is turned Off. • Refrigerator is in drawer...
Owners Guide
Page 32
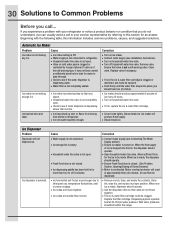
... warm. Digital temperature displays are opened too frequently or too long. • Refrigerator/freezer door may be stored at a temperature just below the freezing point for the freezer compartment to over cool while automatic ice maker is on. • Set refrigerator control to a warmer setting. Refrigerator temperature too cold. Freezer temperature is satisfactory. • Refrigerator control is provided with a high-efficiency, variable-speed compressor. • Electronic control system has detected a performance problem. 32 Solutions to Common Problems Running Your Refrigerator...
... warm. Digital temperature displays are opened too frequently or too long. • Refrigerator/freezer door may be stored at a temperature just below the freezing point for the freezer compartment to over cool while automatic ice maker is on. • Set refrigerator control to a warmer setting. Refrigerator temperature too cold. Freezer temperature is satisfactory. • Refrigerator control is provided with a high-efficiency, variable-speed compressor. • Electronic control system has detected a performance problem. 32 Solutions to Common Problems Running Your Refrigerator...
Owners Guide
Page 33
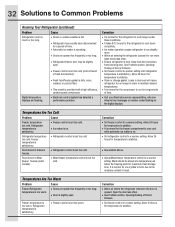
.... • Move humidity control (select models) to Common Problems 33 Temperatures Are Too Warm (continued) Problem Cause Refrigerator temperature is normal for a reverse osmosis system to remove protective caps. Water pressure is extremely low. • Water has been in the tank for a period of time. • Unit not properly connected to cold water line. • Tubing used in bottom of Doors/ Drawers. See Problem section Ice Maker Is Not Making Ice. • Replace filter cartridge being sure to...
.... • Move humidity control (select models) to Common Problems 33 Temperatures Are Too Warm (continued) Problem Cause Refrigerator temperature is normal for a reverse osmosis system to remove protective caps. Water pressure is extremely low. • Water has been in the tank for a period of time. • Unit not properly connected to cold water line. • Tubing used in bottom of Doors/ Drawers. See Problem section Ice Maker Is Not Making Ice. • Replace filter cartridge being sure to...
Owners Guide
Page 34
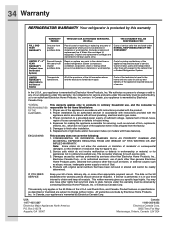
... by Electrolux Canada Corp. Our obligations for the items listed below apply. Proper connection to finish after installation. 6. Damages to a grounded power supply of sufficient voltage, replacement of blown fuses, repair of the full warranties above . Replacement of service. or external causes such as described or illustrated are warranted for pick up and delivery of the appliance required because of light bulbs and...
... by Electrolux Canada Corp. Our obligations for the items listed below apply. Proper connection to finish after installation. 6. Damages to a grounded power supply of sufficient voltage, replacement of blown fuses, repair of the full warranties above . Replacement of service. or external causes such as described or illustrated are warranted for pick up and delivery of the appliance required because of light bulbs and...


