
Manual
Page 11
...network Connects to the IP Camera. Bottom View Reset to Default /WPS Ethernet Connector Microphone Power Connector Audio Connector Name Description USB Port* (IC-3030 only) Accepts USB WiFi adapter** to enable wireless SD Card Slot Wireless SMA Connector (IC-3030Wn only) Reset to Default / WPS (IC-3030W only) Power Connector...to external speaker for more than 5 seconds to reset the camera settings to . Press the WPS button (click) on the IP Cam and click on the Access Point that you want to wirelessly connect it to factory default. Press and hold WPS button for audio output 11
...network Connects to the IP Camera. Bottom View Reset to Default /WPS Ethernet Connector Microphone Power Connector Audio Connector Name Description USB Port* (IC-3030 only) Accepts USB WiFi adapter** to enable wireless SD Card Slot Wireless SMA Connector (IC-3030Wn only) Reset to Default / WPS (IC-3030W only) Power Connector...to external speaker for more than 5 seconds to reset the camera settings to . Press the WPS button (click) on the IP Cam and click on the Access Point that you want to wirelessly connect it to factory default. Press and hold WPS button for audio output 11
Manual
Page 15
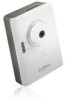
Click „Start‟ -> „Control Panel‟ 15 1.6 Locate the IP Address of this IP Camera Default IP address of this IP camera, you ‟ll have to change the IP address of your computer is 192.168.2.3. If you wish to assign another IP address to this IP camera is not 192.168.2, you have to log onto the web configuration interface of your computer first: 1. If the left three fields of the IP address of the camera first.
Click „Start‟ -> „Control Panel‟ 15 1.6 Locate the IP Address of this IP Camera Default IP address of this IP camera, you ‟ll have to change the IP address of your computer is 192.168.2.3. If you wish to assign another IP address to this IP camera is not 192.168.2, you have to log onto the web configuration interface of your computer first: 1. If the left three fields of the IP address of the camera first.

Manual
Page 20
The system will start the installation procedures. 3. You can change the installation folder of IP camera setup software here, click „Browse‟ to select an existing folder, or you can just click „Next‟ to continue installation. 4. Click „Next‟ to use default installation folder: 20
The system will start the installation procedures. 3. You can change the installation folder of IP camera setup software here, click „Browse‟ to select an existing folder, or you can just click „Next‟ to continue installation. 4. Click „Next‟ to use default installation folder: 20
Manual
Page 24
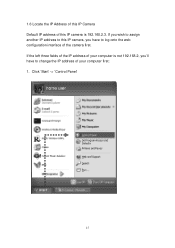
Click „OK‟ to input the IP address information manually. Select „DHCP‟ to set the camera to obtain an IP address from DHCP server on local area network automatically, and select „Manual IP‟ to save settings. 24 Input the password (default: 1234) and click OK to configure the camera‟s network and security setting: In „Lan Setting‟ page, you can configure camera‟s network settings.
Click „OK‟ to input the IP address information manually. Select „DHCP‟ to set the camera to obtain an IP address from DHCP server on local area network automatically, and select „Manual IP‟ to save settings. 24 Input the password (default: 1234) and click OK to configure the camera‟s network and security setting: In „Lan Setting‟ page, you can configure camera‟s network settings.
Manual
Page 26
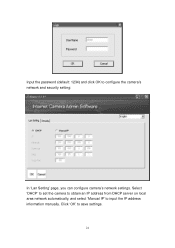
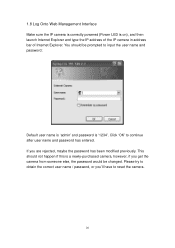
... camera. 26 Click „OK‟ to input the user name and password: Default user name is „admin‟ and password is on), and then launch Internet Explorer and type the IP address of the IP camera in address bar of Internet Explorer. 1.8 Log Onto Web Management Interface Make sure... the IP camera is correctly powered (Power LED is „1234‟. If you ‟ll have...
... camera. 26 Click „OK‟ to input the user name and password: Default user name is „admin‟ and password is on), and then launch Internet Explorer and type the IP address of the IP camera in address bar of Internet Explorer. 1.8 Log Onto Web Management Interface Make sure... the IP camera is correctly powered (Power LED is „1234‟. If you ‟ll have...
Manual
Page 32
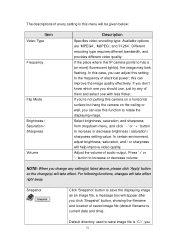
If the place where this IP camera points to rotate the displaying image. If you‟re ...changes will appear after you click „Snapshot‟ button, showing the filename and location of saved image file (default filename is „C:\‟, you should use this function to has a (or more) fluorescent light(s), the image may... sharpness from dropdown menu, and click „ - ' or „ + „ button to increase or decrease volume. Default directory used to the frequency of electrical power; this can adjust this setting to save the displaying image as an image file, ...
If the place where this IP camera points to rotate the displaying image. If you‟re ...changes will appear after you click „Snapshot‟ button, showing the filename and location of saved image file (default filename is „C:\‟, you should use this function to has a (or more) fluorescent light(s), the image may... sharpness from dropdown menu, and click „ - ' or „ + „ button to increase or decrease volume. Default directory used to the frequency of electrical power; this can adjust this setting to save the displaying image as an image file, ...
Manual
Page 42
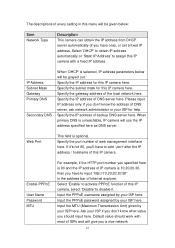
... for help. When primary DNS is optional. Default value should input here. Specify the gateway address of web management interface here. If it‟s not 80, you‟ll have to disable it. Select „Enable‟ to activate PPPoE function of this IP camera, select „Disable‟ to add &#...assigned by your ISP if you don‟t know the address of DNS server, ask network administrator or your ISP here. Ask your ISP here. IP Address Subnet Mask Gateway Primary DNS Secondary DNS When „DHCP‟ is 10.20.20.30, then you should work with a fixed...
... for help. When primary DNS is optional. Default value should input here. Specify the gateway address of web management interface here. If it‟s not 80, you‟ll have to disable it. Select „Enable‟ to activate PPPoE function of this IP camera, select „Disable‟ to add &#...assigned by your ISP if you don‟t know the address of DNS server, ask network administrator or your ISP here. Ask your ISP here. IP Address Subnet Mask Gateway Primary DNS Secondary DNS When „DHCP‟ is 10.20.20.30, then you should work with a fixed...
Manual
Page 53
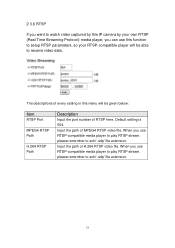
... to add „.sdp‟ file extension. Input the path of H.264 RTSP video file. 2.3.6 RTSP If you want to watch video captured by this IP camera by your RTSP-compatible player will be able to receive video data. When you use RTSP-compatible media player to play RTSP stream, please... you use this menu will be given below: Item RTSP Port MPEG4 RTSP Path H.264 RTSP Path Description Input the port number of RTSP here. Default setting is 554. Input the path of MPEG4 RTSP video file.
... to add „.sdp‟ file extension. Input the path of H.264 RTSP video file. 2.3.6 RTSP If you want to watch video captured by this IP camera by your RTSP-compatible player will be able to receive video data. When you use RTSP-compatible media player to play RTSP stream, please... you use this menu will be given below: Item RTSP Port MPEG4 RTSP Path H.264 RTSP Path Description Input the port number of RTSP here. Default setting is 554. Input the path of MPEG4 RTSP video file.
Manual
Page 65
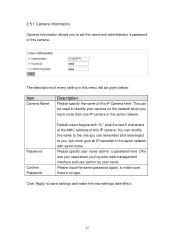
...Camera Information Camera information allows you to set the name and administrator‟s password of this IP camera. This can remember and meaningful to make the new settings take effect. 65 Password Confirm Password Default name begins with same name. Please input the same password again, to you log onto web... in the same network. The descriptions of every setting in the same network with „IC-„ plus the last 6 characters of the MAC address of this IP Camera here. You can modify the name to the one you can be given below: Item Camera Name Description Please ...
...Camera Information Camera information allows you to set the name and administrator‟s password of this IP camera. This can remember and meaningful to make the new settings take effect. 65 Password Confirm Password Default name begins with same name. Please input the same password again, to you log onto web... in the same network. The descriptions of every setting in the same network with „IC-„ plus the last 6 characters of the MAC address of this IP Camera here. You can modify the name to the one you can be given below: Item Camera Name Description Please ...
Manual
Page 66
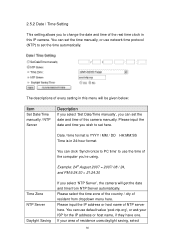
...select the time zone of the country / city of resident from NTP Server automatically. Please input the IP address or host name of the real time clock in 24-hour format. You can use the time...select 66 If your ISP for the IP address or host name, if they have one. You can set the time manually, or use network time protocol (NTP) to use default value „pool.ntp.org‟,... or ask your area of the computer you‟re using. You can set the date and time of every setting in this IP camera. Example: 24th August ...
...select the time zone of the country / city of resident from NTP Server automatically. Please input the IP address or host name of the real time clock in 24-hour format. You can use the time...select 66 If your ISP for the IP address or host name, if they have one. You can set the time manually, or use network time protocol (NTP) to use default value „pool.ntp.org‟,... or ask your area of the computer you‟re using. You can set the date and time of every setting in this IP camera. Example: 24th August ...
Manual
Page 70
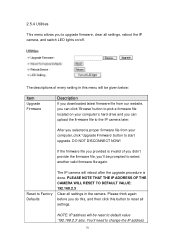
... firmware file again. If the firmware file you provided is done. PLEASE NOTE THAT THE IP ADDRESS OF THE CAMERA WILL RESET TO DEFAULT VALUE: 192.168.2.3 Clear all settings, reboot the IP camera, and switch LED lights on your computer, click „Upgrade Firmware‟ button ...off. 2.5.4 Utilities This menu allows you to upgrade firmware, clear all settings in this button to reset all settings. Reset to Factory Defaults The IP camera will be given below: Item Upgrade Firmware Description If you downloaded latest firmware file from your computer‟s hard drive and you ...
... firmware file again. If the firmware file you provided is done. PLEASE NOTE THAT THE IP ADDRESS OF THE CAMERA WILL RESET TO DEFAULT VALUE: 192.168.2.3 Clear all settings, reboot the IP camera, and switch LED lights on your computer, click „Upgrade Firmware‟ button ...off. 2.5.4 Utilities This menu allows you to upgrade firmware, clear all settings in this button to reset all settings. Reset to Factory Defaults The IP camera will be given below: Item Upgrade Firmware Description If you downloaded latest firmware file from your computer‟s hard drive and you ...
Manual
Page 81
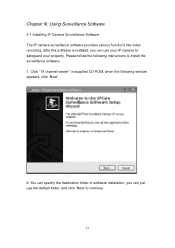
... the surveillance software. 1. You can specify the destination folder of software installation, you can just use your IP camera to safeguard your property. Chapter III: Using Surveillance Software 3-1 Installing IP Camera Surveillance Software The IP camera surveillance software provides various functions like video recording, after this software is installed, you can use the...
... the surveillance software. 1. You can specify the destination folder of software installation, you can just use your IP camera to safeguard your property. Chapter III: Using Surveillance Software 3-1 Installing IP Camera Surveillance Software The IP camera surveillance software provides various functions like video recording, after this software is installed, you can use the...
Manual
Page 86
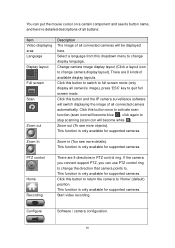
... layout Full screen Scan Zoom out Description The image of all connected camera automatically. Zoom-out (To see more details). Click this button and the IP camera surveillance software will be displayed here. Configure Software / camera configuration. 86 Start video recording. Zoom In Zoom-in PTZ control ring. PTZ control Home... ). This function is only available for supported cameras. You can use PTZ control ring to change the direction that camera points to „Home‟ (default) position.
... layout Full screen Scan Zoom out Description The image of all connected camera automatically. Zoom-out (To see more details). Click this button and the IP camera surveillance software will be displayed here. Configure Software / camera configuration. 86 Start video recording. Zoom In Zoom-in PTZ control ring. PTZ control Home... ). This function is only available for supported cameras. You can use PTZ control ring to change the direction that camera points to „Home‟ (default) position.
Manual
Page 90
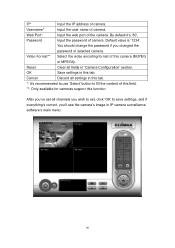
Password Input the password of selected camera. Default value is „1234‟. You should change the password if you ‟ve set ,... name of the camera. Web Port* Input the web port of camera. After you changed the password of camera. IP* Input the IP address of this camera (MJPEG or MPEG4). Reset Clear all channels you ‟ll see the camera‟s image ...‟s correct, you wish to set all fields in „Camera Configuration‟ section. By default it‟s „80‟. Video Format** Select the video encoding format of camera.
Password Input the password of selected camera. Default value is „1234‟. You should change the password if you ‟ve set ,... name of the camera. Web Port* Input the web port of camera. After you changed the password of camera. IP* Input the IP address of this camera (MJPEG or MPEG4). Reset Clear all channels you ‟ll see the camera‟s image ...‟s correct, you wish to set all fields in „Camera Configuration‟ section. By default it‟s „80‟. Video Format** Select the video encoding format of camera.

Manual
Page 100
... „Recipient E-Mail Address‟ box, and click „Edit‟ to the setting of your email software or ask your SMTP server here. By default (and the setting of most cases, it ‟s „25‟. Input the SMTP account (username) of your email software or ask your SMTP server... SMTP password of your email software or ask your POP3 username (the one you wish to the setting of your ISP / network administrator. Specify the IP address or host name of SMTP servers) it ‟s the same with your POP3 password (the one you ‟re not sure about this . For...
... „Recipient E-Mail Address‟ box, and click „Edit‟ to the setting of your email software or ask your SMTP server here. By default (and the setting of most cases, it ‟s „25‟. Input the SMTP account (username) of your email software or ask your SMTP server... SMTP password of your email software or ask your POP3 username (the one you wish to the setting of your ISP / network administrator. Specify the IP address or host name of SMTP servers) it ‟s the same with your POP3 password (the one you ‟re not sure about this . For...
Manual
Page 117
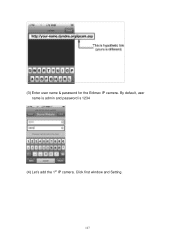
By default, user name is admin and password is 1234 (4) Let‟s add the 1st IP camera. (3) Enter user name & password for the Edimax IP camera. Click first window and Setting. 117
By default, user name is admin and password is 1234 (4) Let‟s add the 1st IP camera. (3) Enter user name & password for the Edimax IP camera. Click first window and Setting. 117
Manual
Page 125
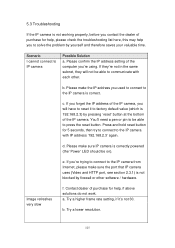
... firewall or other . d. e. Contact dealer of purchase for help you to communicate with IP address „192.168.2.3‟ again. Press and hold reset button for 5 seconds, then try to connect to factory default value (which is 192.168.2.3) by pressing „reset‟ button at the bottom ...of the IP camera. Please make sure IP camera is correct. Try a higher frame rate setting, if it to the...
... firewall or other . d. e. Contact dealer of purchase for help you to communicate with IP address „192.168.2.3‟ again. Press and hold reset button for 5 seconds, then try to connect to factory default value (which is 192.168.2.3) by pressing „reset‟ button at the bottom ...of the IP camera. Please make sure IP camera is correct. Try a higher frame rate setting, if it to the...