
Quick Install Guide
Page 6
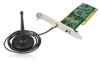
Product Information Main Features z Complies with IEEE 802.1x) for high security level. z Supports operating system: Windows OS 2000/XP/Vista/7, MAC OS 10.4.x /10.5.x and Linux z Supports WPS configuration button. 5 z Supports 64/128-bit WEP, WPA (TKIP with IEEE 802.1x),WPA2 (AES with 802.11n, 802.11g and 802.11b standards. z Supports WMM, WMM-PS (IEEE 802.11e QoS standard). 1.
Product Information Main Features z Complies with IEEE 802.1x) for high security level. z Supports operating system: Windows OS 2000/XP/Vista/7, MAC OS 10.4.x /10.5.x and Linux z Supports WPS configuration button. 5 z Supports 64/128-bit WEP, WPA (TKIP with IEEE 802.1x),WPA2 (AES with 802.11n, 802.11g and 802.11b standards. z Supports WMM, WMM-PS (IEEE 802.11e QoS standard). 1.
Quick Install Guide
Page 9
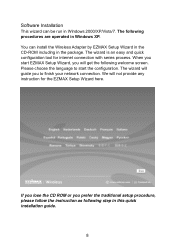
.... Please choose the language to finish your network connection. If you lose the CD ROM or you will get the following procedures are operated in Windows XP. The wizard is an easy and quick configuration tool for the EZMAX Setup Wizard here. You can be run in... Windows 2000/XP/Vista/7. We will guide you to start EZMAX Setup Wizard, you prefer the traditional setup procedure, please follow the instruction as following step ...
.... Please choose the language to finish your network connection. If you lose the CD ROM or you will get the following procedures are operated in Windows XP. The wizard is an easy and quick configuration tool for the EZMAX Setup Wizard here. You can be run in... Windows 2000/XP/Vista/7. We will guide you to start EZMAX Setup Wizard, you prefer the traditional setup procedure, please follow the instruction as following step ...

Quick Install Guide
Page 10
It's recommended to select 'Edimax Configuration Tool', which provides fully access to configure the wireless network card here. Please read the end user license agreement and click 'I accept the terms ... the configuration tool used to all function of this wireless network card. 3.2.1 Please execute 'Edimax_xxxx_Setup.exe' program to use the wireless configuration tool provided by Windows XP or Vista, please select 'Microsoft Zero Configuration Tool', and then click 'Next'. 9 If you prefer to install your wireless adapter.
It's recommended to select 'Edimax Configuration Tool', which provides fully access to configure the wireless network card here. Please read the end user license agreement and click 'I accept the terms ... the configuration tool used to all function of this wireless network card. 3.2.1 Please execute 'Edimax_xxxx_Setup.exe' program to use the wireless configuration tool provided by Windows XP or Vista, please select 'Microsoft Zero Configuration Tool', and then click 'Next'. 9 If you prefer to install your wireless adapter.

Quick Install Guide
Page 12
... Connect to Wireless Access Point 4.1 After installation is complete, wireless configuration utility will be shown as an icon at the lower-right corner of your windows desktop.
... Connect to Wireless Access Point 4.1 After installation is complete, wireless configuration utility will be shown as an icon at the lower-right corner of your windows desktop.

Quick Install Guide
Page 14
Click 'OK' to user manual enclosed in supplied CD-ROM. 13 For advanced settings and other features of wireless configuration utility window. 4.4 If the wireless access point is successfully connected, you'll see a 'Connected' message displayed at the lower-left corner of this wireless network card, please refer to exit.
Click 'OK' to user manual enclosed in supplied CD-ROM. 13 For advanced settings and other features of wireless configuration utility window. 4.4 If the wireless access point is successfully connected, you'll see a 'Connected' message displayed at the lower-left corner of this wireless network card, please refer to exit.

Manual
Page 6
PIN 54 2-8 Radio On/Off 56 2-9 About ...57 2-10 On-line Help 58 CHAPTER III: Soft-AP Function 59 3-1 Switch to Profile 26 2-2-2 Using Windows Zero Configuration 34 2-3 Profile Management 38 2-3-1 Add a profile 39 2-3-2 Edit an existing profile 40 2-3-3 Delete an existing profile 41 2-3-4 Activate a profile 42 2-4 Advanced Settings 43 2-5 ...
PIN 54 2-8 Radio On/Off 56 2-9 About ...57 2-10 On-line Help 58 CHAPTER III: Soft-AP Function 59 3-1 Switch to Profile 26 2-2-2 Using Windows Zero Configuration 34 2-3 Profile Management 38 2-3-1 Add a profile 39 2-3-2 Edit an existing profile 40 2-3-3 Delete an existing profile 41 2-3-4 Activate a profile 42 2-4 Advanced Settings 43 2-5 ...

Manual
Page 17
Please click 'Install' to configure the wireless network card here. If you prefer to all functions of this wireless network card. You can choose the configuration tool used to start utility installation. If you see 'Found New Hardware' message again, please ignore it and wait. 10 It's recommended to select 'Ralink Configuration Tool', which provides fully access to use the wireless configuration tool provided by Windows XP, please select 'Microsoft Zero Configuration Tool' then click 'Next'. 7. 6.
Please click 'Install' to configure the wireless network card here. If you prefer to all functions of this wireless network card. You can choose the configuration tool used to start utility installation. If you see 'Found New Hardware' message again, please ignore it and wait. 10 It's recommended to select 'Ralink Configuration Tool', which provides fully access to use the wireless configuration tool provided by Windows XP, please select 'Microsoft Zero Configuration Tool' then click 'Next'. 7. 6.

Manual
Page 19
... wireless card will also see an icon at the lower-right corner of your windows system. If you put the mouse cursor on this case, you stopped config utility by clicking 'Edimax Wireless Utility' icon from 'Start' -> 'All Programs' -> 'Edimax Wireless', as a popup balloon. If you want to start config utility again by...
... wireless card will also see an icon at the lower-right corner of your windows system. If you put the mouse cursor on this case, you stopped config utility by clicking 'Edimax Wireless Utility' icon from 'Start' -> 'All Programs' -> 'Edimax Wireless', as a popup balloon. If you want to start config utility again by...

Manual
Page 21
2-2 Using the Wireless Configuration Utility There are two ways you can configure your wireless network card to connect to wireless access point: using the Edimax configuration utility and using built-in windows zero configuration utility. 14
2-2 Using the Wireless Configuration Utility There are two ways you can configure your wireless network card to connect to wireless access point: using the Edimax configuration utility and using built-in windows zero configuration utility. 14

Manual
Page 22
...Less button It consists two parts: Menu and setup area. In this case, you can click 'More / less' button to expand the setup utility window, to display more information, and can select a setup function (Profile, Network, etc.) from menu, and corresponding setup items will launch, and begin ... You can not be displayed at lower-right corner of computer desktop and then clicks 'Launch Config Utility'. 2. Right-click the Edimax configuration utility icon located at setup area. Edimax setup utility will be fitted in setup area. Some function includes more information: 15 2-2-1 Using...
...Less button It consists two parts: Menu and setup area. In this case, you can click 'More / less' button to expand the setup utility window, to display more information, and can select a setup function (Profile, Network, etc.) from menu, and corresponding setup items will launch, and begin ... You can not be displayed at lower-right corner of computer desktop and then clicks 'Launch Config Utility'. 2. Right-click the Edimax configuration utility icon located at setup area. Edimax setup utility will be fitted in setup area. Some function includes more information: 15 2-2-1 Using...

Manual
Page 23
You can click 'More / Less' button again, and setup utility window will expand automatically. 16 Tip: If a setup item requires more information to complete the setup procedure, the setup utility window will resume to its original size.
You can click 'More / Less' button again, and setup utility window will expand automatically. 16 Tip: If a setup item requires more information to complete the setup procedure, the setup utility window will resume to its original size.

Manual
Page 41
Right-click Ralink configuration utility icon and select 'Use Zero Configuration as 'Windows Zero Configuration' (WZC). Right click Windows Zero Configuration icon and select 'View Available Wireless Networks'. HERE! 34 You can not find the icon, please follow the procedures from step 3 to configure your wireless network parameter: 1. If you can also use WZC to step 5. 2-2-2 Using Windows Zero Configuration Windows XP and Vista has a built-in wireless network configuration utility, called as Configuration utility'. 2.
Right-click Ralink configuration utility icon and select 'Use Zero Configuration as 'Windows Zero Configuration' (WZC). Right click Windows Zero Configuration icon and select 'View Available Wireless Networks'. HERE! 34 You can not find the icon, please follow the procedures from step 3 to configure your wireless network parameter: 1. If you can also use WZC to step 5. 2-2-2 Using Windows Zero Configuration Windows XP and Vista has a built-in wireless network configuration utility, called as Configuration utility'. 2.

Manual
Page 42
Click 'Start' button (should be located at the bottom-left corner of windows desktop), click 'Control Panel', then click 'Network and Internet Connections' in Control Panel. 4. 3. Click 'Network Connections'. 35
Click 'Start' button (should be located at the bottom-left corner of windows desktop), click 'Control Panel', then click 'Network and Internet Connections' in Control Panel. 4. 3. Click 'Network Connections'. 35

Manual
Page 51
.... When you need to CCX-compatible wireless devices. Check this box and the configuration utility will adjust TCP window size automatically to roam between multiple access points. When your computer is a wireless feature developed by wireless authentication server, a dialog...wireless access point and wireless devices. Here are descriptions of every setup item: Item Name Wireless mode Enable Tx Burst Enable TCP Window Size Fast Roaming Show Authentication Status Dialog Enable CCX Description Display the wireless operation mode of authentication will become available: Turn on...
.... When you need to CCX-compatible wireless devices. Check this box and the configuration utility will adjust TCP window size automatically to roam between multiple access points. When your computer is a wireless feature developed by wireless authentication server, a dialog...wireless access point and wireless devices. Here are descriptions of every setup item: Item Name Wireless mode Enable Tx Burst Enable TCP Window Size Fast Roaming Show Authentication Status Dialog Enable CCX Description Display the wireless operation mode of authentication will become available: Turn on...

Manual
Page 56
... enable WMM function. Please click 'Apply' button on the right of every setup item: Item Name WMM Enable WMM - Power Save Enable Description Check this window will be displayed. Valid values are descriptions of this check box after you have to select WMM power save modes here: Direct Link Setup Enable...
... enable WMM function. Please click 'Apply' button on the right of every setup item: Item Name WMM Enable WMM - Power Save Enable Description Check this window will be displayed. Valid values are descriptions of this check box after you have to select WMM power save modes here: Direct Link Setup Enable...

Manual
Page 65
2-10 On-line Help If you need to know the directions of how to view on-line help format. Click this button to use specific function in Windows help documents. 58 On-line help documents will be presented in the utility, please click 'Help' button.
2-10 On-line Help If you need to know the directions of how to view on-line help format. Click this button to use specific function in Windows help documents. 58 On-line help documents will be presented in the utility, please click 'Help' button.

Manual
Page 67
After you click 'Enable ICS' or 'Not enable ICS', you to Internet, please select it from 'Name' dropdown menu, and click 'Enable ICS'; If your computer does not have another network card which asks you 'll see the basic configuration menu of the AP function. 60 if your computer has another network card with internet connection. A configuration window will appear after you switch the operation mode to 'AP', which is connected to assign an existing network card with Internet connection, please click 'Not enable ICS'.
After you click 'Enable ICS' or 'Not enable ICS', you to Internet, please select it from 'Name' dropdown menu, and click 'Enable ICS'; If your computer does not have another network card which asks you 'll see the basic configuration menu of the AP function. 60 if your computer has another network card with internet connection. A configuration window will appear after you switch the operation mode to 'AP', which is connected to assign an existing network card with Internet connection, please click 'Not enable ICS'.
Manual
Page 71
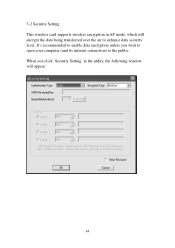
It's recommended to enable data encryption unless you click 'Security Setting' in AP mode, which will appear: 64 When you wish to open your computer (and its internet connection) to the public. 3-2 Security Setting This wireless card supports wireless encryption in the utility, the following window will encrypt the data being transferred over the air to enhance data security level.
It's recommended to enable data encryption unless you click 'Security Setting' in AP mode, which will appear: 64 When you wish to open your computer (and its internet connection) to the public. 3-2 Security Setting This wireless card supports wireless encryption in the utility, the following window will encrypt the data being transferred over the air to enhance data security level.

Manual
Page 81
CHAPTER IV: Appendix 4-1 Specification Standards: IEEE 802.11b/g/n (1T1R) Interface: 32Bit PCI Frequency Band: 2.4000 ~ 2.4835GHz (Industrial Scientific Medical Band) Data Rate: 11b: 1/2/5.5/11Mbps 11g: 6/9/12/24/36/48/54Mbps 11n (20MHz): MCS0-7 (up to 72Mbps) 11n (40MHz): MCS0-7 (up to 150Mbps) Securities: WEP 64/128-bit, WPA, WPA2 Cisco CCX Support Antenna: One External Dipole Antenna (1T1R) Drivers: Windows 2000/XP/Vista/7 LEDs: Link, Tx/Rx Temperature: 32~104°F (0 ~ 40°C) Humidity: 10-90% (NonCondensing) Certification: FCC, CE 74
CHAPTER IV: Appendix 4-1 Specification Standards: IEEE 802.11b/g/n (1T1R) Interface: 32Bit PCI Frequency Band: 2.4000 ~ 2.4835GHz (Industrial Scientific Medical Band) Data Rate: 11b: 1/2/5.5/11Mbps 11g: 6/9/12/24/36/48/54Mbps 11n (20MHz): MCS0-7 (up to 72Mbps) 11n (40MHz): MCS0-7 (up to 150Mbps) Securities: WEP 64/128-bit, WPA, WPA2 Cisco CCX Support Antenna: One External Dipole Antenna (1T1R) Drivers: Windows 2000/XP/Vista/7 LEDs: Link, Tx/Rx Temperature: 32~104°F (0 ~ 40°C) Humidity: 10-90% (NonCondensing) Certification: FCC, CE 74

Manual
Page 85
... in the IEEE 802 .11 standard. 8. 5. What is Infrastructure? What is TKIP? Compare with the same BSS ID. 7. On the hardware side, as with Netware, Windows 2000, or other LAN operating systems to ensure the highest degree of security and authenticity for digital information, wherever and however communicated or stored, while...
... in the IEEE 802 .11 standard. 8. 5. What is Infrastructure? What is TKIP? Compare with the same BSS ID. 7. On the hardware side, as with Netware, Windows 2000, or other LAN operating systems to ensure the highest degree of security and authenticity for digital information, wherever and however communicated or stored, while...
