
User Manual
Page 17
... 29 MCP/SPP fan connector EVGA 6 NVIDIA SPP with Active fan 3. Front panel connector 16. 780i 3-Way SLI Motherboard 22 22 25 23 24... 23 23 21 20 19 26 27 28 29 1187 13 1 13 2 16 3 15 4 14 13 11 12 10 9 8 1. Reset Button 19. PCI Express x1 slot 26. NVIDIA MCP (passive heat sink) 6 7 4 11. USB headers 12. Power button 18. Motherboard... battery 13. PCI slots 23. FDD connector 9. Serial connector 15. Azalia HD Audio Header 5 21. CPU fan connector 4. Jumper 17. PCI Express x16 slots (SLI...
... 29 MCP/SPP fan connector EVGA 6 NVIDIA SPP with Active fan 3. Front panel connector 16. 780i 3-Way SLI Motherboard 22 22 25 23 24... 23 23 21 20 19 26 27 28 29 1187 13 1 13 2 16 3 15 4 14 13 11 12 10 9 8 1. Reset Button 19. PCI Express x1 slot 26. NVIDIA MCP (passive heat sink) 6 7 4 11. USB headers 12. Power button 18. Motherboard... battery 13. PCI slots 23. FDD connector 9. Serial connector 15. Azalia HD Audio Header 5 21. CPU fan connector 4. Jumper 17. PCI Express x16 slots (SLI...
User Manual
Page 21
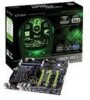
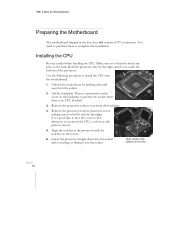
... CPU installed. 3. Use the following procedure to protect the socket when there is a protective socket cover on the socket. 6. 780i 3-Way SLI Motherboard Preparing the Motherboard The motherboard shipped in the processor with notches on the back. Make sure... not to bend or break any pins on the CPU EVGA 10 Remove the protective socket cover from the socket. 2. Unhook the socket lever by pushing down into the socket...
... CPU installed. 3. Use the following procedure to protect the socket when there is a protective socket cover on the socket. 6. 780i 3-Way SLI Motherboard Preparing the Motherboard The motherboard shipped in the processor with notches on the back. Make sure... not to bend or break any pins on the CPU EVGA 10 Remove the protective socket cover from the socket. 2. Unhook the socket lever by pushing down into the socket...

User Manual
Page 22
...that can install the DIMM into any slot, however, slot 0 is preferred. ‰ Two DIMMs: Install into slot 0. Installing Memory DIMMs Your new motherboard has four 1.8V 240-pin slots for your chassis type and your fan assembly. Use the following the recommendations for installing memory. (See Figure 1 on... channel DDR2 memory technology up to ensure normal operation. The idea is to not have the DIMMs in the socket. 7. There must be used with you close and engage the socket lever. Hardware Installation Note: Make sure the CPU is fully seated and level in adjacent slots. ‰ Four...
...that can install the DIMM into any slot, however, slot 0 is preferred. ‰ Two DIMMs: Install into slot 0. Installing Memory DIMMs Your new motherboard has four 1.8V 240-pin slots for your chassis type and your fan assembly. Use the following the recommendations for installing memory. (See Figure 1 on... channel DDR2 memory technology up to ensure normal operation. The idea is to not have the DIMMs in the socket. 7. There must be used with you close and engage the socket lever. Hardware Installation Note: Make sure the CPU is fully seated and level in adjacent slots. ‰ Four...