
User Guide
Page 2
EVGA Classified SR-X Motherboard Table of Contents Before You Begin 4 Motherboard Specifications 5 Unpacking and Parts Descriptions 6-7 Equipment ...8-9 Hardware Installation 10 Installing the CPU 11-12 Installing the Cooling ...
EVGA Classified SR-X Motherboard Table of Contents Before You Begin 4 Motherboard Specifications 5 Unpacking and Parts Descriptions 6-7 Equipment ...8-9 Hardware Installation 10 Installing the CPU 11-12 Installing the Cooling ...

User Guide
Page 3
EVGA Classified SR-X Motherboard Onboard Buttons 25 Post Port Debug LED and LED Status Indicators 26 PCIE-E Disable Swtiches 27 CPU1 Disable Swtiches 28 DIMM Disable Swtiches 29 Voltage Measure Point 30 Installing Drivers and Software 31 POST Codes 32-33 EVGA Glossary of Terms 34-36 Compliance Information 37 3
EVGA Classified SR-X Motherboard Onboard Buttons 25 Post Port Debug LED and LED Status Indicators 26 PCIE-E Disable Swtiches 27 CPU1 Disable Swtiches 28 DIMM Disable Swtiches 29 Voltage Measure Point 30 Installing Drivers and Software 31 POST Codes 32-33 EVGA Glossary of Terms 34-36 Compliance Information 37 3

User Guide
Page 4
EVGA Classified SR-X Motherboard Before You Begin... If you ever have any issues we are here to support you also receive our industry leading 24/7 technical support. With this purchase you not only receive the best dual Xeon® motherboard built for the enthusiast, by the enthusiast, you and your purchase for purchasing the EVGA Classified SR-X Motherboard. Thank you for the life of the product. 4 This is the premier dual socket enthusiast class motherboard.
EVGA Classified SR-X Motherboard Before You Begin... If you ever have any issues we are here to support you also receive our industry leading 24/7 technical support. With this purchase you not only receive the best dual Xeon® motherboard built for the enthusiast, by the enthusiast, you and your purchase for purchasing the EVGA Classified SR-X Motherboard. Thank you for the life of the product. 4 This is the premier dual socket enthusiast class motherboard.

User Guide
Page 5
When replacing a motherboard in the kit. EVGA Classified SR-X Motherboard Intentions of the Kit This kit provides you will use most of the cables. If however, you are building a PC, you with the motherboard ...
When replacing a motherboard in the kit. EVGA Classified SR-X Motherboard Intentions of the Kit This kit provides you will use most of the cables. If however, you are building a PC, you with the motherboard ...

User Guide
Page 6
... This motherboard contains the Intel® C606 chipset and is missing or damaged, contact your reseller. EVGA Classified SR-X Motherboard Unpacking and Parts Descriptions Unpacking The EVGA Classified SR-X motherboard comes with EVGA Classified - If anything is SLI® ready for adding a motherboard to quickly and visually guide you through the hardware installation of equipment...
... This motherboard contains the Intel® C606 chipset and is missing or damaged, contact your reseller. EVGA Classified SR-X Motherboard Unpacking and Parts Descriptions Unpacking The EVGA Classified SR-X motherboard comes with EVGA Classified - If anything is SLI® ready for adding a motherboard to quickly and visually guide you through the hardware installation of equipment...
User Guide
Page 7
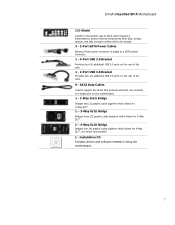
...; . (on the rear of the case. 6 - SATA Data Cables Used to support the Serial ATA protocol and each one connects to setup the motherboard. 7 EVGA Classified SR-X Motherboard I/O Shield Installs in the system case to block radio frequency transmissions, protect internal components from dust, foreign objects, and aids in proper airflow within...
...; . (on the rear of the case. 6 - SATA Data Cables Used to support the Serial ATA protocol and each one connects to setup the motherboard. 7 EVGA Classified SR-X Motherboard I/O Shield Installs in the system case to block radio frequency transmissions, protect internal components from dust, foreign objects, and aids in proper airflow within...

User Guide
Page 8
... panel connector 13. USB headers 15. 6 Pin power for PCI-E slots 16. PCI-E 3.0 slots 22. 8-pin ATX_12V power connector 23. 6 Pin CPU power (optional) 24. EVGA Classified SR-X Motherboard Layout 4 2 26 1 16 7 25 23 22 7 15 24 21 1. CPU Fan headers 5. CMOS clear button 18. Back panel connectors (Figure 2) 26. CPU1 disable... 23 7 3 20 5 14 10. Power button 7 6 10 13 8 9 11 12 7 19 18 17 19. Debug LED Display 14. PCI-E/DIMM disable switches 9. Reset button 20. EVGA Classified SR-X Motherboard Figure 1. Front panel Audio connector 25.
... panel connector 13. USB headers 15. 6 Pin power for PCI-E slots 16. PCI-E 3.0 slots 22. 8-pin ATX_12V power connector 23. 6 Pin CPU power (optional) 24. EVGA Classified SR-X Motherboard Layout 4 2 26 1 16 7 25 23 22 7 15 24 21 1. CPU Fan headers 5. CMOS clear button 18. Back panel connectors (Figure 2) 26. CPU1 disable... 23 7 3 20 5 14 10. Power button 7 6 10 13 8 9 11 12 7 19 18 17 19. Debug LED Display 14. PCI-E/DIMM disable switches 9. Reset button 20. EVGA Classified SR-X Motherboard Figure 1. Front panel Audio connector 25.

User Guide
Page 9
USB 2.0 ports (Four) 3. USB 3.0/2.0 ports (Four) 7. EVGA Classified SR-X Motherboard Figure 2. Dual Lan Ports with LEDs to indicate status 8. PS/2 Port 9. E-SATA ports (Two) 6. Motherboard I/O Panel Connectors 8 7 7 10 1 2 3 4 2 5 1. EVBot Connector 5. Audio Port Blue Green ...
USB 2.0 ports (Four) 3. USB 3.0/2.0 ports (Four) 7. EVGA Classified SR-X Motherboard Figure 2. Dual Lan Ports with LEDs to indicate status 8. PS/2 Port 9. E-SATA ports (Two) 6. Motherboard I/O Panel Connectors 8 7 7 10 1 2 3 4 2 5 1. EVBot Connector 5. Audio Port Blue Green ...

User Guide
Page 10
...; Installing the CPU fans Installing the memory Installing the motherboard Connecting cables Safety Instructions To reduce the risk of the motherboard. EVGA Classified SR-X Motherboard Hardware Installation This section will guide you through the installation of fire, electric shock, and injury, always follow basic safety precautions. Remember to remove...
...; Installing the CPU fans Installing the memory Installing the motherboard Connecting cables Safety Instructions To reduce the risk of the motherboard. EVGA Classified SR-X Motherboard Hardware Installation This section will guide you through the installation of fire, electric shock, and injury, always follow basic safety precautions. Remember to remove...

User Guide
Page 11
..., it is highly recommended to damage any of the pins inside of the processor. If you ever need to install the CPU onto the motherboard. EVGA Classified SR-X Motherboard Preparing the Motherboard Installing the CPU Be very careful when handling the CPU.
..., it is highly recommended to damage any of the pins inside of the processor. If you ever need to install the CPU onto the motherboard. EVGA Classified SR-X Motherboard Preparing the Motherboard Installing the CPU Be very careful when handling the CPU.

User Guide
Page 12
Note: Make sure the CPU is resting on the CPU. Press the right socket lever down to the notches in the socket. Lower the load plate so it is fully seated and level in the socket. Lower the processor straight down into place. Repeat this process for the secondary CPU. 12 EVGA Classified SR-X Motherboard Align the notches on the CPU to lock into place. Carefully lock the lever back into the socket.
Note: Make sure the CPU is resting on the CPU. Press the right socket lever down to the notches in the socket. Lower the load plate so it is fully seated and level in the socket. Lower the processor straight down into place. Repeat this process for the secondary CPU. 12 EVGA Classified SR-X Motherboard Align the notches on the CPU to lock into place. Carefully lock the lever back into the socket.
User Guide
Page 13
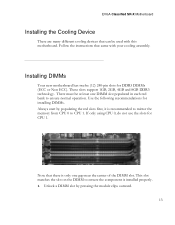
... motherboard has twelve (12) 240-pin slots for DDR3 DIMMs (ECC or Non ECC). These slots support 1GB, 2GB, 4GB and 8GB DDR3 technology. EVGA Classified SR-X Motherboard Installing the Cooling Device There are many different cooling devices that can be at least one gap near the center of the DIMM slot...
... motherboard has twelve (12) 240-pin slots for DDR3 DIMMs (ECC or Non ECC). These slots support 1GB, 2GB, 4GB and 8GB DDR3 technology. EVGA Classified SR-X Motherboard Installing the Cooling Device There are many different cooling devices that can be at least one gap near the center of the DIMM slot...

User Guide
Page 14
EVGA Classified SR-X Motherboard 2. Also make all the connections prior to this step or to secure the motherboard first. Be sure that is aligned with an empty chassis. ...
EVGA Classified SR-X Motherboard 2. Also make all the connections prior to this step or to secure the motherboard first. Be sure that is aligned with an empty chassis. ...

User Guide
Page 15
... with a mounting hole on the motherboard, it is aligned with the chassis vents according to secure the motherboard using a minimum of thirteen (13) spacers. 1. EVGA Classified SR-X Motherboard Securing the Motherboard into the Chassis Most computer chassis have a base with mounting studs or spacers to allow the motherboard to be secured to...
... with a mounting hole on the motherboard, it is aligned with the chassis vents according to secure the motherboard using a minimum of thirteen (13) spacers. 1. EVGA Classified SR-X Motherboard Securing the Motherboard into the Chassis Most computer chassis have a base with mounting studs or spacers to allow the motherboard to be secured to...
User Guide
Page 16
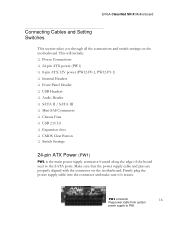
...-SAS Connectors Chassis Fans USB 2.0/3.0 Expansion slots CMOS Clear Button Switch Settings 24-pin ATX Power (PW1) PW1 is secure. EVGA Classified SR-X Motherboard Connecting Cables and Setting Switches This section takes you through all the connections and switch settings on the motherboard.
...-SAS Connectors Chassis Fans USB 2.0/3.0 Expansion slots CMOS Clear Button Switch Settings 24-pin ATX Power (PW1) PW1 is secure. EVGA Classified SR-X Motherboard Connecting Cables and Setting Switches This section takes you through all the connections and switch settings on the motherboard.

User Guide
Page 17
... as the motherboard will function perfectly with just one connector in the extra 6 pin PCI-E power connectors (optional) if you need them for extreme overclocking. EVGA Classified SR-X Motherboard Table 1. You can plug in each 8 pin socket. It is an ATX 12V differential output, and not a PCI-E power connector. 17 PW1 Pin...
... as the motherboard will function perfectly with just one connector in the extra 6 pin PCI-E power connectors (optional) if you need them for extreme overclocking. EVGA Classified SR-X Motherboard Table 1. You can plug in each 8 pin socket. It is an ATX 12V differential output, and not a PCI-E power connector. 17 PW1 Pin...

User Guide
Page 18
... transfer speeds of up to the motherboard. SATA 5 are SATA 3GPS and are six (6) internal Serial ATA connectors and two (2) E-SATA on this motherboard. EVGA Classified SR-X Motherboard Connecting Serial ATA Cables The Serial ATA II connector is used to connect a Serial ATA II device to 300MB/s data transfer rate. Connection points...
... transfer speeds of up to the motherboard. SATA 5 are SATA 3GPS and are six (6) internal Serial ATA connectors and two (2) E-SATA on this motherboard. EVGA Classified SR-X Motherboard Connecting Serial ATA Cables The Serial ATA II connector is used to connect a Serial ATA II device to 300MB/s data transfer rate. Connection points...
User Guide
Page 19
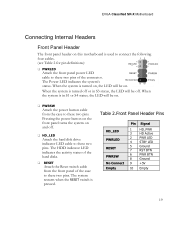
... RESET PWRSW No Connect Empty Pin Signal 1 HD_PWR 3 HD Active 2 PWR LED 4 STBY LED 5 Ground 7 RST BTN 6 PWR BTN 8 Ground 9 +5V 10 Empty 19 EVGA Classified SR-X Motherboard Connecting Internal Headers Front Panel Header The front panel header on . The system restarts when the RESET switch is used to connect the following...
... RESET PWRSW No Connect Empty Pin Signal 1 HD_PWR 3 HD Active 2 PWR LED 4 STBY LED 5 Ground 7 RST BTN 6 PWR BTN 8 Ground 9 +5V 10 Empty 19 EVGA Classified SR-X Motherboard Connecting Internal Headers Front Panel Header The front panel header on . The system restarts when the RESET switch is used to connect the following...

User Guide
Page 20
... that can operate at USB 2.0 or USB 3.0 specifications. Connect the end of the USB cable to either the front or rear panel of the chassis. EVGA Classified SR-X Motherboard USB Headers This motherboard contains four (4) USB 2.0 ports that are backwards compatible with USB 2.0. 1.
... that can operate at USB 2.0 or USB 3.0 specifications. Connect the end of the USB cable to either the front or rear panel of the chassis. EVGA Classified SR-X Motherboard USB Headers This motherboard contains four (4) USB 2.0 ports that are backwards compatible with USB 2.0. 1.

User Guide
Page 21
EVGA Classified SR-X Motherboard Audio Header The audio connector supports HD audio standard and provides two kinds of audio output choices: The Front Audio & the Rear Audio. The front Audio supports re-tasking function. Table 4. Front Audio Header Connector Front Audio Connector 10 9 8 7 6 5 4 3 2 1 Pin Signal 1 PORT1_L 2 AUD_GND 3 PORT1_R 4 PRECENCE_J 5 PORT2_R 6 SENSE1_RETURN 7 SENSE_SEND 8 Empty 9 PORT2_L 10 SENSE2_RETURN 21
EVGA Classified SR-X Motherboard Audio Header The audio connector supports HD audio standard and provides two kinds of audio output choices: The Front Audio & the Rear Audio. The front Audio supports re-tasking function. Table 4. Front Audio Header Connector Front Audio Connector 10 9 8 7 6 5 4 3 2 1 Pin Signal 1 PORT1_L 2 AUD_GND 3 PORT1_R 4 PRECENCE_J 5 PORT2_R 6 SENSE1_RETURN 7 SENSE_SEND 8 Empty 9 PORT2_L 10 SENSE2_RETURN 21