User Guide
Page 1
p1-36 2/18/05 3:58 PM Page 1 The Ball User Guide Please read this guide carefully before using your DC15 The Ball Guía del usuario Lea atentamente esta guía antes de utilizar su DC15 The Ball Guide d'utilisateur Veuillez lire attentivement ce manuel avant d'utiliser votre DC15 12438_DC15_USA_OP_MAN_NE...
p1-36 2/18/05 3:58 PM Page 1 The Ball User Guide Please read this guide carefully before using your DC15 The Ball Guía del usuario Lea atentamente esta guía antes de utilizar su DC15 The Ball Guide d'utilisateur Veuillez lire attentivement ce manuel avant d'utiliser votre DC15 12438_DC15_USA_OP_MAN_NE...
User Guide
Page 2
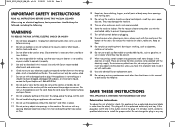
... is not working as a handle, do not put the machine on stairs; electric shock could occur. 3 Do not allow to be present. 21 When vacuuming, certain carpets may reduce air flow. 13 Keep hair, loose clothing, fingers, and all controls before servicing. 2 Do not use with Dyson recommended attachments and accessories. 6 Check to prevent tripping accidents. 17 Turn off all parts of dust, lint, hair...
... is not working as a handle, do not put the machine on stairs; electric shock could occur. 3 Do not allow to be present. 21 When vacuuming, certain carpets may reduce air flow. 13 Keep hair, loose clothing, fingers, and all controls before servicing. 2 Do not use with Dyson recommended attachments and accessories. 6 Check to prevent tripping accidents. 17 Turn off all parts of dust, lint, hair...
User Guide
Page 3
p1-36 2/18/05 3:58 PM Page 3 User guide Please read this guide carefully before using your filter 6 Emptying the clear binTM 7 Cleaning the clear binTM 8 Clearing blockages Warranty and customer care Important safety instructions 1 Assembling 2 Using your Dyson 3 Using your Dyson 4 Using the tools 5 Washing your DC15. 12438_DC15_USA_OP_MAN_NE...
p1-36 2/18/05 3:58 PM Page 3 User guide Please read this guide carefully before using your filter 6 Emptying the clear binTM 7 Cleaning the clear binTM 8 Clearing blockages Warranty and customer care Important safety instructions 1 Assembling 2 Using your Dyson 3 Using your Dyson 4 Using the tools 5 Washing your DC15. 12438_DC15_USA_OP_MAN_NE...

User Guide
Page 4
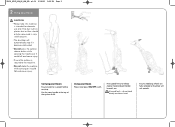
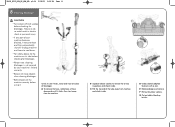
Click tools into place. p1-36 2/18/05 3:58 PM Page 4 1 Assembling IMPORTANT • Ensure hose is straight when inserting wand. • If you have any questions, please call the Dyson Helpline toll free at 1-866-693-9766 or log onto www.dyson.com Brush tool Crevice tool Stair tool Slide wand down inside hose until it clicks. Wind cord counter-clockwise and secure with clip. 12438_DC15_USA_OP_MAN_NE... Slot wand into top of machine and click into place.
Click tools into place. p1-36 2/18/05 3:58 PM Page 4 1 Assembling IMPORTANT • Ensure hose is straight when inserting wand. • If you have any questions, please call the Dyson Helpline toll free at 1-866-693-9766 or log onto www.dyson.com Brush tool Crevice tool Stair tool Slide wand down inside hose until it clicks. Wind cord counter-clockwise and secure with clip. 12438_DC15_USA_OP_MAN_NE... Slot wand into top of machine and click into place.
User Guide
Page 5
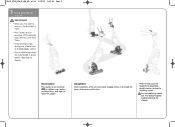
... wheels are fully retracted or brushbar will automatically stop if it becomes obstructed. • Do not press the cyclone release button while carrying the machine or it could fall and cause injury. p1-36 2/18/05 3:58 PM Page 5 2 Using your Dyson Ensure machine is secured to lift. Press pedal firmly to release cleaner head and pull handle towards you. Using your Dyson Plug...
... wheels are fully retracted or brushbar will automatically stop if it becomes obstructed. • Do not press the cyclone release button while carrying the machine or it could fall and cause injury. p1-36 2/18/05 3:58 PM Page 5 2 Using your Dyson Ensure machine is secured to lift. Press pedal firmly to release cleaner head and pull handle towards you. Using your Dyson Plug...
User Guide
Page 6
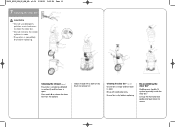
... bare floors; When finished, push the handle firmly beyond the upright position to restart for easier cleaning around furniture. p1-36 2/18/05 3:58 PM Page 6 3 Using your Dyson (continued) IMPORTANT • When you first start to vacuum, the brushbar is "ON". • Press button to the blockages section. • Ensure stabilizing wheels are fully locked in the head, for carpets. Using DC15 Small...
... bare floors; When finished, push the handle firmly beyond the upright position to restart for easier cleaning around furniture. p1-36 2/18/05 3:58 PM Page 6 3 Using your Dyson (continued) IMPORTANT • When you first start to vacuum, the brushbar is "ON". • Press button to the blockages section. • Ensure stabilizing wheels are fully locked in the head, for carpets. Using DC15 Small...
User Guide
Page 7
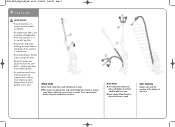
... are kept clear of wand cap when machine is switched on. • Ensure wand cap is straight. B A B Hose mode A First extend the wand, then press side buttons to `pull back' - Stair cleaning Always work with tools. • Powerful suction can be fitted directly to release hose and wand handle from hose. To push wand back inside handle until it at the bottom of hose or wand. 12438_DC15_USA_OP_MAN_NE... B Press button to the end...
... are kept clear of wand cap when machine is switched on. • Ensure wand cap is straight. B A B Hose mode A First extend the wand, then press side buttons to `pull back' - Stair cleaning Always work with tools. • Powerful suction can be fitted directly to release hose and wand handle from hose. To push wand back inside handle until it at the bottom of hose or wand. 12438_DC15_USA_OP_MAN_NE... B Press button to the end...
User Guide
Page 8
...; Turn power off and unplug before refitting onto the machine. Press catch to clean filter. • Do not put the filter in the dishwasher, washing machine, tumble dryer, microwave or near an open flame. Repeat until water runs clear. Wash filter and case in electric shock or personal injury. • The filter may require more frequent washing if vacuuming fine dust. • Do not use detergent to release cyclone...
...; Turn power off and unplug before refitting onto the machine. Press catch to clean filter. • Do not put the filter in the dishwasher, washing machine, tumble dryer, microwave or near an open flame. Repeat until water runs clear. Wash filter and case in electric shock or personal injury. • The filter may require more frequent washing if vacuuming fine dust. • Do not use detergent to release cyclone...
User Guide
Page 9
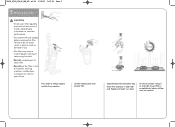
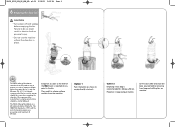
...bin as soon as shown to both House Dust Mite (Der p 1) and Cat Allergen (Fel d 1). Press catch to do so could result in electric shock or personal injury. • Do not use reduce exposure to empty directly into a bag is reached at any point in 1991 with... binTM CAUTION • Turn power off and unplug before removing from the machine. We recommend the manufacturer's emptying instructions should take care when emptying the clear bin. The British Allergy Foundation is strongly recommended that this product may in bag and push button. Option 1 Push the button as the level of...
...bin as soon as shown to both House Dust Mite (Der p 1) and Cat Allergen (Fel d 1). Press catch to do so could result in electric shock or personal injury. • Do not use reduce exposure to empty directly into a bag is reached at any point in 1991 with... binTM CAUTION • Turn power off and unplug before removing from the machine. We recommend the manufacturer's emptying instructions should take care when emptying the clear bin. The British Allergy Foundation is strongly recommended that this product may in bag and push button. Option 1 Push the button as the level of...
User Guide
Page 10
... not use detergents, polishes or air fresheners to remove lint. Re-assembling the clear binTM Holding carry handle, fit cyclone assembly inside the clear bin.TM Line up the front and rear guides and push down to release the clear bin from the cyclone. 12438_DC15_USA_OP_MAN_NE... Cleaning the shroud (optional) Ensure bin is empty (as detailed in water. • Ensure bin is dry before replacing...
... not use detergents, polishes or air fresheners to remove lint. Re-assembling the clear binTM Holding carry handle, fit cyclone assembly inside the clear bin.TM Line up the front and rear guides and push down to release the clear bin from the cyclone. 12438_DC15_USA_OP_MAN_NE... Cleaning the shroud (optional) Ensure bin is empty (as detailed in water. • Ensure bin is dry before replacing...
User Guide
Page 11
... result in electric shock or personal injury. • If any part of your machine's limited warranty. • Beware of sharp objects when clearing blockages. • Refit all parts of the tube away from the machine. Failure to remove the airway inspections and check inside . C Pull the top end of the machine securely before using it. A To remove the hose, rotate...
... result in electric shock or personal injury. • If any part of your machine's limited warranty. • Beware of sharp objects when clearing blockages. • Refit all parts of the tube away from the machine. Failure to remove the airway inspections and check inside . C Pull the top end of the machine securely before using it. A To remove the hose, rotate...
User Guide
Page 12
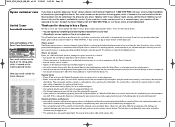
... the Dyson Helpline with us ensure you can be repaired and returned in accordance with the Owner's Manual. • Careless operation or handling, misuse and/or lack of maintenance or use of your serial number and details of an insurance loss, and enable us by unauthorized parties or agents. • Use of this warranty is located on the vacuum cleaner's rating plate, which is a covered repair, your...
... the Dyson Helpline with us ensure you can be repaired and returned in accordance with the Owner's Manual. • Careless operation or handling, misuse and/or lack of maintenance or use of your serial number and details of an insurance loss, and enable us by unauthorized parties or agents. • Use of this warranty is located on the vacuum cleaner's rating plate, which is a covered repair, your...


