User Guide
Page 1
Owner's Manual Please read this guide carefully before use.
Owner's Manual Please read this guide carefully before use.
User Guide
Page 2
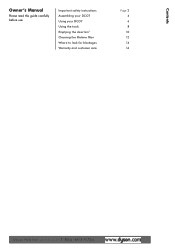
Important safety instructions Assembling your DCO7 Using your DCO7 Using the tools Emptying the clear binTM Cleaning the lifetime filter Where to look for blockages Warranty and customer care Page 2 4 6 8 10 12 14 16 Dyson Helpline contact us on 1-866-693-9766 3 Contents Owner's Manual Please read this guide carefully before use.
Important safety instructions Assembling your DCO7 Using your DCO7 Using the tools Emptying the clear binTM Cleaning the lifetime filter Where to look for blockages Warranty and customer care Page 2 4 6 8 10 12 14 16 Dyson Helpline contact us on 1-866-693-9766 3 Contents Owner's Manual Please read this guide carefully before use.
User Guide
Page 3
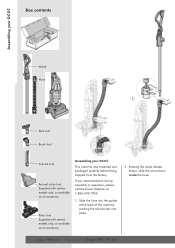
... Box contents Wand Hose 1 2 Stair tool Brush tool Crevice tool Animal turbo tool Supplied with certain models only, or available as an accessory. If you need assistance during assembly or operation, please call the Dyson Helpline on 1-866-693-9766. 1 Slide the hose into the guides at the back of the machine, pushing the tab securely into place. 2 Pressing the wand release button, slide the wand down inside the hose. 4 Dyson Helpline...
... Box contents Wand Hose 1 2 Stair tool Brush tool Crevice tool Animal turbo tool Supplied with certain models only, or available as an accessory. If you need assistance during assembly or operation, please call the Dyson Helpline on 1-866-693-9766. 1 Slide the hose into the guides at the back of the machine, pushing the tab securely into place. 2 Pressing the wand release button, slide the wand down inside the hose. 4 Dyson Helpline...
User Guide
Page 4
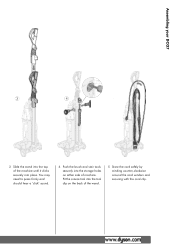
Fit the crevice tool into the tool clip on either side of the wand. 5 Store the cord safely by winding counter-clockwise around the cord winders and securing with the cord clip. 5 Assembling your DCO7 3 4 5 3 Slide the wand into the top of the machine until it clicks securely into the storage holes on the back of machine. You may need to press firmly and should hear a 'click' sound. 4 Push the brush and stair tools securely into place.
Fit the crevice tool into the tool clip on either side of the wand. 5 Store the cord safely by winding counter-clockwise around the cord winders and securing with the cord clip. 5 Assembling your DCO7 3 4 5 3 Slide the wand into the top of the machine until it clicks securely into the storage holes on the back of machine. You may need to press firmly and should hear a 'click' sound. 4 Push the brush and stair tools securely into place.
User Guide
Page 5
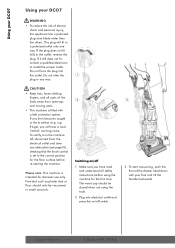
... machine is intended for the floor surface before using the tools. 2 Plug into the outlet. Fine dust such as plaster dust or flour should be vacuumed in the outlet, reverse the plug. Using your DCO7 Using your foot and tilt the handle backwards. 6 Dyson Helpline contact us on /off switch. 3 3 To start vacuuming, push the front of the cleaner head down with a belt protection system. Please note: This...
... machine is intended for the floor surface before using the tools. 2 Plug into the outlet. Fine dust such as plaster dust or flour should be vacuumed in the outlet, reverse the plug. Using your DCO7 Using your foot and tilt the handle backwards. 6 Dyson Helpline contact us on /off switch. 3 3 To start vacuuming, push the front of the cleaner head down with a belt protection system. Please note: This...
User Guide
Page 6
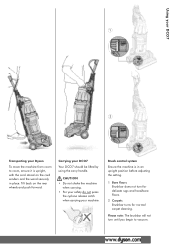
.../bare floors. 2 Carpets Brushbar turns for normal carpet cleaning. CAUTION • Do not shake the machine when carrying. • For your safety do not press the cyclone release catch when carrying your DCO7 Your DCO7 should be lifted by using the carry handle. Tilt back on the cord winders and the wand securely in an upright position before adjusting the setting. 1 Bare floors Brushbar...
.../bare floors. 2 Carpets Brushbar turns for normal carpet cleaning. CAUTION • Do not shake the machine when carrying. • For your safety do not press the cyclone release catch when carrying your DCO7 Your DCO7 should be lifted by using the carry handle. Tilt back on the cord winders and the wand securely in an upright position before adjusting the setting. 1 Bare floors Brushbar...
User Guide
Page 7
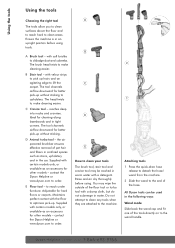
... in water. The brush head twists to the wand handle. 8 Dyson Helpline contact us on to make cleaning easier. the air powered brushbar ensures effective removal of the hose. A B C D E How to clean your tools The brush tool, stair tool and crevice tool may wipe the outside of the tools directly on 1-866-693-9766 Do not attempt to clean any tools when they are attached to the machine. 2 1 Attaching tools 1 Press the quick-draw hose release to...
... in water. The brush head twists to the wand handle. 8 Dyson Helpline contact us on to make cleaning easier. the air powered brushbar ensures effective removal of the hose. A B C D E How to clean your tools The brush tool, stair tool and crevice tool may wipe the outside of the tools directly on 1-866-693-9766 Do not attempt to clean any tools when they are attached to the machine. 2 1 Attaching tools 1 Press the quick-draw hose release to...
User Guide
Page 8
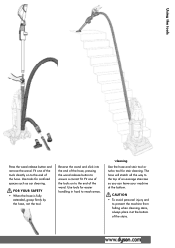
... from falling when cleaning stairs, always place it at the bottom of the hose, pressing the wand release button to the end of an average staircase so you can leave your machine at the bottom. Fit one of the tools directly on to the end of the wand. Using the tools Hose mode Press the wand release button and remove the wand. The hose will stretch all...
... from falling when cleaning stairs, always place it at the bottom of the hose, pressing the wand release button to the end of an average staircase so you can leave your machine at the bottom. Fit one of the tools directly on to the end of the wand. Using the tools Hose mode Press the wand release button and remove the wand. The hose will stretch all...
User Guide
Page 9
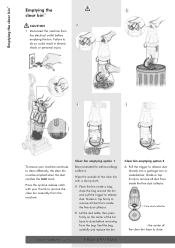
... and pull the trigger to remove the clear bin assembly from the machine. Emptying the clear binTM Emptying the A clear binTM CAUTION A • Disconnect the machine from the electrical outlet before removing from the bag. Press the cyclone release catch with a damp cloth. Clear bin emptying option 1 Recommended for asthma/allergy sufferers. Fine dust collector B Press firmly on...
... and pull the trigger to remove the clear bin assembly from the machine. Emptying the clear binTM Emptying the A clear binTM CAUTION A • Disconnect the machine from the electrical outlet before removing from the bag. Press the cyclone release catch with a damp cloth. Clear bin emptying option 1 Recommended for asthma/allergy sufferers. Fine dust collector B Press firmly on...
User Guide
Page 10
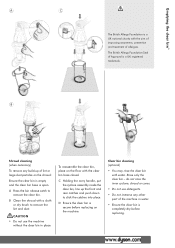
... cyclone, shroud or cones. • Do not use the machine without the clear bin in water. • Ensure the clear bin is a UK national charity with a cloth or dry brush to click the catches into place. B D Shroud cleaning (when necessary) To remove any other part of lint or large dust particles on the floor with water. A Press the bin release catch to remove...
... cyclone, shroud or cones. • Do not use the machine without the clear bin in water. • Ensure the clear bin is a UK national charity with a cloth or dry brush to click the catches into place. B D Shroud cleaning (when necessary) To remove any other part of lint or large dust particles on the floor with water. A Press the bin release catch to remove...
User Guide
Page 11
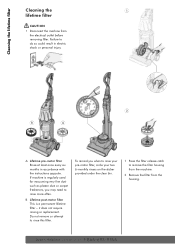
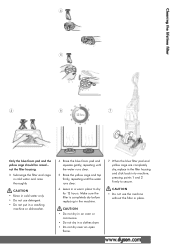
.... Cleaning the lifetime filter Cleaning the 1 lifetime filter CAUTION • Disconnect the machine from the housing. 12 Dyson Helpline contact us on the sticker provided under the clear bin. 1 Press the filter release catch to remove the filter housing from the machine. 2 Remove the filter from the electrical outlet before removing filter. B Lifetime post-motor filter This is regularly used for vacuuming very fine dust such as plaster dust or carpet...
.... Cleaning the lifetime filter Cleaning the 1 lifetime filter CAUTION • Disconnect the machine from the housing. 12 Dyson Helpline contact us on the sticker provided under the clear bin. 1 Press the filter release catch to remove the filter housing from the machine. 2 Remove the filter from the electrical outlet before removing filter. B Lifetime post-motor filter This is regularly used for vacuuming very fine dust such as plaster dust or carpet...
User Guide
Page 12
...filter is completely dry before replacing in cold water and rinse thoroughly. not the filter housing. 3 Submerge the filter and cage in the machine. CAUTION • Do not use detergent. • Do not put in a washing machine or dishwasher. 4 Rinse the blue foam pad and squeeze gently, repeating until the water runs... not dry in a clothes dryer. • Do not dry near an open flame. 7 When the blue filter pad and yellow cage are completely dry, replace in place. 13 CAUTION • Rinse in cold water only. • Do not use the machine without the filter in the filter housing ...
...filter is completely dry before replacing in cold water and rinse thoroughly. not the filter housing. 3 Submerge the filter and cage in the machine. CAUTION • Do not use detergent. • Do not put in a washing machine or dishwasher. 4 Rinse the blue foam pad and squeeze gently, repeating until the water runs... not dry in a clothes dryer. • Do not dry near an open flame. 7 When the blue filter pad and yellow cage are completely dry, replace in place. 13 CAUTION • Rinse in cold water only. • Do not use the machine without the filter in the filter housing ...
Parts List
Page 2
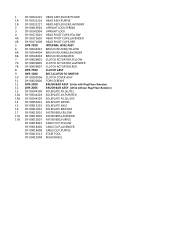
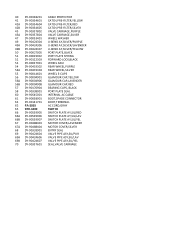
... UPRIGHT LOCK 4 DY‐90171601 HEAD PIVOT CLIPS,YELLOW 4A DY‐90171605 HEAD PIVOT CLIPS,LAVENDER 4B DY‐90171608 HEAD PIVOT CLIPS,RED 5 DYR‐7200 INTERNAL HOSE ASSY 6 DY‐90544401 BRUSH HOUSING,YELLOW 6A DY‐90544404 BRUSH HOUSING,LAVENDER 6B DY‐90544403 BRUSH HOUSING,RED ...,RED 8 DYR‐7500 CLUTCH ASSY 9 DYR‐1000 BELT,CLUTCH TO MOTOR 10 DY‐90240506 CLUTCH COVER ASSY 11 DY‐90020006 TORX SCREWS 12 DYR‐2000 BRUSH BAR ASSY (Units with Rug/Floor Selector) 12 DYR‐2005 BRUSH BAR ASSY (Units without Rug/Floor ...
... UPRIGHT LOCK 4 DY‐90171601 HEAD PIVOT CLIPS,YELLOW 4A DY‐90171605 HEAD PIVOT CLIPS,LAVENDER 4B DY‐90171608 HEAD PIVOT CLIPS,RED 5 DYR‐7200 INTERNAL HOSE ASSY 6 DY‐90544401 BRUSH HOUSING,YELLOW 6A DY‐90544404 BRUSH HOUSING,LAVENDER 6B DY‐90544403 BRUSH HOUSING,RED ...,RED 8 DYR‐7500 CLUTCH ASSY 9 DYR‐1000 BELT,CLUTCH TO MOTOR 10 DY‐90240506 CLUTCH COVER ASSY 11 DY‐90020006 TORX SCREWS 12 DYR‐2000 BRUSH BAR ASSY (Units with Rug/Floor Selector) 12 DYR‐2005 BRUSH BAR ASSY (Units without Rug/Floor ...
Parts List
Page 4
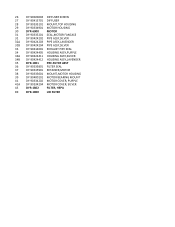
...90486110 CYCLONE ASSY,PUR/RED 18A DY‐90486115 CYCLONE ASSY,SIL/LAV 18B DY‐90486118 CYCLONE ASSY,SIL/YEL 19 DY‐90392901 BIN BAFFLE,YELLOW 19A DY‐90392904 BIN BAFFLE,RED 19B DY‐90392905 BIN BAFFLE,LAVENDER 20 DY‐90027401 BIN SEAL 21 DY‐90498501 SEAL,FINE DUST COLLECTOR... 22 DY‐90447601 BIN ASSY,YELLOW 22A DY‐90447604 BIN ASSY,RED...
...90486110 CYCLONE ASSY,PUR/RED 18A DY‐90486115 CYCLONE ASSY,SIL/LAV 18B DY‐90486118 CYCLONE ASSY,SIL/YEL 19 DY‐90392901 BIN BAFFLE,YELLOW 19A DY‐90392904 BIN BAFFLE,RED 19B DY‐90392905 BIN BAFFLE,LAVENDER 20 DY‐90027401 BIN SEAL 21 DY‐90498501 SEAL,FINE DUST COLLECTOR... 22 DY‐90447601 BIN ASSY,YELLOW 22A DY‐90447604 BIN ASSY,RED...
Parts List
Page 6
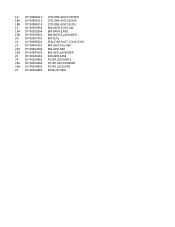
...90020004 DIFFUSER SCREW 27 DY‐90413701 DIFFUSER 28 DY‐90335101 MOUNT,TOP HOUSING 29 DY‐90334901 MOTOR HOUSING 30 DYR‐6000 MOTOR 31 DY‐90335201 SEAL,MOTOR FANCASE 32 DY‐90424202 PIPE ASSY,SILVER 32A DY‐90424203 PIPE ASSY,LAVENDER 32B DY‐...‐1801 PRE‐FILTER ASSY 36 DY‐90335801 FILTER SEAL 37 DY‐90335901 RETAINER,MOTOR 38 DY‐90335001 MOUNT,MOTOR HOUSING 39 DY‐90400101 MOTOR BEARING MOUNT 41 DY‐90334202 MOTOR COVER, PURPLE 41A DY‐90334204 MOTOR COVER, SILVER 43 DYR‐1802 FILTER, HEPA 89 DYR‐1800...
...90020004 DIFFUSER SCREW 27 DY‐90413701 DIFFUSER 28 DY‐90335101 MOUNT,TOP HOUSING 29 DY‐90334901 MOTOR HOUSING 30 DYR‐6000 MOTOR 31 DY‐90335201 SEAL,MOTOR FANCASE 32 DY‐90424202 PIPE ASSY,SILVER 32A DY‐90424203 PIPE ASSY,LAVENDER 32B DY‐...‐1801 PRE‐FILTER ASSY 36 DY‐90335801 FILTER SEAL 37 DY‐90335901 RETAINER,MOTOR 38 DY‐90335001 MOUNT,MOTOR HOUSING 39 DY‐90400101 MOTOR BEARING MOUNT 41 DY‐90334202 MOTOR COVER, PURPLE 41A DY‐90334204 MOTOR COVER, SILVER 43 DYR‐1802 FILTER, HEPA 89 DYR‐1800...
Parts List
Page 8
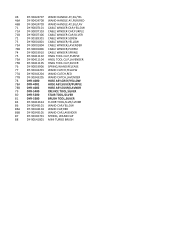
.../YELLOW PORT PLATE,BLACK PORT PLATE SPRING FORWARD LOCK,BLACK WHEEL AXLE REAR WHEEL,PURPLE REAR WHEEL,SILVER WHEEL E‐CLIPS GLAMOUR CAP,YELLOW GLAMOUR CAP,LAVENDER GLAMOUR CAP,RED BEARING CLIPS, BLACK PORT PLATE SEAL INTERNAL AC CABLE BOOT,SPADE CONNECTOR BOOT,TERMINAL AC CORD,GRAY SWITCH SWITCH PLATE AY,SIL/RED SWITCH PLATE AY,SIL/LAV SWITCH PLATE AY,SIL/YEL MOTOR COVER,LAVENDER MOTOR COVER,SILVER...
.../YELLOW PORT PLATE,BLACK PORT PLATE SPRING FORWARD LOCK,BLACK WHEEL AXLE REAR WHEEL,PURPLE REAR WHEEL,SILVER WHEEL E‐CLIPS GLAMOUR CAP,YELLOW GLAMOUR CAP,LAVENDER GLAMOUR CAP,RED BEARING CLIPS, BLACK PORT PLATE SEAL INTERNAL AC CABLE BOOT,SPADE CONNECTOR BOOT,TERMINAL AC CORD,GRAY SWITCH SWITCH PLATE AY,SIL/RED SWITCH PLATE AY,SIL/LAV SWITCH PLATE AY,SIL/YEL MOTOR COVER,LAVENDER MOTOR COVER,SILVER...
Parts List
Page 10
... TOOL CLIP,PURPLE 75A DY‐90411104 HNDL TOOL CLIP,LAVENDER 75B DY‐90411105 HNDL TOOL CLIP,SILVER 76 DY‐90019906 SPRING,WAND RELEASE 77 DY‐90343201 WAND CATCH,YELLOW 77A DY‐90343204 WAND CATCH,RED 77B DY‐90343205 WAND CATCH,LAVENDER 78 DYR‐4000 HOSE ...;4002 HOSE ASY,SILVR/LAVNDR 79 DYR‐5400 CREVICE TOOL,SILVER 80 DYR‐5200 STAIR TOOL,SILVER 81 DYR‐5300 BRUSH TOOL,SILVER 82 DY‐90413614 FLOOR TOOL,SLVR/LVNDR 86 DY‐90343101 WAND CAP,YELLOW 86A DY‐90343104 WAND CAP,RED 86B DY‐90343105 WAND CAP...
... TOOL CLIP,PURPLE 75A DY‐90411104 HNDL TOOL CLIP,LAVENDER 75B DY‐90411105 HNDL TOOL CLIP,SILVER 76 DY‐90019906 SPRING,WAND RELEASE 77 DY‐90343201 WAND CATCH,YELLOW 77A DY‐90343204 WAND CATCH,RED 77B DY‐90343205 WAND CATCH,LAVENDER 78 DYR‐4000 HOSE ...;4002 HOSE ASY,SILVR/LAVNDR 79 DYR‐5400 CREVICE TOOL,SILVER 80 DYR‐5200 STAIR TOOL,SILVER 81 DYR‐5300 BRUSH TOOL,SILVER 82 DY‐90413614 FLOOR TOOL,SLVR/LVNDR 86 DY‐90343101 WAND CAP,YELLOW 86A DY‐90343104 WAND CAP,RED 86B DY‐90343105 WAND CAP...


