User Manual (English)
Page 2
... 1 Other considerations 2 Features 3 Front panel 3 Back panel 4 Remote control 5 Installing remote control batteries 6 Setting up your DVD player 6 Unpacking and setting up 6 Making connections 6 Connecting power 6 HDMI connection 7 Component connection with analog audio 7 Component connection with ...digital audio 7 Composite connection 8 Using your DVD player 8 Turning your player on and off 8 Playing a disc 8 Playback options 8 JPEG disc playback 9 Using the menus 9 Troubleshooting 10...
... 1 Other considerations 2 Features 3 Front panel 3 Back panel 4 Remote control 5 Installing remote control batteries 6 Setting up your DVD player 6 Unpacking and setting up 6 Making connections 6 Connecting power 6 HDMI connection 7 Component connection with analog audio 7 Component connection with ...digital audio 7 Composite connection 8 Using your DVD player 8 Turning your player on and off 8 Playing a disc 8 Playback options 8 JPEG disc playback 9 Using the menus 9 Troubleshooting 10...
User Manual (English)
Page 3
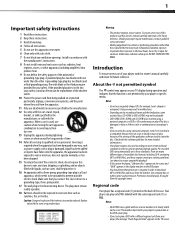
...may appear on or pinched particularly at plugs, convenience receptacles, and the point where they exit from the Internet. Notes: • Most DVDs have fallen into your player, the message "Check Regional Code" appears on it. 16 An apparatus with a three-prong, grounding-type plug is recorded in a ... a regional code (1) printed on the screen and "UNdI" appears in accordance with the apparatus. Install in the display window on the DVD player. • You should always be played, "Unknown Disc" appears on the back of the polarized or grounding-type plug. Caution: Danger of...
...may appear on or pinched particularly at plugs, convenience receptacles, and the point where they exit from the Internet. Notes: • Most DVDs have fallen into your player, the message "Check Regional Code" appears on it. 16 An apparatus with a three-prong, grounding-type plug is recorded in a ... a regional code (1) printed on the screen and "UNdI" appears in accordance with the apparatus. Install in the display window on the DVD player. • You should always be played, "Unknown Disc" appears on the back of the polarized or grounding-type plug. Caution: Danger of...
User Manual (English)
Page 5
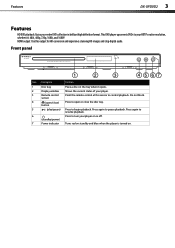
This DVD player upconverts DVDs to control playback. HDMI output: Use this sensor to your HDTV's native resolution, whether it opens. 2 Display window Shows the current status of your player. 3 Remote control Point the remote control at this output for HD conversion and experience...4 5 67 Item Description Function 1 Disc tray Place a disc on . Press again to turn your entire DVD collection in brilliant high definition format. Features DX-UPDVD2 3 Features HD DVD playback: Enjoy your player on or off. (standby/power) 7 Power indicator Turns red on standby and blue when the...
This DVD player upconverts DVDs to control playback. HDMI output: Use this sensor to your HDTV's native resolution, whether it opens. 2 Display window Shows the current status of your player. 3 Remote control Point the remote control at this output for HD conversion and experience...4 5 67 Item Description Function 1 Disc tray Place a disc on . Press again to turn your entire DVD collection in brilliant high definition format. Features DX-UPDVD2 3 Features HD DVD playback: Enjoy your player on or off. (standby/power) 7 Power indicator Turns red on standby and blue when the...
User Manual (English)
Page 7
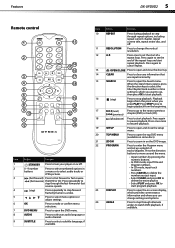
...end of tracks/chapters. Press to open the Search menu. Features DX-UPDVD2 5 Remote control 1 2 3 4 5 6 7 8 9 10 11 12 13 15 14 16 17 18 19 20 21 22 23 24 Item Button Function 1 /STANDBY Press to turn your player on some discs). Item Button Function 10 REPEAT Press during playback to...to step through the fast forward or fast reverse speeds. 4 (step) Press repeatedly to step forward frame by pressing the numeric buttons. • In DVD mode, input Title and Chapter numbers. • In CD mode, input track numbers. • Press CANCEL to delete the number you want to go ...
...end of tracks/chapters. Press to open the Search menu. Features DX-UPDVD2 5 Remote control 1 2 3 4 5 6 7 8 9 10 11 12 13 15 14 16 17 18 19 20 21 22 23 24 Item Button Function 1 /STANDBY Press to turn your player on some discs). Item Button Function 10 REPEAT Press during playback to...to step through the fast forward or fast reverse speeds. 4 (step) Press repeatedly to step forward frame by pressing the numeric buttons. • In DVD mode, input Title and Chapter numbers. • In CD mode, input track numbers. • Press CANCEL to delete the number you want to go ...
User Manual (English)
Page 8
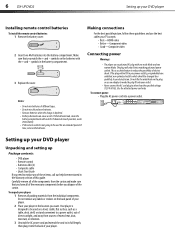
...• Better-Component video • Good-Composite video Connecting power Warnings: • The player uses a polarized AC plug with one wide blade and one narrow blade. To unpack your DVD player Installing remote control batteries To install the remote control batteries: 1 Remove the battery cover....8226; If the remote control is not going to replace any labels or stickers on the batteries with a cloth. 6 DX-UPDVD2 Setting up Package contents: • DVD player • Remote control • Batteries AAA (2) • Composite cable • Quick Start Guide If you want. Make...
...• Better-Component video • Good-Composite video Connecting power Warnings: • The player uses a polarized AC plug with one wide blade and one narrow blade. To unpack your DVD player Installing remote control batteries To install the remote control batteries: 1 Remove the battery cover....8226; If the remote control is not going to replace any labels or stickers on the batteries with a cloth. 6 DX-UPDVD2 Setting up Package contents: • DVD player • Remote control • Batteries AAA (2) • Composite cable • Quick Start Guide If you want. Make...
User Manual (English)
Page 9
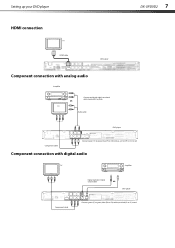
Component connection with analog audio Amplifier OR OR TV Connect red (audio right) to red and white (audio left) to red. Setting up your DVD player DX-UPDVD2 7 HDMI connection TV HDMI cable DVD player Component connection with digital audio TV Amplifier Component cable Digital optical or digital coaxial cable OR DVD player Connect green (Y) to green, blue (Pb or Cb) to blue, and red (Pr or Cr) to white. Audio cable DVD player Component cable Connect green (Y) to green, blue (Pb or Cb) to blue, and red (Pr or Cr) to red.
Component connection with analog audio Amplifier OR OR TV Connect red (audio right) to red and white (audio left) to red. Setting up your DVD player DX-UPDVD2 7 HDMI connection TV HDMI cable DVD player Component connection with digital audio TV Amplifier Component cable Digital optical or digital coaxial cable OR DVD player Connect green (Y) to green, blue (Pb or Cb) to blue, and red (Pr or Cr) to white. Audio cable DVD player Component cable Connect green (Y) to green, blue (Pb or Cb) to blue, and red (Pr or Cr) to red.
User Manual (English)
Page 10
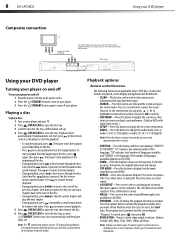
...picture. Note: Setting a resolution your TV cannot support could result in the video. 8 DX-UPDVD2 Using your DVD player Composite connection TV Composite cable (included) A/V cable connectors are applicable only to DVD discs. Press to resume normal playback. • During playback, press to return to set ... to start of the disc, press again, then press . Playback starts automatically. The player notes the stopped point, depending on the remote control or the player to confirm. • DVD MENU-Press this button and the screen displays "SUBTITLE 01/XX XXXXX." Note: The ...
...picture. Note: Setting a resolution your TV cannot support could result in the video. 8 DX-UPDVD2 Using your DVD player Composite connection TV Composite cable (included) A/V cable connectors are applicable only to DVD discs. Press to resume normal playback. • During playback, press to return to set ... to start of the disc, press again, then press . Playback starts automatically. The player notes the stopped point, depending on the remote control or the player to confirm. • DVD MENU-Press this button and the screen displays "SUBTITLE 01/XX XXXXX." Note: The ...
User Manual (English)
Page 11
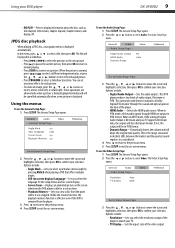
... or to select a different enlargement ratio, or press the , , , or buttons to move the cursor and highlight a selection, then press OK to confirm your DVD player DX-UPDVD2 9 • DISPLAY-Press to select a slideshow transition. The General Setup Page opens. 2 Press the , , , or buttons to move the enlarged picture. &#...and highlight a selection, then press OK to confirm your selection. If not, the output will be in on the screen whenever the DVD player is Bitstream and your TV. • TV Display-Sets the aspect ratio of Digital Audio Output is idle for the setup menus ...
... or to select a different enlargement ratio, or press the , , , or buttons to move the cursor and highlight a selection, then press OK to confirm your DVD player DX-UPDVD2 9 • DISPLAY-Press to select a slideshow transition. The General Setup Page opens. 2 Press the , , , or buttons to move the enlarged picture. &#...and highlight a selection, then press OK to confirm your selection. If not, the output will be in on the screen whenever the DVD player is Bitstream and your TV. • TV Display-Sets the aspect ratio of Digital Audio Output is idle for the setup menus ...
User Manual (English)
Page 12
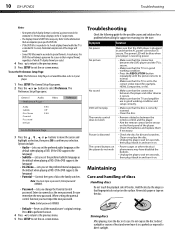
...is a standard 4:3 screen, horizontal compression of heat and never leave it to the store. 14 Symptom Solution No power Make sure that the DVD player is plugged in good working condition and setup correctly. Enter six numerals as s word Default G o to Preference Page 3 Press the , ,... causes and solutions for a problem before calling for example, HDMI, Component, or AV). The power LED will always appear on . 10 DX-UPDVD2 Troubleshooting Notes: • No matter which TV display format you must input a password. (Initial password: 000000). • Password-Lets you...
...is a standard 4:3 screen, horizontal compression of heat and never leave it to the store. 14 Symptom Solution No power Make sure that the DVD player is plugged in good working condition and setup correctly. Enter six numerals as s word Default G o to Preference Page 3 Press the , ,... causes and solutions for a problem before calling for example, HDMI, Component, or AV). The power LED will always appear on . 10 DX-UPDVD2 Troubleshooting Notes: • No matter which TV display format you must input a password. (Initial password: 000000). • Password-Lets you...
User Manual (English)
Page 13
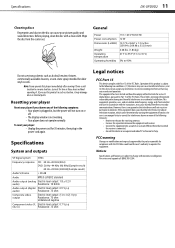
...equipment into an outlet on a circuit different from that to a warm location. Resetting your player Reset your player: • Unplug the power cord for older vinyl records. This equipment generates, uses, and...this device may cause undesired operation. For service and support call (800) 305-2204. Specifications DX-UPDVD2 11 Cleaning discs Fingerprints and dust on the disc can be determined by turning the equipment off...Specifications System and outputs VF Signal system NTSC Frequency response CD: 20 Hz~20 KHz (EIAJ) DVD: 20 Hz~44 KHz (96 KHz)(Sample result) 20 Hz~22 KHz (48 KHz)(Sample...
...equipment into an outlet on a circuit different from that to a warm location. Resetting your player Reset your player: • Unplug the power cord for older vinyl records. This equipment generates, uses, and...this device may cause undesired operation. For service and support call (800) 305-2204. Specifications DX-UPDVD2 11 Cleaning discs Fingerprints and dust on the disc can be determined by turning the equipment off...Specifications System and outputs VF Signal system NTSC Frequency response CD: 20 Hz~20 KHz (EIAJ) DVD: 20 Hz~44 KHz (96 KHz)(Sample result) 20 Hz~22 KHz (48 KHz)(Sample...


