Quick Setup Guide (English)
Page 1
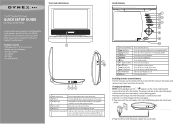
... to a wall outlet (AC); Front and side features Inside features 7" and 9" Portable DVD Players QUICK SETUP GUIDE DX-P7DVD and DX-P9DVD Congratulations on your player to a TV or monitor. 3 Headphone jack Plug headphones into a wall outlet. When headphones are plugged in personal DVD player design and is charging and flashes red when you turn off . Lights red... playback. Charging the battery NOTE: During playback, an icon appears on the screen, indicating the amount of power left on the side of a high-quality Dynex product.
... to a wall outlet (AC); Front and side features Inside features 7" and 9" Portable DVD Players QUICK SETUP GUIDE DX-P7DVD and DX-P9DVD Congratulations on your player to a TV or monitor. 3 Headphone jack Plug headphones into a wall outlet. When headphones are plugged in personal DVD player design and is charging and flashes red when you turn off . Lights red... playback. Charging the battery NOTE: During playback, an icon appears on the screen, indicating the amount of power left on the side of a high-quality Dynex product.
Quick Setup Guide (English)
Page 2
...on the adapter must accept any heat sources such as sunshine, fire, or the like. ENGLISH 10-0035 7" AND 9" PORTABLE DVD PLAYERS I QUICK SETUP GUIDE I DX-P7DVD AND DX-P9DVD The red charge indicator will not occur in a particular installation. Make sure that to which can be determined by Best ... right audio jack. Replace only with a region code of BBY Solutions, Inc. We're here for details. DYNEX is charged. 2 Slide the ON/OFF switch inside your player to safely disconnect the device from the built-in any ventilation openings. Registered in the disc tray, then close...
...on the adapter must accept any heat sources such as sunshine, fire, or the like. ENGLISH 10-0035 7" AND 9" PORTABLE DVD PLAYERS I QUICK SETUP GUIDE I DX-P7DVD AND DX-P9DVD The red charge indicator will not occur in a particular installation. Make sure that to which can be determined by Best ... right audio jack. Replace only with a region code of BBY Solutions, Inc. We're here for details. DYNEX is charged. 2 Slide the ON/OFF switch inside your player to safely disconnect the device from the built-in any ventilation openings. Registered in the disc tray, then close...
User Manual (English)
Page 2
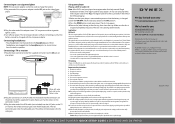
...dry cloth. 7 Do not block any ventilation openings. Install in personal DVD player design and is designed for reliable and trouble-free performance. DX-P7DVD and DX-P9DVD Contents Welcome 3 Important safety instructions 3 Features 5 Setting up your player 9 Using your player 12 Troubleshooting 20 Maintaining 21 Specifications 22 Legal notices 22 90-day ... purchase of the art in accordance with the manufacturer's instructions. 8 Do not use attachments/accessories specified by the manufacturer. Your DX-P7DVD or DX-P9DVD represents the state of a high-quality Dynex product.
...dry cloth. 7 Do not block any ventilation openings. Install in personal DVD player design and is designed for reliable and trouble-free performance. DX-P7DVD and DX-P9DVD Contents Welcome 3 Important safety instructions 3 Features 5 Setting up your player 9 Using your player 12 Troubleshooting 20 Maintaining 21 Specifications 22 Legal notices 22 90-day ... purchase of the art in accordance with the manufacturer's instructions. 8 Do not use attachments/accessories specified by the manufacturer. Your DX-P7DVD or DX-P9DVD represents the state of a high-quality Dynex product.
User Manual (English)
Page 6
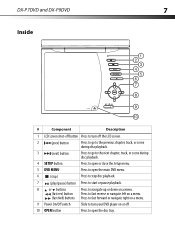
DX-P7DVD and DX-P9DVD 7 Inside SETUP DVD MENU OPEN OFF ON # Component Description 1 LCD screen shut-off button Press to turn off the LCD screen. 2 (... the next chapter, track, or scene during disc playback. 4 SETUP button Press to open or close the Setup menu. 5 DVD MENU Press to open the main DVD menu. 6 (stop) Press to stop disc playback. 7 (play/pause) button Press to start or pause playback. 8 or... fwd) buttons Press to fast forward or navigate right on a menu. 9 Power On/Off switch Slide to turn your DVD player on or off. 10 OPEN button Press to open the disc tray.
DX-P7DVD and DX-P9DVD 7 Inside SETUP DVD MENU OPEN OFF ON # Component Description 1 LCD screen shut-off button Press to turn off the LCD screen. 2 (... the next chapter, track, or scene during disc playback. 4 SETUP button Press to open or close the Setup menu. 5 DVD MENU Press to open the main DVD menu. 6 (stop) Press to stop disc playback. 7 (play/pause) button Press to start or pause playback. 8 or... fwd) buttons Press to fast forward or navigate right on a menu. 9 Power On/Off switch Slide to turn your DVD player on or off. 10 OPEN button Press to open the disc tray.
User Manual (English)
Page 8
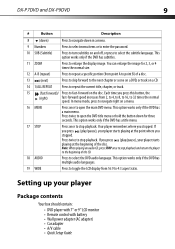
... the image for three seconds. This option works only if the DVD has a main menu. If you stopped. Your player remembers where you press (play /pause), your player Package contents Your box should contain: • DVD player with 7" or 9" LCD monitor • Remote control with battery... 14 1/ALL REPEAT Press to repeat the current title, chapter, or track. 15 (fast forward)/ Press to select the DVD audio language. Press twice to select the subtitle language. DX-P7DVD and DX-P9DVD 9 # Button Description 8 (down) Press to navigate down for 2, 3, or 4 times the normal size. 12...
... the image for three seconds. This option works only if the DVD has a main menu. If you stopped. Your player remembers where you press (play /pause), your player Package contents Your box should contain: • DVD player with 7" or 9" LCD monitor • Remote control with battery... 14 1/ALL REPEAT Press to repeat the current title, chapter, or track. 15 (fast forward)/ Press to select the DVD audio language. Press twice to select the subtitle language. DX-P7DVD and DX-P9DVD 9 # Button Description 8 (down) Press to navigate down for 2, 3, or 4 times the normal size. 12...
User Manual (English)
Page 10
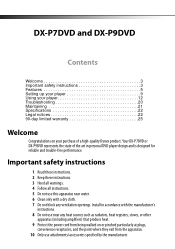
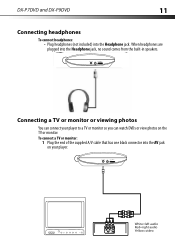
When headphones are plugged into the Headphone jack. AV OUT VOL White=left audio Red=right audio Yellow=video DX-P7DVD and DX-P9DVD 11 Connecting headphones To connect headphones: • Plug headphones (not included) into the Headphone jack, no sound comes from the built-in speakers. To connect a TV or monitor: 1 Plug the end of the supplied A/V cable that has one black connector into the AV jack on the TV or monitor. AV OUT VOL Connecting a TV or monitor or viewing photos You can connect your player to a TV or monitor so you can watch DVDs or view photos on your player.
When headphones are plugged into the Headphone jack. AV OUT VOL White=left audio Red=right audio Yellow=video DX-P7DVD and DX-P9DVD 11 Connecting headphones To connect headphones: • Plug headphones (not included) into the Headphone jack, no sound comes from the built-in speakers. To connect a TV or monitor: 1 Plug the end of the supplied A/V cable that has one black connector into the AV jack on the TV or monitor. AV OUT VOL Connecting a TV or monitor or viewing photos You can connect your player to a TV or monitor so you can watch DVDs or view photos on your player.
User Manual (English)
Page 11
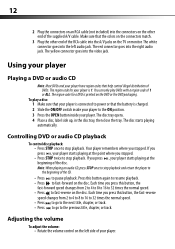
... you stopped. • Press STOP twice to fast-forward on the DVD or the DVD packaging. The yellow connector goes into the right audio jack. If you press , your player. You can only play a disc: 1 Make sure that your player starts playing at the point where you press this button, the fast... the volume To adjust the volume: • Rotate the volume control on the disc. Using your player Playing a DVD or audio CD Note: Most DVDs and your player to the previous title, chapter, or track. Press this button, the fast-reverse speed changes from 2 to 4 to 8 to 16 to 32 times ...
... you stopped. • Press STOP twice to fast-forward on the DVD or the DVD packaging. The yellow connector goes into the right audio jack. If you press , your player. You can only play a disc: 1 Make sure that your player starts playing at the point where you press this button, the fast... the volume To adjust the volume: • Rotate the volume control on the disc. Using your player Playing a DVD or audio CD Note: Most DVDs and your player to the previous title, chapter, or track. Press this button, the fast-reverse speed changes from 2 to 4 to 8 to 16 to 32 times ...
User Manual (English)
Page 16
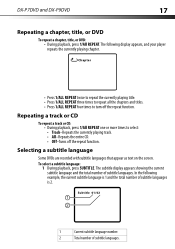
DX-P7DVD and DX-P9DVD 17 Repeating a chapter, title, or DVD To repeat a chapter, title, or DVD: • During playback, press 1/All REPEAT. Repeating a track or CD To repeat a track or CD: • During playback, press 1/All REPEAT one or more times ... current subtitle language and the total number of subtitle languages is 1 and the total number of subtitle languages. In the following display appears, and your player repeats the currently playing chapter. Chapter • Press 1/ALL REPEAT twice to repeat the currently playing title. • Press 1/ALL REPEAT three times to ...
DX-P7DVD and DX-P9DVD 17 Repeating a chapter, title, or DVD To repeat a chapter, title, or DVD: • During playback, press 1/All REPEAT. Repeating a track or CD To repeat a track or CD: • During playback, press 1/All REPEAT one or more times ... current subtitle language and the total number of subtitle languages is 1 and the total number of subtitle languages. In the following display appears, and your player repeats the currently playing chapter. Chapter • Press 1/ALL REPEAT twice to repeat the currently playing title. • Press 1/ALL REPEAT three times to ...
User Manual (English)
Page 17
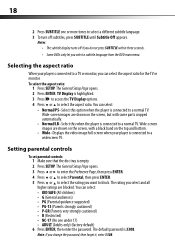
...TV. The default password is empty. 2 Press SETUP. Selecting the aspect ratio When your player is connected to block. TV Display is connected to a normal TV. Note: If you select a subtitle language from the DVD main menu. 18 2 Press SUBTITLE one under 17) • ADULT (Adults only) ...(factory default) 6 Press ENTER, then enter the password. You can select: • Normal/PS-Select this when the player is highlighted. 3 Press to access the TV ...
...TV. The default password is empty. 2 Press SETUP. Selecting the aspect ratio When your player is connected to block. TV Display is connected to a normal TV. Note: If you select a subtitle language from the DVD main menu. 18 2 Press SUBTITLE one under 17) • ADULT (Adults only) ...(factory default) 6 Press ENTER, then enter the password. You can select: • Normal/PS-Select this when the player is highlighted. 3 Press to access the TV ...
User Manual (English)
Page 18
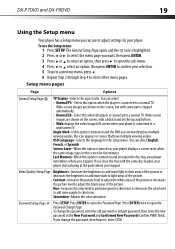
... this option is turned on and the DVD you are shown on the screen, with some parts cropped automatically. • Normal/LB-Select this option is turned on the top and bottom. • Wide displays the video image full-screen when your player is highlighted. 2 Press or to select... tray, your selection. 5 To go to a previous menu, press . 6 Repeat Step 2 through Step 4 to light areas of the picture. DX-P7DVD and DX-P9DVD 19 Using the Setup menu Your player has a Setup menu you can use the Setup menu: 1 Press SETUP. To change the password, then forget it, enter 3308.
... this option is turned on and the DVD you are shown on the screen, with some parts cropped automatically. • Normal/LB-Select this option is turned on the top and bottom. • Wide displays the video image full-screen when your player is highlighted. 2 Press or to select... tray, your selection. 5 To go to a previous menu, press . 6 Repeat Step 2 through Step 4 to light areas of the picture. DX-P7DVD and DX-P9DVD 19 Using the Setup menu Your player has a Setup menu you can use the Setup menu: 1 Press SETUP. To change the password, then forget it, enter 3308.
User Manual (English)
Page 19
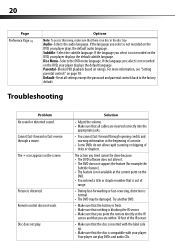
... • You cannot fast-forward through a movie. For more information, see "Setting parental controls" on ratings. The icon appears on the DVD, your player. 20 Page Preference Page Options Note: To access this menu, make sure that there is distorted. Default-Reset all cables are within 10 feet.... • Make sure that you point the remote directly at the IR sensor and that you select is not recorded on the DVD, your player displays the default language. Audio-Selects the audio language. Subtitle-Select the subtitle language. If the language you tried cannot be damaged....
... • You cannot fast-forward through a movie. For more information, see "Setting parental controls" on ratings. The icon appears on the DVD, your player. 20 Page Preference Page Options Note: To access this menu, make sure that there is distorted. Default-Reset all cables are within 10 feet.... • Make sure that you point the remote directly at the IR sensor and that you select is not recorded on the DVD, your player displays the default language. Audio-Selects the audio language. Subtitle-Select the subtitle language. If the language you tried cannot be damaged....
User Manual (English)
Page 20
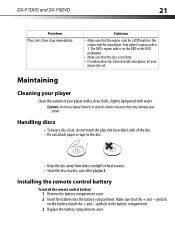
..., do not touch the play side (non-label side) of your player. symbols on the DVD or the DVD packaging. • Make sure that the + and - The DVD's region code is on the battery match the + and - symbols in a disc case after playback. DX-P7DVD and DX-P9DVD 21 Problem Play starts, then stops immediately. Caution: Do...
..., do not touch the play side (non-label side) of your player. symbols on the DVD or the DVD packaging. • Make sure that the + and - The DVD's region code is on the battery match the + and - symbols in a disc case after playback. DX-P7DVD and DX-P9DVD 21 Problem Play starts, then stops immediately. Caution: Do...


