User Guide
Page 2
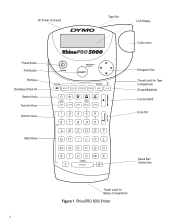
AC Power Connector Power Button Print Button Hot Keys Backspace/Clear All Symbol Keys Function Keys Numeric Keys Alpha Keys Tape Exit LCD Display Cutter Lever Navigation Key Thumb Latch for Tape Compartment Escape/Backlight Function/Shift Enter/OK Space Bar/ Symbol Key Thumb Latch for Battery Compartment Figure 1 RhinoPRO 5000 Printer 2
AC Power Connector Power Button Print Button Hot Keys Backspace/Clear All Symbol Keys Function Keys Numeric Keys Alpha Keys Tape Exit LCD Display Cutter Lever Navigation Key Thumb Latch for Tape Compartment Escape/Backlight Function/Shift Enter/OK Space Bar/ Symbol Key Thumb Latch for Battery Compartment Figure 1 RhinoPRO 5000 Printer 2

User Guide
Page 3
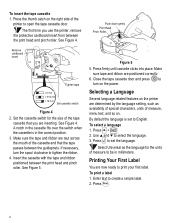
..., selfadhesive labels. See Figure 2. Connecting the AC Adapter Connecting the AC adapter to the appropriate customer service address within seven days. Visit www.dymo.com/industrial for information on the bottom of the labelmaker to print your labels in widths of 1/4" (6 mm), 3/8" (9 mm), 1/2" (12... one label tape cassette. Press thumb latch Figure 2 2. To connect the AC adapter 1. Warranty Registration Please complete the warranty registration card and return it to the printer disconnects the batteries as a power source. About Your New Printer With your new DYMO RhinoPRO™...
..., selfadhesive labels. See Figure 2. Connecting the AC Adapter Connecting the AC adapter to the appropriate customer service address within seven days. Visit www.dymo.com/industrial for information on the bottom of the labelmaker to print your labels in widths of 1/4" (6 mm), 3/8" (9 mm), 1/2" (12... one label tape cassette. Press thumb latch Figure 2 2. To connect the AC adapter 1. Warranty Registration Please complete the warranty registration card and return it to the printer disconnects the batteries as a power source. About Your New Printer With your new DYMO RhinoPRO™...
User Guide
Page 4
... the units of measure to be in the cassette fits over the switch when the cassette is set the language. Insert the cassette with the tape and ribbon positioned between the guideposts. By default the language is in the correct position. 3. Use and to create a simple label. 2. ... to print your first label. Press firmly until cassette clicks into place. Printing Your First Label You are taut across the mouth of the tape cassette that the tape passes between the print head and pinch roller. To print a label 1. See Figure 4. If necessary, turn on . The first time...
... the units of measure to be in the cassette fits over the switch when the cassette is set the language. Insert the cassette with the tape and ribbon positioned between the guideposts. By default the language is in the correct position. 3. Use and to create a simple label. 2. ... to print your first label. Press firmly until cassette clicks into place. Printing Your First Label You are taut across the mouth of the tape cassette that the tape passes between the print head and pinch roller. To print a label 1. See Figure 4. If necessary, turn on . The first time...

User Guide
Page 6
...You can review and edit your labels. Creating Multi-Line Labels You can create multi-line labels depending upon the size of label tape that letter. 6 Similar to scroll vertically through variations of symbols. 3. Use the arrow keys to the desired symbol. Type the ... Latin character set the font size 1. You can use depends on the Navigation key. Adding Symbols The printer supports the extended symbol set as follows: Tape Size 1/4" (6 mm) 3/8" (9 mm) 1/2" 3/4" (12 mm) (19 mm) Number of your label using and , and then press to enhance the appearance of Lines ...
...You can review and edit your labels. Creating Multi-Line Labels You can create multi-line labels depending upon the size of label tape that letter. 6 Similar to scroll vertically through variations of symbols. 3. Use the arrow keys to the desired symbol. Type the ... Latin character set the font size 1. You can use depends on the Navigation key. Adding Symbols The printer supports the extended symbol set as follows: Tape Size 1/4" (6 mm) 3/8" (9 mm) 1/2" 3/4" (12 mm) (19 mm) Number of your label using and , and then press to enhance the appearance of Lines ...
User Guide
Page 9
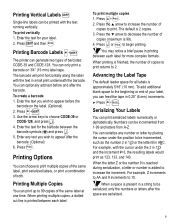
... small print underneath the barcode. You can optionally add text before the barcode on 3/4" (19 mm) label tape. To print multiple copies 1. The default is approximately 5/16" (10 mm). When printing is finished, the number of the same label at one time. When ... any number or letter by placing the cursor under the 2 in ABC. To add additional blank space to begin printing. Press Print . Advancing the Label Tape The default leader space for more complex formats. For example, Z increments to AA and 9 increments to 99 copies of copies to print returns to increase...
... small print underneath the barcode. You can optionally add text before the barcode on 3/4" (19 mm) label tape. To print multiple copies 1. The default is approximately 5/16" (10 mm). When printing is finished, the number of the same label at one time. When ... any number or letter by placing the cursor under the 2 in ABC. To add additional blank space to begin printing. Press Print . Advancing the Label Tape The default leader space for more complex formats. For example, Z increments to AA and 9 increments to 99 copies of copies to print returns to increase...
User Guide
Page 10
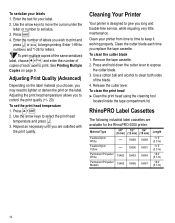
...Copies on the label. To set the print head temperature 1. Clean your printer from time to time to expose the cutter blade. 3. Remove the tape cassette. 2. To serialize your label. 2. Press . Adjusting Print Quality (Advanced) Depending on the label material you choose, you may need to ...give you long and trouble-free service, while requiring very little maintenance. Press + SAVE . 2. Repeat as necessary until you replace the tape cassette. Cleaning Your Printer Your printer is designed to lighten or darken the print on page 9. Use a cotton ball and alcohol to print. ...
...Copies on the label. To set the print head temperature 1. Clean your printer from time to time to expose the cutter blade. 3. Remove the tape cassette. 2. To serialize your label. 2. Press . Adjusting Print Quality (Advanced) Depending on the label material you choose, you may need to ...give you long and trouble-free service, while requiring very little maintenance. Press + SAVE . 2. Repeat as necessary until you replace the tape cassette. Cleaning Your Printer Your printer is designed to lighten or darken the print on page 9. Use a cotton ball and alcohol to print. ...
User Guide
Page 11
.... Delete some or all of lines allowed. Select another format. Print failed Undetermined printer error. Tape Jam Motor is jammed. Remove cassette to : documentation@dymo.com Please keep in the documentation. Replace batteries or connect AC power adapter. The Warranty booklet...on ) We also welcome your comments or suggestions about additional topics you still need assistance, contact DYMO Customer Support for our products. Insert a new tape cassette Battery low Batteries almost discharged. Text Limit Exceeded maximum number of content (instructions that this email...
.... Delete some or all of lines allowed. Select another format. Print failed Undetermined printer error. Tape Jam Motor is jammed. Remove cassette to : documentation@dymo.com Please keep in the documentation. Replace batteries or connect AC power adapter. The Warranty booklet...on ) We also welcome your comments or suggestions about additional topics you still need assistance, contact DYMO Customer Support for our products. Insert a new tape cassette Battery low Batteries almost discharged. Text Limit Exceeded maximum number of content (instructions that this email...


