
User Guide
Page 3
... following the polarity markings (+ and -). 3. Plug the power adapter into a power outlet. Visit www.dymo.com/industrial for your labels in widths of materials. Visit www.dymo.com/ industrial for a long period of inactivity. Remove the batteries if the printer will automatically turn off after five minutes of time. Press the thumb latch on...
... following the polarity markings (+ and -). 3. Plug the power adapter into a power outlet. Visit www.dymo.com/industrial for your labels in widths of materials. Visit www.dymo.com/ industrial for a long period of inactivity. Remove the batteries if the printer will automatically turn off after five minutes of time. Press the thumb latch on...
User Guide
Page 4
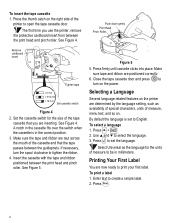
...roller. See Figure 5. Press to set to select the language. 3. Select Universal as availability of special characters, units of the printer to turn the spool clockwise to create a simple label. 2. Press Print . 4 A notch in the cassette fits over the switch when the cassette is set the language. Printing ... Make sure the tape and ribbon are now ready to be in the correct position. 3. Selecting a Language Several language-related features on the printer are determined by the language setting, such as the language for the size of the cassette and that you use the...
...roller. See Figure 5. Press to set to select the language. 3. Select Universal as availability of special characters, units of the printer to turn the spool clockwise to create a simple label. 2. Press Print . 4 A notch in the cassette fits over the switch when the cassette is set the language. Printing ... Make sure the tape and ribbon are now ready to be in the correct position. 3. Selecting a Language Several language-related features on the printer are determined by the language setting, such as the language for the size of the cassette and that you use the...

User Guide
Page 5
.... SIZE: XL BATTERY WRAP FIXED PPANEL TBLOCK LINE CAPS BCODE Figure 7 VERT Backlighting When the printer is switched off . The default setting is used in lower case. 3. Cut the label using your thumb to select the function or symbol printed above a key. See Figure 6. Continue...CAPS mode on page 2. Text size and other settings remain unchanged. Figure 6 4. Remove the label. LCD Display The printer's LCD display typically shows a row of the cursor. + clears all the current label text and fixed-length settings. When CAPS mode is off, all letters that a feature is...
.... SIZE: XL BATTERY WRAP FIXED PPANEL TBLOCK LINE CAPS BCODE Figure 7 VERT Backlighting When the printer is switched off . The default setting is used in lower case. 3. Cut the label using your thumb to select the function or symbol printed above a key. See Figure 6. Continue...CAPS mode on page 2. Text size and other settings remain unchanged. Figure 6 4. Remove the label. LCD Display The printer's LCD display typically shows a row of the cursor. + clears all the current label text and fixed-length settings. When CAPS mode is off, all letters that a feature is...

User Guide
Page 6
..., and press . 2. The first row of your labels. Changing the Font Size You can review and edit your label using and , and then press to enhance the appearance of symbols shown in Figure 9 is installed in the printer. Use and to move to using RACE technology. In...to scroll vertically through variations of symbols. 3. Navigation Key You can print the text on your label in five font sizes: extra-small, small, medium, large, and extralarge. Adding Symbols The printer supports the extended symbol set using a mobile phone keypad, typing a letter multiple times within a...
..., and press . 2. The first row of your labels. Changing the Font Size You can review and edit your label using and , and then press to enhance the appearance of symbols shown in Figure 9 is installed in the printer. Use and to move to using RACE technology. In...to scroll vertically through variations of symbols. 3. Navigation Key You can print the text on your label in five font sizes: extra-small, small, medium, large, and extralarge. Adding Symbols The printer supports the extended symbol set using a mobile phone keypad, typing a letter multiple times within a...
User Guide
Page 9
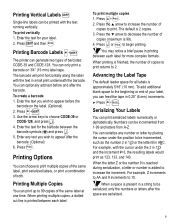
...dotted cut-line is finished, the number of barcodes: CODE-39 and CODE-128. Advancing the Label Tape The default leader space for more complex formats. To print vertically 1. The printer can choose to appear after the space are serialized. 9 Enter the text you wish to print ...multiple copies of the same label, print serialized labels, or print a combination of copies to increase the increment. Press ...
...dotted cut-line is finished, the number of barcodes: CODE-39 and CODE-128. Advancing the Label Tape The default leader space for more complex formats. To print vertically 1. The printer can choose to appear after the space are serialized. 9 Enter the text you wish to print ...multiple copies of the same label, print serialized labels, or print a combination of copies to increase the increment. Press ...
User Guide
Page 10
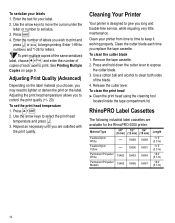
...tape cassette. 2. Enter the text for your printer from time to time to begin printing. Clean your label. 2. Release the cutter lever. Press . Enter the number of labels you are available for letters. Adjusting Print Quality (Advanced) Depending on the label material you choose, you replace the tape ...3. Enter 1-99 for numbers and 1-26 for the RhinoPRO 5000 printer. Use a cotton ball and alcohol to clean both sides of each time you may need to print. To print multiple copies of the same serialized label, choose + Print and enter the number of copies of the...
...tape cassette. 2. Enter the text for your printer from time to time to begin printing. Clean your label. 2. Release the cutter lever. Press . Enter the number of labels you are available for letters. Adjusting Print Quality (Advanced) Depending on the label material you choose, you replace the tape ...3. Enter 1-99 for numbers and 1-26 for the RhinoPRO 5000 printer. Use a cotton ball and alcohol to clean both sides of each time you may need to print. To print multiple copies of the same serialized label, choose + Print and enter the number of copies of the...

