
Revision 4 (5/2003)
Page 1
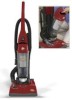
For quick reference, please record your vacuum together or answer any questions, call: 1 1-800-321-1134 (USA & Canada) www.dirtdevil.com A\WARNING Cleaner assembly may include small parts. code located on the lower backside of cleaner) Espanol - Small parts can present a choking hazard. Code: (Mfg. pagina El ©2003 All rights reserved # 1-113354-000 5/03 Model #: Mfg. Dirt uX"Aa® OWNER'S MANUAL Operating and Servicing Instructions • Please read these instructions carefully before using your cleaner. • Let us help you put your vacuum information below.
For quick reference, please record your vacuum together or answer any questions, call: 1 1-800-321-1134 (USA & Canada) www.dirtdevil.com A\WARNING Cleaner assembly may include small parts. code located on the lower backside of cleaner) Espanol - Small parts can present a choking hazard. Code: (Mfg. pagina El ©2003 All rights reserved # 1-113354-000 5/03 Model #: Mfg. Dirt uX"Aa® OWNER'S MANUAL Operating and Servicing Instructions • Please read these instructions carefully before using your cleaner. • Let us help you put your vacuum information below.
Revision 4 (5/2003)
Page 2
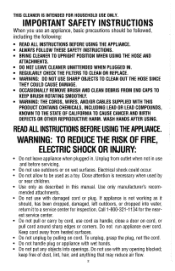
... THESE SAFETY INSTRUCTIONS. • BRING CLEANER TO UPRIGHT POSITION WHEN USING THE HOSE AND ATTACHMENTS. • DO NOT LEAVE CLEANER UNATTENDED WHEN PLUGGED IN. • REGULARLY CHECK THE FILTERS TO CLEAN OR REPLACE. • WARNING: DO NOT USE SHARP OBJECTS TO CLEAN OUT THE HOSE SINCE THEY COULD CAUSE DAMAGE. • OCCASIONALLY REMOVE BRUSH AND CLEAN DEBRIS FROM END CAPS TO KEEP BRUSH ROTATING SMOOTHLY. • WARNING: THE CORDS, WIRES, AND/OR...
... THESE SAFETY INSTRUCTIONS. • BRING CLEANER TO UPRIGHT POSITION WHEN USING THE HOSE AND ATTACHMENTS. • DO NOT LEAVE CLEANER UNATTENDED WHEN PLUGGED IN. • REGULARLY CHECK THE FILTERS TO CLEAN OR REPLACE. • WARNING: DO NOT USE SHARP OBJECTS TO CLEAN OUT THE HOSE SINCE THEY COULD CAUSE DAMAGE. • OCCASIONALLY REMOVE BRUSH AND CLEAN DEBRIS FROM END CAPS TO KEEP BRUSH ROTATING SMOOTHLY. • WARNING: THE CORDS, WIRES, AND/OR...

Revision 4 (5/2003)
Page 3
... of electric shock, this happens, turn switch off all parts of body away from openings and moving parts. • Do not pick up flammable or combustible liquids, such as gasoline, or use to use an extension cord with this vacuum cleaner. • Store the vacuum cleaner indoors. Empty the dirt container and clean filters. Do not change the plug in the upright position to lift the rotating brush off the motor to...
... of electric shock, this happens, turn switch off all parts of body away from openings and moving parts. • Do not pick up flammable or combustible liquids, such as gasoline, or use to use an extension cord with this vacuum cleaner. • Store the vacuum cleaner indoors. Empty the dirt container and clean filters. Do not change the plug in the upright position to lift the rotating brush off the motor to...

Revision 4 (5/2003)
Page 4
... Instructions Feature Descriptions How to Assemble Body to Nozzle Assembly Tool Caddy Assembly Handle to your new purchase will repair or replace any ROYAL® Authorized Sales & Warranty Service Station. Our company designed and developed this vacuum cleaner to any defective parts free of the vacuum cleaner. warrants this product with their quality and performance. The complete machine must be delivered prepaid to be free of defects in the USA). 4 Use...
... Instructions Feature Descriptions How to Assemble Body to Nozzle Assembly Tool Caddy Assembly Handle to your new purchase will repair or replace any ROYAL® Authorized Sales & Warranty Service Station. Our company designed and developed this vacuum cleaner to any defective parts free of the vacuum cleaner. warrants this product with their quality and performance. The complete machine must be delivered prepaid to be free of defects in the USA). 4 Use...

Revision 4 (5/2003)
Page 5
... Power Cord 17. On/Off Pedal 21. Dirt Cup Lid 4. Carpet Height Adjust Knob 8. Cord Guide 12. Dirt Container Release Latch 3. Carrying Handle/Upper Cord Wrap 16. Handle 2. Headlight 7. Swivel Casters'" 19. FRONT VIEW FEATURES BACK VIEW V Ef 3 4 5 10 6 9 7 0 0 8 FRONT VIEW 1. Dirt Cup Filter 6. Lower Hose 22 0 21 11 12 13 14 15 16 20 17 19 18 18 BACK VIEW 11. Hose 13. 2-in-1 Tool-Dust Brush / Upholstery Tool 14. Handle Release Pedal 20. Extension Wand 22. Hose...
... Power Cord 17. On/Off Pedal 21. Dirt Cup Lid 4. Carpet Height Adjust Knob 8. Cord Guide 12. Dirt Container Release Latch 3. Carrying Handle/Upper Cord Wrap 16. Handle 2. Headlight 7. Swivel Casters'" 19. FRONT VIEW FEATURES BACK VIEW V Ef 3 4 5 10 6 9 7 0 0 8 FRONT VIEW 1. Dirt Cup Filter 6. Lower Hose 22 0 21 11 12 13 14 15 16 20 17 19 18 18 BACK VIEW 11. Hose 13. 2-in-1 Tool-Dust Brush / Upholstery Tool 14. Handle Release Pedal 20. Extension Wand 22. Hose...
Revision 4 (5/2003)
Page 7
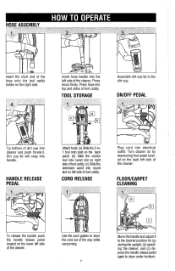
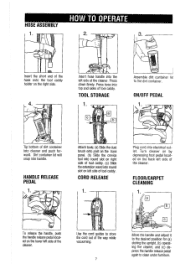
... cleaner. FLOOR/CARPET CLEANING a lb I To release the handle, push the handle release pedal located on the back left side of tool caddy. HOW TO OPERATE HOSE ASSEMBLY nsert the short end of the way while vacuuming. 7 Move the handle and adjust it to the desired position for (a) storing the upright, (b) operating the cleaner, and (c) depress the handle release pedal again to clean under furniture. CORD RELEASE Plug cord into handle. Press hose into cleaner and push forward. a b Assemble dirt cup...
... cleaner. FLOOR/CARPET CLEANING a lb I To release the handle, push the handle release pedal located on the back left side of tool caddy. HOW TO OPERATE HOSE ASSEMBLY nsert the short end of the way while vacuuming. 7 Move the handle and adjust it to the desired position for (a) storing the upright, (b) operating the cleaner, and (c) depress the handle release pedal again to clean under furniture. CORD RELEASE Plug cord into handle. Press hose into cleaner and push forward. a b Assemble dirt cup...
Revision 4 (5/2003)
Page 8
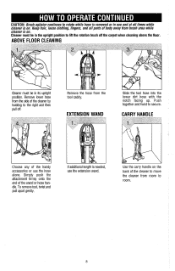
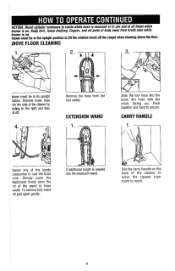
... WAND Slide the tool hose into the lower dirt hose with the notch facing up. CARRY HANDLE c7/ Choose any of the wand or hose handle. ABOVE FLOOR CLEANING 1 A U Cleaner must be in its upright position. Remove lower hose from brush area while cleaner is on . Cleaner must be in the upright position to lift the rotation brush off . HOW TO OPERATE CONTINUED CAUTION: Brush agitator continues to rotate while hose is removed or in use...
... WAND Slide the tool hose into the lower dirt hose with the notch facing up. CARRY HANDLE c7/ Choose any of the wand or hose handle. ABOVE FLOOR CLEANING 1 A U Cleaner must be in its upright position. Remove lower hose from brush area while cleaner is on . Cleaner must be in the upright position to lift the rotation brush off . HOW TO OPERATE CONTINUED CAUTION: Brush agitator continues to rotate while hose is removed or in use...

Revision 4 (5/2003)
Page 9
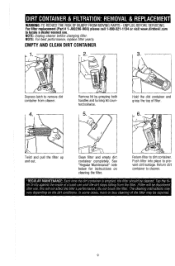
... dirt container is emptied, the filter should be required. 9 See "Regular Maintenance" note below for instructions on the dirt conditions. Tap the fil- EMPTY AND CLEAN DIRT CONTAINER 2. NOTE: Unplug cleaner before changing filter. Hold the dirt container and grasp the top of the filter may vary depending on cleaning the filter. DIRT CONTAINER & FILTRATION: REMOVAL & REPLACEMENT WARNING: TO REDUCE THE RISK OF INJURY FROM MOVING PARTS - For filter replacement (Part...
... dirt container is emptied, the filter should be required. 9 See "Regular Maintenance" note below for instructions on the dirt conditions. Tap the fil- EMPTY AND CLEAN DIRT CONTAINER 2. NOTE: Unplug cleaner before changing filter. Hold the dirt container and grasp the top of the filter may vary depending on cleaning the filter. DIRT CONTAINER & FILTRATION: REMOVAL & REPLACEMENT WARNING: TO REDUCE THE RISK OF INJURY FROM MOVING PARTS - For filter replacement (Part...
Revision 4 (5/2003)
Page 10
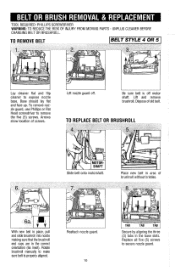
BELT OR BRUSH REMOVAL & REPLACEMENT TOOL REQUIRED: PHILLIPS SCREWDRIVER WARNING: TO REDUCE THE RISK OF INJURY FROM MOVING PARTS - Lift and remove brushroll. TO REPLACE BELT OR BRUSHROLL 4. 5 MOTORSHAFT Slide belt onto motorshaft. Rotate brushroll manually to expose nozzle base. To remove nozzle guard, use Phillips or Flat Head screwdriver to secure nozzle guard. With new belt in place, pull and slide brushroll into nozzle making sure that the brushroll end...
BELT OR BRUSH REMOVAL & REPLACEMENT TOOL REQUIRED: PHILLIPS SCREWDRIVER WARNING: TO REDUCE THE RISK OF INJURY FROM MOVING PARTS - Lift and remove brushroll. TO REPLACE BELT OR BRUSHROLL 4. 5 MOTORSHAFT Slide belt onto motorshaft. Rotate brushroll manually to expose nozzle base. To remove nozzle guard, use Phillips or Flat Head screwdriver to secure nozzle guard. With new belt in place, pull and slide brushroll into nozzle making sure that the brushroll end...

Revision 4 (5/2003)
Page 11
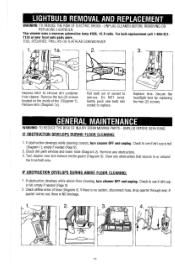
... cleaner. Gently push new bulb into socket to see if dirt cup is no suction, disconnect hose, drop quarter through end. Replace lens. Secure the headlight lens by replacing the two (2) screws. GENERAL MAINTENANCE WARNING: TO REDUCE THE RISK OF INJURY FROM MOVING PARTS - Check dirt path window and lower hose (Diagram 2). Remove any obstruction that occurs in or around the brushroll area. Turn cleaner over and remove nozzle...
... cleaner. Gently push new bulb into socket to see if dirt cup is no suction, disconnect hose, drop quarter through end. Replace lens. Secure the headlight lens by replacing the two (2) screws. GENERAL MAINTENANCE WARNING: TO REDUCE THE RISK OF INJURY FROM MOVING PARTS - Check dirt path window and lower hose (Diagram 2). Remove any obstruction that occurs in or around the brushroll area. Turn cleaner over and remove nozzle...

Revision 4 (5/2003)
Page 12
...Filter clogged. 1. Pg. 9. 3. Replace bulb - Broken or worn belt. 5. Pg. 9. 3. Review hose installation - Cleaner tools won 't pick-up 1. Brushroll worn. 4. Pg. 7. Pg. 7. 2. Pg. 9. Power cord not firmly 1. Replace belt - Review dirt container removal and replacement - Dirt container full. 3. working 2. Set carpet height setting adjust knob to appropriate setting for nearest authorized Royal® Dealer. Check fuse or breaker in firmly. Carpet height setting is 1. ction - Cleaner is incorrect. 1. ANY OTHER SERVICING...
...Filter clogged. 1. Pg. 9. 3. Replace bulb - Broken or worn belt. 5. Pg. 9. 3. Review hose installation - Cleaner tools won 't pick-up 1. Brushroll worn. 4. Pg. 7. Pg. 7. 2. Pg. 9. Power cord not firmly 1. Replace belt - Review dirt container removal and replacement - Dirt container full. 3. working 2. Set carpet height setting adjust knob to appropriate setting for nearest authorized Royal® Dealer. Check fuse or breaker in firmly. Carpet height setting is 1. ction - Cleaner is incorrect. 1. ANY OTHER SERVICING...

Revision 1 (3/2004)
Page 1
Model Mfg. Code: (Mfg. For quick reference, please record your cleaner. OWNER'S MANUAL Operating and Servicing Instructions Please read these instructions carefully before using your vacuum information below. Espafiol pagina El 02004 All rights reserved # 1-113354-000 3/04 Let us help you put your vacuum together or answer any questions, call: 1-800-321-1134 (USA & Canada) www.dirtdevil.com AWARNING: 'leaner assembly may include small parts. Small parts can present a choking hazard. code located on the lower backside of cleaner) -
Model Mfg. Code: (Mfg. For quick reference, please record your cleaner. OWNER'S MANUAL Operating and Servicing Instructions Please read these instructions carefully before using your vacuum information below. Espafiol pagina El 02004 All rights reserved # 1-113354-000 3/04 Let us help you put your vacuum together or answer any questions, call: 1-800-321-1134 (USA & Canada) www.dirtdevil.com AWARNING: 'leaner assembly may include small parts. Small parts can present a choking hazard. code located on the lower backside of cleaner) -

Revision 1 (3/2004)
Page 2
... INSTRUCTIONS Nhen you use with damaged cord or plug. OCCASIONALLY REMOVE BRUSH AND CLEAN DEBRIS FROM END CAPS TO KEEP BRUSH ROTATING SMOOTHLY. WASH HANDS AFTER USING. keep free of dust, lint, hair, and anything that may reduce air flow. 2 IEAD ALL INSTRUCTIONS BEFORE USING THE APPLIANCE. [HIS CLEANER IS INTENDED FOR HOUSEHOLD USE ONLY. REGULARLY CHECK THE FILTERS TO CLEAN OR REPLACE. DO NOT LEAVE CLEANER UNATTENDED WHEN PLUGGED IN. Close attention is not working as handle...
... INSTRUCTIONS Nhen you use with damaged cord or plug. OCCASIONALLY REMOVE BRUSH AND CLEAN DEBRIS FROM END CAPS TO KEEP BRUSH ROTATING SMOOTHLY. WASH HANDS AFTER USING. keep free of dust, lint, hair, and anything that may reduce air flow. 2 IEAD ALL INSTRUCTIONS BEFORE USING THE APPLIANCE. [HIS CLEANER IS INTENDED FOR HOUSEHOLD USE ONLY. REGULARLY CHECK THE FILTERS TO CLEAN OR REPLACE. DO NOT LEAVE CLEANER UNATTENDED WHEN PLUGGED IN. Close attention is not working as handle...

Revision 1 (3/2004)
Page 3
... motor and possible injury to the user. Use extra care when cleaning on furniture. Do not use to lift the rotating brush off all parts of electric shock, this vacuum cleaner. Proper voltage is listed on the floor. Do not change the plug in place. Do not use without dirt container and filters in any way. Cleaner must be present. Keep the vacuum cleaner on the cleaner plate. Put the vacuum cleaner away after use to install...
... motor and possible injury to the user. Use extra care when cleaning on furniture. Do not use to lift the rotating brush off all parts of electric shock, this vacuum cleaner. Proper voltage is listed on the floor. Do not change the plug in place. Do not use without dirt container and filters in any way. Cleaner must be present. Keep the vacuum cleaner on the cleaner plate. Put the vacuum cleaner away after use to install...

Revision 1 (3/2004)
Page 4
... To Operate P. Co. The warranty does not include unusual wear, damage resulting from state to be delivered &to your vacuum cleaner carton for the length of warranty and save your new purchase will repair or replace any ROYALe Authorized Sales & Warranty Service Station. This warranty does not cover unauthorized repairs. age 9 Belt or Brush: Removal & Replacement..........Page 10 Lightbulb: Removal and Replacement Page 11 General Maintenance P.age 11 Troubleshooting Guide P. Use only...
... To Operate P. Co. The warranty does not include unusual wear, damage resulting from state to be delivered &to your vacuum cleaner carton for the length of warranty and save your new purchase will repair or replace any ROYALe Authorized Sales & Warranty Service Station. This warranty does not cover unauthorized repairs. age 9 Belt or Brush: Removal & Replacement..........Page 10 Lightbulb: Removal and Replacement Page 11 General Maintenance P.age 11 Troubleshooting Guide P. Use only...
Revision 1 (3/2004)
Page 7
... into electrical outlet. Turn cleaner on by depressing foot pedal located on right side of tool caddy. (c) Slide the extension wand into top and sides of tool caddy. Insert the short end of the hose onto the tool caddy holder on left side of the cleaner. Press down firmly. CORD RELEASE Plug cord into cleaner and push forward. Use the cord guides to the dirt container. HANDLE RELEASE PEDAL Attach tools: (a) Slide the dust brush...
... into electrical outlet. Turn cleaner on by depressing foot pedal located on right side of tool caddy. (c) Slide the extension wand into top and sides of tool caddy. Insert the short end of the hose onto the tool caddy holder on left side of the cleaner. Press down firmly. CORD RELEASE Plug cord into cleaner and push forward. Use the cord guides to the dirt container. HANDLE RELEASE PEDAL Attach tools: (a) Slide the dust brush...
Revision 1 (3/2004)
Page 8
... cleaner from the tool caddy. CARRY HANDLE hoose any of the handy xessories or use the extension wand. leaner must be in the upright positionto lift the rotation brush off the carpet when cleaning above the floor. \BOVE FLOOR CLEANING leaner must be in use and at all parts of the w a d or hose andle. AUTION: Brush agitator continues to rotate while hose is removed or in its upright xition. EXTENSION WAND...
... cleaner from the tool caddy. CARRY HANDLE hoose any of the handy xessories or use the extension wand. leaner must be in the upright positionto lift the rotation brush off the carpet when cleaning above the floor. \BOVE FLOOR CLEANING leaner must be in use and at all parts of the w a d or hose andle. AUTION: Brush agitator continues to rotate while hose is removed or in its upright xition. EXTENSION WAND...
Revision 1 (3/2004)
Page 9
... to remove dirt container from cleaner. NOTE: For best performance, replace filter yearly. EMPTY AND CLEAN DIRT CONTAINER Depress latch to prevent dirt leakage. UNPLUG BEFORE SERVICING. Remove lid by grasping both handles and turning lid counterclockwise. Hold the dirt container and grasp the top of filter. See "Regular Maintenance" note below for instructions on cleaning the filter. WARNING: TO REDUCE THE RISK OF INJURY FROM MOVING PARTS - Return dirt...
... to remove dirt container from cleaner. NOTE: For best performance, replace filter yearly. EMPTY AND CLEAN DIRT CONTAINER Depress latch to prevent dirt leakage. UNPLUG BEFORE SERVICING. Remove lid by grasping both handles and turning lid counterclockwise. Hold the dirt container and grasp the top of filter. See "Regular Maintenance" note below for instructions on cleaning the filter. WARNING: TO REDUCE THE RISK OF INJURY FROM MOVING PARTS - Return dirt...
Revision 1 (3/2004)
Page 11
... remove dirt container from cleaner. Clear any obstruction. 3. If there is NO blockage. Remove the two (2) screws located on the inside of socket to remove. Replace lens. empty if needed (Page 9). 2. Check to replace. This cleaner uses a common automotive lamp #906,13.0 volts. Check dirt path window and lower hose (Diagram 2). Check airflow areas of hose (Diagram 4). If quarter comes out, there is no suction, disconnect hose. If obstruction develops while cleaning carpets, turn cleaner...
... remove dirt container from cleaner. Clear any obstruction. 3. If there is NO blockage. Remove the two (2) screws located on the inside of socket to remove. Replace lens. empty if needed (Page 9). 2. Check to replace. This cleaner uses a common automotive lamp #906,13.0 volts. Check dirt path window and lower hose (Diagram 2). Check airflow areas of hose (Diagram 4). If quarter comes out, there is no suction, disconnect hose. If obstruction develops while cleaning carpets, turn cleaner...

Revision 1 (3/2004)
Page 12
...2. Replace belt - Pg. 10. 5. Remove lower hose; Dust escaping from an authorized RoyaleDealer or retailer. Dirt container full. 2. Review hose installation - Hose clogged. 2. Remove hose and tools; Carpet height setting is difficult to cool - - Allow cleaner to push incorrect. 1. Dirt container not installed correctly. 2. appropriate setting for carpet being cleaned Pg. 7. Pg. 9. 2. Loose electrical wires. 1. obstruction - Power cord not firmly 1. plugged into outlet. 2. Clogged filter. 6. Nozzle/dirt passage hose clogged...
...2. Replace belt - Pg. 10. 5. Remove lower hose; Dust escaping from an authorized RoyaleDealer or retailer. Dirt container full. 2. Review hose installation - Hose clogged. 2. Remove hose and tools; Carpet height setting is difficult to cool - - Allow cleaner to push incorrect. 1. Dirt container not installed correctly. 2. appropriate setting for carpet being cleaned Pg. 7. Pg. 9. 2. Loose electrical wires. 1. obstruction - Power cord not firmly 1. plugged into outlet. 2. Clogged filter. 6. Nozzle/dirt passage hose clogged...


