Revision 3 (2/2003)
Page 6
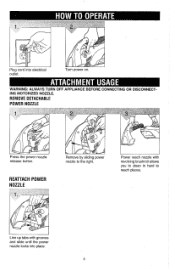
Turn power on. Plug cord into place. REMOVE DETACHABLE POWER NOZZLE Press the power nozzle release button. REATTACH POWER NOZZLE Remove by sliding power nozzle to reach places. WARNING: ALWAYS TURN OFF APPLIANCE BEFORE CONNECTING OR DISCONNECTING MOTORIZED NOZZLE. I I Line up tabs with revolving brushroll allows you to clean in hard to the right. Power reach nozzle with grooves and slide until the power nozzle locks into electrical outlet.
Turn power on. Plug cord into place. REMOVE DETACHABLE POWER NOZZLE Press the power nozzle release button. REATTACH POWER NOZZLE Remove by sliding power nozzle to reach places. WARNING: ALWAYS TURN OFF APPLIANCE BEFORE CONNECTING OR DISCONNECTING MOTORIZED NOZZLE. I I Line up tabs with revolving brushroll allows you to clean in hard to the right. Power reach nozzle with grooves and slide until the power nozzle locks into electrical outlet.
Revision 3 (2/2003)
Page 7
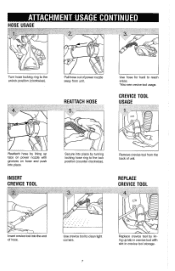
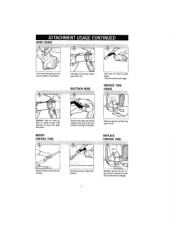
... crevice tool to reach areas. *Also see crevice tool usage. REATTACH HOSE Use hose for hard to clean tight corners. CREVICE TOOL USAGE Reattach hose by turning locking hose ring to the unlock position (clockwise). REPLACE CREVICE TOOL Insert crevice tool into place. Pull hose out of power nozzle away from...from unit. INSERT CREVICE TOOL Secure into place by lining up tab in crevice tool storage. Replace crevice tool by lining up tabs on power nozzle with slot in crevice tool with grooves on hose and push into the end of unit. Turn hose locking ring to the lock ...
... crevice tool to reach areas. *Also see crevice tool usage. REATTACH HOSE Use hose for hard to clean tight corners. CREVICE TOOL USAGE Reattach hose by turning locking hose ring to the unlock position (clockwise). REPLACE CREVICE TOOL Insert crevice tool into place. Pull hose out of power nozzle away from...from unit. INSERT CREVICE TOOL Secure into place by lining up tab in crevice tool storage. Replace crevice tool by lining up tabs on power nozzle with slot in crevice tool with grooves on hose and push into the end of unit. Turn hose locking ring to the lock ...

Revision 3 (4/2001)
Page 6
... (2a). *Also see crevice tool usage. Secure into place. HOSE USAGE Remove by turning locking hose ring to reach places. Pull hose out of power nozzle away from unit. I \\\ I I I Plug cord into place. Use for hard to the unlock position (clockwise). Reattach hose ...up tabs with revolving brushroll allows you to clean in hard to the lock position (counter clockwise). REMOVE DETACHABLE REATTACH POWER POWER NOZZLE NOZZLE Press the power nozzle release button. Line up tabs on power nozzle with grooves on . Power reach nozzle with grooves and slide until the...
... (2a). *Also see crevice tool usage. Secure into place. HOSE USAGE Remove by turning locking hose ring to reach places. Pull hose out of power nozzle away from unit. I \\\ I I I Plug cord into place. Use for hard to the unlock position (clockwise). Reattach hose ...up tabs with revolving brushroll allows you to clean in hard to the lock position (counter clockwise). REMOVE DETACHABLE REATTACH POWER POWER NOZZLE NOZZLE Press the power nozzle release button. Line up tabs on power nozzle with grooves on . Power reach nozzle with grooves and slide until the...
Revision 3 (10/2001)
Page 6
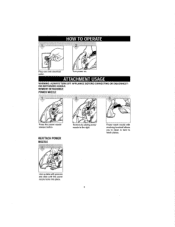
REATTACH POWER NOZZLE Remove by sliding power nozzle to reach places. Turn power on. Power reach nozzle with grooves and slide until the power nozzle locks into electrical outlet. Line up tabs with revolving brushroll allows you to clean in hard to the right. WARNING: ALWAYS TURN OFF APPLIANCE BEFORE CONNECTING OR DISCONNECTING MOTORIZED NOZZLE. Plug cord into place. REMOVE DETACHABLE POWER NOZZLE Press the power nozzle release button.
REATTACH POWER NOZZLE Remove by sliding power nozzle to reach places. Turn power on. Power reach nozzle with grooves and slide until the power nozzle locks into electrical outlet. Line up tabs with revolving brushroll allows you to clean in hard to the right. WARNING: ALWAYS TURN OFF APPLIANCE BEFORE CONNECTING OR DISCONNECTING MOTORIZED NOZZLE. Plug cord into place. REMOVE DETACHABLE POWER NOZZLE Press the power nozzle release button.
Revision 3 (10/2001)
Page 7
...into place by lining up tab in crevice tool with slot in crevice tool storage. INSERT CREVICE TOOL Secure into place. Pull hose out of power nozzle away from the back of hose. I I Remove crevice tool from unit. Replace crevice tool by turning locking hose ring to the unlock... position (clockwise). Use crevice tool to reach areas. 'Also see crevice tool usage. REPLACE CREVICE TOOL Insert crevice tool into the end of unit. Turn hose locking ring to the lock position...
...into place by lining up tab in crevice tool with slot in crevice tool storage. INSERT CREVICE TOOL Secure into place. Pull hose out of power nozzle away from the back of hose. I I Remove crevice tool from unit. Replace crevice tool by turning locking hose ring to the unlock... position (clockwise). Use crevice tool to reach areas. 'Also see crevice tool usage. REPLACE CREVICE TOOL Insert crevice tool into the end of unit. Turn hose locking ring to the lock position...
Revision 1 (4/2004)
Page 1
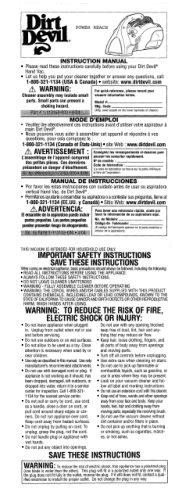
...sharp edges or corners. Look on the lower backs~deof cleaner) MODE D'EMPLOI Veuillez lire attentivement ces instructions avant d'utiliser votre aspirateur a main Dirt Devil? POWER REACH I 'appareil comprend des petites pieces. Small parts can present a choking hazard. A d J* 2 Model #: ~ f g C. ode: ...et ~tats-~niss)ite Web : www.dirtdevil.com Cassemblage de I INSTRUCTION MANUAL Please read these instructions carefully before unplugging. de Dirt DevilB. y Canada) Sitio Web: www.dirtdevil.com A ADVERTENCIA: El ensamble de la aspiradora incluir partes pequeiias. DO NOT ...
...sharp edges or corners. Look on the lower backs~deof cleaner) MODE D'EMPLOI Veuillez lire attentivement ces instructions avant d'utiliser votre aspirateur a main Dirt Devil? POWER REACH I 'appareil comprend des petites pieces. Small parts can present a choking hazard. A d J* 2 Model #: ~ f g C. ode: ...et ~tats-~niss)ite Web : www.dirtdevil.com Cassemblage de I INSTRUCTION MANUAL Please read these instructions carefully before unplugging. de Dirt DevilB. y Canada) Sitio Web: www.dirtdevil.com A ADVERTENCIA: El ensamble de la aspiradora incluir partes pequeiias. DO NOT ...
Revision 1 (4/2004)
Page 2
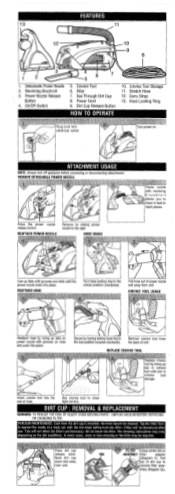
... clean end of unit. Remove crevice tool from unit. OnIOff Switch 5. See Through Dirt Cup 8. Detachable Power Nozzle 2. Power Nozzle Release Button 4. Power Cord 9. IEMOVE DETACHABLE POWEl NOZZLE ress the power nozzle Remove bv slidina- .Dower release button. REATTACH POWER NOZZLE HOSE USAGE &jr' f reach places. Filter 7. REPLACE CREVICE TOOL I 1. I Insert crevice tool into place. Crevice Tool...
... clean end of unit. Remove crevice tool from unit. OnIOff Switch 5. See Through Dirt Cup 8. Detachable Power Nozzle 2. Power Nozzle Release Button 4. Power Cord 9. IEMOVE DETACHABLE POWEl NOZZLE ress the power nozzle Remove bv slidina- .Dower release button. REATTACH POWER NOZZLE HOSE USAGE &jr' f reach places. Filter 7. REPLACE CREVICE TOOL I 1. I Insert crevice tool into place. Crevice Tool...


