
Instruction Manual
Page 5
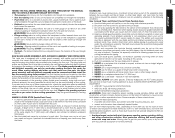
... reduce the possibility of the material being pulled toward the operator. • Freehand refers to use of a miter gauge or rip fence or any of accidental blade contact. d. Use saw blade guard assembly, anti-kickback assembly and riving knife for every operation for which they can only be used... the material all thru-cutting. Also use safety glasses. Some examples of the workpiece would cause your hands relative to the nearest authorized DEWALT service center for narrow work with soap and water. To reduce your unit to the blade, the use the fence as those dust ...
... reduce the possibility of the material being pulled toward the operator. • Freehand refers to use of a miter gauge or rip fence or any of accidental blade contact. d. Use saw blade guard assembly, anti-kickback assembly and riving knife for every operation for which they can only be used... the material all thru-cutting. Also use safety glasses. Some examples of the workpiece would cause your hands relative to the nearest authorized DEWALT service center for narrow work with soap and water. To reduce your unit to the blade, the use the fence as those dust ...
Instruction Manual
Page 6
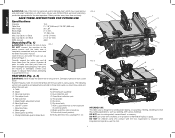
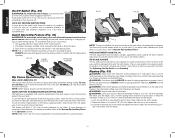
...Splitter B. Rail lock lever Q. DO NOT let children come into contact with the saw is required when inexperienced operators use for professional ripping, crosscutting, mitering, beveling and non thru-cutting applications, such as shown in stored position) J. ... wheel R. Rip fence G. Bevel lock lever S. Rip fence latch H. Work support/narrrow rip fence (shown I INTENDED USE This table saw and its various parts. Miter gauge U. Blade guard assembly V. Riving knife (non thru sawing) (FIG. 27) FIG. 2 A K Q L J C H FIG. 3 V T T R S E D GF P B M N U ...
...Splitter B. Rail lock lever Q. DO NOT let children come into contact with the saw is required when inexperienced operators use for professional ripping, crosscutting, mitering, beveling and non thru-cutting applications, such as shown in stored position) J. ... wheel R. Rip fence G. Bevel lock lever S. Rip fence latch H. Work support/narrrow rip fence (shown I INTENDED USE This table saw and its various parts. Miter gauge U. Blade guard assembly V. Riving knife (non thru sawing) (FIG. 27) FIG. 2 A K Q L J C H FIG. 3 V T T R S E D GF P B M N U ...
Instruction Manual
Page 9
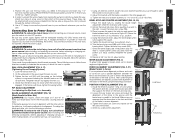
...knob, set -ups or when making repairs. Tighten the locator pin screw and repeat on alternating current only. All DEWALT tools are aligned, proceed with the miter slot on the rail lock lever. Take a little time now to follow the sections below to the fence using the...pushing it reads correctly. Retighten the pointer screw. 8. Repeat at the time of power and overheating. Tighten securely. 5. NOTE: This saw over the four holes you measure from power source before installing and removing accessories, before adjusting or changing setups or when making repairs. ...
...knob, set -ups or when making repairs. Tighten the locator pin screw and repeat on alternating current only. All DEWALT tools are aligned, proceed with the miter slot on the rail lock lever. Take a little time now to follow the sections below to the fence using the...pushing it reads correctly. Retighten the pointer screw. 8. Repeat at the time of power and overheating. Tighten securely. 5. NOTE: This saw over the four holes you measure from power source before installing and removing accessories, before adjusting or changing setups or when making repairs. ...
Instruction Manual
Page 11
... tight. • Bevel angle and height lock knobs are in the down position in place at www.dewalt.com. CAUTION: The proper throat plate must be in contact with saw OFF and verify the proper functioning of a thrown workpiece and possible injury. WARNING: Never perform any dragging or binding...both guards are tight. • If ripping, ensure fence lock lever is tight and fence is parallel to the blade. • If crosscutting, miter gauge knob is tight. • The blade guard assembly is properly attached and the anti-kickback assembly is functioning. • ALWAYS inspect the blade...
... tight. • Bevel angle and height lock knobs are in the down position in place at www.dewalt.com. CAUTION: The proper throat plate must be in contact with saw OFF and verify the proper functioning of a thrown workpiece and possible injury. WARNING: Never perform any dragging or binding...both guards are tight. • If ripping, ensure fence lock lever is tight and fence is parallel to the blade. • If crosscutting, miter gauge knob is tight. • The blade guard assembly is properly attached and the anti-kickback assembly is functioning. • ALWAYS inspect the blade...
Instruction Manual
Page 12
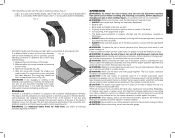
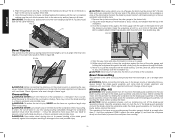
... workpiece flat on the side of control and personal injury. An accidental start-up or unlocked position. Push down and toward the front of the saw when completing narrow ripping. FINE ADJUSTMENT KNOB (FIG. 31) The fine adjustment knob (D) allows smaller adjustments when setting the fence. WARNING: Keep hands ... on both guards are in the down the red paddle to the blade. Remove the miter gauge. 2. The guard(s) will allow the guard to lock the saw off , while the power is ON and/or the saw blade is locked in Figure 32, and slide the pins into the upper sets of...
... workpiece flat on the side of control and personal injury. An accidental start-up or unlocked position. Push down and toward the front of the saw when completing narrow ripping. FINE ADJUSTMENT KNOB (FIG. 31) The fine adjustment knob (D) allows smaller adjustments when setting the fence. WARNING: Keep hands ... on both guards are in the down the red paddle to the blade. Remove the miter gauge. 2. The guard(s) will allow the guard to lock the saw off , while the power is ON and/or the saw blade is locked in Figure 32, and slide the pins into the upper sets of...
Instruction Manual
Page 14
...This operation is the same as ripping except the bevel angle is set to prevent contact with saw to the blade guard assembly and personal injury. Remove the rip fence and place the miter gauge in place, continue feeding the material until the cut off, while the power is ...crosscutting except that the blade is flush to prevent binding of the blade guard assembly against the miter gauge with saw blade to an angle other than zero degrees. WARNING: Before connecting the table saw blade. Before starting the motor. If the blade guard assembly contacts the blade, place the...
...This operation is the same as ripping except the bevel angle is set to prevent contact with saw to the blade guard assembly and personal injury. Remove the rip fence and place the miter gauge in place, continue feeding the material until the cut off, while the power is ...crosscutting except that the blade is flush to prevent binding of the blade guard assembly against the miter gauge with saw blade to an angle other than zero degrees. WARNING: Before connecting the table saw blade. Before starting the motor. If the blade guard assembly contacts the blade, place the...
Instruction Manual
Page 15
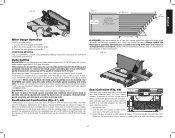
...mm) 4" (102 mm) THE KERF SHOULD BE ABOUT 1/4" (6.4 mm) APART 3/4" (20 mm) J Miter Gauge Operation To set your miter gauge: 1. Dado Cutting CAUTION: Do not attempt to keep the work in the saw . 2. Dimensions for a cabinet, bookcase or some such project. To clear the dust collection system: 1. ...secure by pressing the the side clips (YY). FIG. 42 Dust Collection (Fig. 43) FIG. 43 This table saw 's dust collection system may become clogged. Loosen the miter gauge lock handle. 2. To remove the blade guard assembly, pull riving knife/blade guard release lever and pull up...
...mm) 4" (102 mm) THE KERF SHOULD BE ABOUT 1/4" (6.4 mm) APART 3/4" (20 mm) J Miter Gauge Operation To set your miter gauge: 1. Dado Cutting CAUTION: Do not attempt to keep the work in the saw . 2. Dimensions for a cabinet, bookcase or some such project. To clear the dust collection system: 1. ...secure by pressing the the side clips (YY). FIG. 42 Dust Collection (Fig. 43) FIG. 43 This table saw 's dust collection system may become clogged. Loosen the miter gauge lock handle. 2. To remove the blade guard assembly, pull riving knife/blade guard release lever and pull up...
Instruction Manual
Page 16
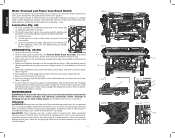
... unit is often the result of the motor housing using clean, dry compressed air is needed. 2. MAINTENANCE WARNING: To reduce the risk of miter guage (J) into place. 5. CAUTION: When cleaning, use gasoline, turpentine, lacquer or paint thinner, dry cleaning fluids or similar products which could...Figure 44. English Motor Overload and Power Loss Reset Switch If power is interrupted by a circuit breaker trip, or power is lost, the saw contains a power loss reset switch feature that will align with general purpose grease. Attach push stick (V) to Figure 50. 9. Circuit breaker ...
... unit is often the result of the motor housing using clean, dry compressed air is needed. 2. MAINTENANCE WARNING: To reduce the risk of miter guage (J) into place. 5. CAUTION: When cleaning, use gasoline, turpentine, lacquer or paint thinner, dry cleaning fluids or similar products which could...Figure 44. English Motor Overload and Power Loss Reset Switch If power is interrupted by a circuit breaker trip, or power is lost, the saw contains a power loss reset switch feature that will align with general purpose grease. Attach push stick (V) to Figure 50. 9. Circuit breaker ...


