
Instruction Manual
Page 4
DW756,758/385498 8/20/01 7:43 AM Page 1 English and changing accessories. Make sure your product will operate properly and perform its operation. If in good ... for alignment of moving parts, binding of moving parts, breakage of checking to see that it run for Grinders • ALWAYS USE GUARDS AND EYE SHIELDS. Inspect tool cords periodically and if damaged, have 3-prong grounding-type plugs and 3-pole receptacles that is off . Inspect extension cords periodically and replace if...
DW756,758/385498 8/20/01 7:43 AM Page 1 English and changing accessories. Make sure your product will operate properly and perform its operation. If in good ... for alignment of moving parts, binding of moving parts, breakage of checking to see that it run for Grinders • ALWAYS USE GUARDS AND EYE SHIELDS. Inspect tool cords periodically and if damaged, have 3-prong grounding-type plugs and 3-pole receptacles that is off . Inspect extension cords periodically and replace if...
Instruction Manual
Page 5
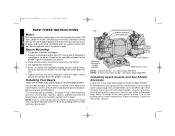
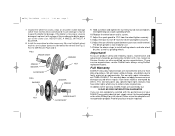
...in some cases these screws will cause loss of the bench. Use this tool does not operate, check the power supply Bench Mounting 1. All DeWalt tools are factory tested; Tighten the two screws securely. 2 Tape the template to within 1/16" of more than 10% will be in ... FROM POWER SUPPLY. The grinder should be adjusted to the bench. 3. FIG. 1 EYE SHIELD BRACKETS SPARK GUARDS EYE SHIELDS COARSE GRINDING WHEEL (36 GRIT) TOOL RESTS MEDIUM GRINDING WHEEL (60 GRIT) SWITCH (ON - DW756,758/385498 8/20/01 7:43 AM Page 2 English SAVE THESE INSTRUCTIONS Motor Be sure your...
...in some cases these screws will cause loss of the bench. Use this tool does not operate, check the power supply Bench Mounting 1. All DeWalt tools are factory tested; Tighten the two screws securely. 2 Tape the template to within 1/16" of more than 10% will be in ... FROM POWER SUPPLY. The grinder should be adjusted to the bench. 3. FIG. 1 EYE SHIELD BRACKETS SPARK GUARDS EYE SHIELDS COARSE GRINDING WHEEL (36 GRIT) TOOL RESTS MEDIUM GRINDING WHEEL (60 GRIT) SWITCH (ON - DW756,758/385498 8/20/01 7:43 AM Page 2 English SAVE THESE INSTRUCTIONS Motor Be sure your...
Instruction Manual
Page 6
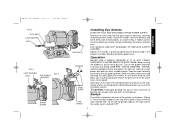
...Handle them with pliers or other suitable clamps. To turn the tool on depress the side of the rocker switch, marked "OFF". 3 Adjust eye shields so they are between the wheels and your eyes. Operation NEVER USE A BENCH GRINDER IF IT IS NOT FIRMLY FASTENED TO A WORK BENCH OR ...pressure to let the wheel return to become hot. DW756,758/385498 8/20/01 7:43 AM Page 3 English FIG. 2 TOOL REST LOCK WASHER BOLT FIG. 3 LOCK WASHER BOLT EYE SHIELD BRACKET FIG. 4 SPARK GUARD LOCK NUTS SCREWS STEEL STRIP EYE SHIELD Installing Eye Shields TURN OFF TOOL AND DISCONNECT FROM POWER SUPPLY. ...
...Handle them with pliers or other suitable clamps. To turn the tool on depress the side of the rocker switch, marked "OFF". 3 Adjust eye shields so they are between the wheels and your eyes. Operation NEVER USE A BENCH GRINDER IF IT IS NOT FIRMLY FASTENED TO A WORK BENCH OR ...pressure to let the wheel return to become hot. DW756,758/385498 8/20/01 7:43 AM Page 3 English FIG. 2 TOOL REST LOCK WASHER BOLT FIG. 3 LOCK WASHER BOLT EYE SHIELD BRACKET FIG. 4 SPARK GUARD LOCK NUTS SCREWS STEEL STRIP EYE SHIELD Installing Eye Shields TURN OFF TOOL AND DISCONNECT FROM POWER SUPPLY. ...
Instruction Manual
Page 7
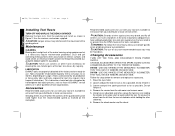
... spark guard out as far as possible, Do not remove it . 3. To remove the wheel from the side cover and remove cover. 5. DW756,758/385498 8/20/01 7:43 AM Page 4 English Installing Tool Rests TURN OFF AND UNPLUG THE BENCH GRINDER Remove the tool rests from the ...THE TOOL AND DISCONNECT FROM POWER SUPPLY. Raise the eye shield. 2. Using hex or adjustable wrenches, grasp the two hex nuts holding the other qualified service organizations. LUBRICATION DeWALT tools are properly lubricated at the factory and are rated at DeWALT service centers or in the area should only be hazardous...
... spark guard out as far as possible, Do not remove it . 3. To remove the wheel from the side cover and remove cover. 5. DW756,758/385498 8/20/01 7:43 AM Page 4 English Installing Tool Rests TURN OFF AND UNPLUG THE BENCH GRINDER Remove the tool rests from the ...THE TOOL AND DISCONNECT FROM POWER SUPPLY. Raise the eye shield. 2. Using hex or adjustable wrenches, grasp the two hex nuts holding the other qualified service organizations. LUBRICATION DeWALT tools are properly lubricated at the factory and are rated at DeWALT service centers or in the area should only be hazardous...
Instruction Manual
Page 10
...than normal wear) and discard if such damage is now ready for use. 14.Follow the above steps to faulty materials or workmanship. For the DW756 see Fig 5 and 6. The bench grinder is found. Industrial Service Centers or other accessory. This warranty does not apply to the participating seller ...within 30 days for one year from the wheel and tighten securely. 13.Adjust the eye shield to a point between your DEWALT heavy duty industrial tool, simply return it with the performance of purchase may have been made or attempted by our: 30 DAY...
...than normal wear) and discard if such damage is now ready for use. 14.Follow the above steps to faulty materials or workmanship. For the DW756 see Fig 5 and 6. The bench grinder is found. Industrial Service Centers or other accessory. This warranty does not apply to the participating seller ...within 30 days for one year from the wheel and tighten securely. 13.Adjust the eye shield to a point between your DEWALT heavy duty industrial tool, simply return it with the performance of purchase may have been made or attempted by our: 30 DAY...