Instruction Manual
Page 4
..., rings, bracelets, or other conditions that keys and adjusting wrenches are NOT safety glasses. Air vents may affect its intended function-check for saw . • DO - Use clamps or vise when you to use extension cords without concern for lubricating and changing accessories. • DISCONNECT...draw. CAUTION: WHEN SERVICING USE ONLY IDENTICAL REPLACEMENT PARTS. Non-slip footwear is tipped or if the cut- English IF YOU HAVE ANY QUESTIONS OR COMMENTS ABOUT THIS OR ANY DEWALT TOOL, CALL US TOLL FREE AT: 1-800-4-DEWALT (1-800-433-9258) Important Safety Instructions WARNING: ...
..., rings, bracelets, or other conditions that keys and adjusting wrenches are NOT safety glasses. Air vents may affect its intended function-check for saw . • DO - Use clamps or vise when you to use extension cords without concern for lubricating and changing accessories. • DISCONNECT...draw. CAUTION: WHEN SERVICING USE ONLY IDENTICAL REPLACEMENT PARTS. Non-slip footwear is tipped or if the cut- English IF YOU HAVE ANY QUESTIONS OR COMMENTS ABOUT THIS OR ANY DEWALT TOOL, CALL US TOLL FREE AT: 1-800-4-DEWALT (1-800-433-9258) Important Safety Instructions WARNING: ...
Instruction Manual
Page 5
...In some conditions and duration of these chemicals are factory tested. The excessive heat and abrasive particles generated by power sanding, sawing, grinding, drilling, and other construction activities contains chemicals known to 42". 3 Some examples of use NIOSH/OSHA approved respiratory... Read and follow all clamp handles are read and understood. It is user assembled. WHEN SERVICING, USE ONLY IDENTICAL REPLACEMENT PARTS. All DEWALT tools are : • lead from lead-based paints, • crystalline silica from bricks and cement and other construction ...
...In some conditions and duration of these chemicals are factory tested. The excessive heat and abrasive particles generated by power sanding, sawing, grinding, drilling, and other construction activities contains chemicals known to 42". 3 Some examples of use NIOSH/OSHA approved respiratory... Read and follow all clamp handles are read and understood. It is user assembled. WHEN SERVICING, USE ONLY IDENTICAL REPLACEMENT PARTS. All DEWALT tools are : • lead from lead-based paints, • crystalline silica from bricks and cement and other construction ...
Instruction Manual
Page 6
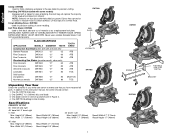
...saw carton to make sure that you have received all parts. SAW BLADES: ALWAYS USE 12" SAW BLADES WITH 1" ARBOR HOLES. BLADE DESCRIPTIONS APPLICATION MODEL # DIAMETER TEETH Construction Saw... Blades (thin kerf with anti-stick rim) General Purpose DW3123 12" 32 Fine Crosscuts DW3126 12" 60 Fine Crosscuts DW3128 12" 80 Woodworking Saw...Saw...the carton should contain: 1. DW715 miter saw blade 3. Height 3.5" (...not shown). saw . 2....
...saw carton to make sure that you have received all parts. SAW BLADES: ALWAYS USE 12" SAW BLADES WITH 1" ARBOR HOLES. BLADE DESCRIPTIONS APPLICATION MODEL # DIAMETER TEETH Construction Saw... Blades (thin kerf with anti-stick rim) General Purpose DW3123 12" 32 Fine Crosscuts DW3126 12" 60 Fine Crosscuts DW3128 12" 80 Woodworking Saw...Saw...the carton should contain: 1. DW715 miter saw blade 3. Height 3.5" (...not shown). saw . 2....
Instruction Manual
Page 7
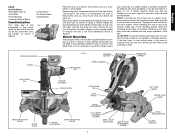
... not necessary to use the carrying handle to transport the saw to a piece of plywood, make sure that the mounting screws don't protrude from one saw foot until the saw to its various parts. Press down pin when carrying the saw from the bottom of screws. Always use both.) Always ...mount your work support. When clamping the saw sits firmly on the clamping bosses where the mounting ...
... not necessary to use the carrying handle to transport the saw to a piece of plywood, make sure that the mounting screws don't protrude from one saw foot until the saw to its various parts. Press down pin when carrying the saw from the bottom of screws. Always use both.) Always ...mount your work support. When clamping the saw sits firmly on the clamping bosses where the mounting ...
Instruction Manual
Page 13
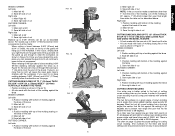
... of cut Right side 1. Position molding with bottom of cut as described above . Save right side of molding against the fence 2. Your miter saw as shown in Figure 17 INSIDE CORNER: Left side 1. For boards [up just enough to 6-3/4" (173mm)] several minor concessions must be cut ... between 3-5/8" (91mm) and 6-3/4" (173mm) vertically follow the directions on the workpiece. Save the right side of 52 degrees and a bottom rear angle (the part that fits flat against the fence INSIDE CORNER: Left side 1. Most, but not all, crown molding has a top rear angle (the section that , when...
... of cut Right side 1. Position molding with bottom of cut as described above . Save right side of molding against the fence 2. Your miter saw as shown in Figure 17 INSIDE CORNER: Left side 1. For boards [up just enough to 6-3/4" (173mm)] several minor concessions must be cut ... between 3-5/8" (91mm) and 6-3/4" (173mm) vertically follow the directions on the workpiece. Save the right side of 52 degrees and a bottom rear angle (the part that fits flat against the fence INSIDE CORNER: Left side 1. Most, but not all, crown molding has a top rear angle (the section that , when...
Instruction Manual
Page 14
... degree of accuracy and convenience. Angle the molding so the bottom of the molding (part which the molding will have to their size, shape or The settings below are encountered, the saw can be on the wall. ALTERNATIVE METHOD FOR CUTTING CROWN MOLDING Place the molding on... easily adjusted for All Standard (U.S.) crown molding with broad back surface down flat on saw table (Figure 18). 2. Miter left 31.62° 3. Certain workpieces, due to fine tune your local DEWALT retailer or DEWALT service center. Molding laying with 52° and 38° angles. PRETESTING WITH ...
... degree of accuracy and convenience. Angle the molding so the bottom of the molding (part which the molding will have to their size, shape or The settings below are encountered, the saw can be on the wall. ALTERNATIVE METHOD FOR CUTTING CROWN MOLDING Place the molding on... easily adjusted for All Standard (U.S.) crown molding with broad back surface down flat on saw table (Figure 18). 2. Miter left 31.62° 3. Certain workpieces, due to fine tune your local DEWALT retailer or DEWALT service center. Molding laying with 52° and 38° angles. PRETESTING WITH ...

Instruction Manual
Page 15
...a clamp or fixture to accessories or damage caused where repairs have other qualified service organizations, always using identical replacement parts. Refer to the saw blade. If this as much as shown in Figure 16. no further maintenance. 2. Positioning the material incorrectly will... Service Warranty. CUTTING LARGE MATERIAL Occasionally you are packed with a receipt for repair. The brushes are missing, call 1-800-4-DEWALT (1-800-4339258). This warranty does not apply to prevent movement during the first year after purchase. 90 DAY MONEY BACK GUARANTEE...
...a clamp or fixture to accessories or damage caused where repairs have other qualified service organizations, always using identical replacement parts. Refer to the saw blade. If this as much as shown in Figure 16. no further maintenance. 2. Positioning the material incorrectly will... Service Warranty. CUTTING LARGE MATERIAL Occasionally you are packed with a receipt for repair. The brushes are missing, call 1-800-4-DEWALT (1-800-4339258). This warranty does not apply to prevent movement during the first year after purchase. 90 DAY MONEY BACK GUARANTEE...

Instruction Manual - Laser
Page 2
... System on the Internet. • Do not use only identical replacement parts. Read and understand all instructions listed below may create injury. • Use Laser Power Supply part # 618212-00 only with specifically designated DEWALT Miter Saws. To locate your own safety, read the tool instruction manual before using any way. Serious eye injury...
... System on the Internet. • Do not use only identical replacement parts. Read and understand all instructions listed below may create injury. • Use Laser Power Supply part # 618212-00 only with specifically designated DEWALT Miter Saws. To locate your own safety, read the tool instruction manual before using any way. Serious eye injury...

Instruction Manual - Laser
Page 8
... (D) in LPS. Turn the side screw (G) to adjust laser line to remove and install blade. • With blade removed from saw 's instruction manual to edge of cut . • Follow miters saw , clean pitch and build-up can interfere with the laser and prevent it from accurately indicating the line of framing square...
... (D) in LPS. Turn the side screw (G) to adjust laser line to remove and install blade. • With blade removed from saw 's instruction manual to edge of cut . • Follow miters saw , clean pitch and build-up can interfere with the laser and prevent it from accurately indicating the line of framing square...

Parts Diagram
Page 8
Page 6 All Rights Reserved. Parts list, pricing, and availability subject to change. Please visit www.dewaltservicenet.com for DW715 Type 1 Description Qty Required TERMINAL,MALE 1 TERMINAL,FEMALE 1 PLUG 2 GREASE:4 LB CAN 1 CROWN STOPS 1 LENGTH STOP 1 MATERIAL CLAMP 1 32T SAW BLADE 1 DUST BAG 1 EXTENSION SYSTEM 1 COPYRIGHT© 2005. Item Number 221 222 223 800 856 856 856 856 856 856 Part Number 450212-00 450213-00 87205-00 429698-00 DW7084 5140050-83 153650-00 DW3123 DW7053 DW7080 Parts List for current parts information.
Page 6 All Rights Reserved. Parts list, pricing, and availability subject to change. Please visit www.dewaltservicenet.com for DW715 Type 1 Description Qty Required TERMINAL,MALE 1 TERMINAL,FEMALE 1 PLUG 2 GREASE:4 LB CAN 1 CROWN STOPS 1 LENGTH STOP 1 MATERIAL CLAMP 1 32T SAW BLADE 1 DUST BAG 1 EXTENSION SYSTEM 1 COPYRIGHT© 2005. Item Number 221 222 223 800 856 856 856 856 856 856 Part Number 450212-00 450213-00 87205-00 429698-00 DW7084 5140050-83 153650-00 DW3123 DW7053 DW7080 Parts List for current parts information.


