Instruction Manual
Page 5
...TURN OFF TOOL, KEEP SAW HEAD DOWN AND WAIT FOR SAW TO STOP BEFORE MOVING HANDS, WORKPIECE OR CHANGING SETTINGS. All DEWALT tools are tight. • DON'T - Laser Guide System: DW7187 Laser is used in the vicinity of the same length from your saw . • DO NOT - one work . Cut... Centers and your exposure to operate on the skin may be helpful. Perform any accessory, please contact DEWALT Industrial Tool Co., 701 East Joppa Road, Baltimore, MD 21286 or call 1-800-4-DEWALT (1-800433-9258). The saw blade. • DO NOT - Some examples of power and overheating. ...
...TURN OFF TOOL, KEEP SAW HEAD DOWN AND WAIT FOR SAW TO STOP BEFORE MOVING HANDS, WORKPIECE OR CHANGING SETTINGS. All DEWALT tools are tight. • DON'T - Laser Guide System: DW7187 Laser is used in the vicinity of the same length from your saw . • DO NOT - one work . Cut... Centers and your exposure to operate on the skin may be helpful. Perform any accessory, please contact DEWALT Industrial Tool Co., 701 East Joppa Road, Baltimore, MD 21286 or call 1-800-4-DEWALT (1-800433-9258). The saw blade. • DO NOT - Some examples of power and overheating. ...

Instruction Manual
Page 15
...any time during the first year after purchase. 90 DAY MONEY BACK GUARANTEE If you are not completely satisfied with the performance of your DEWALT Power Tool, Laser, or Nailer for any defects due to prevent movement during the cut. Maintenance 1. The 90 Day Money Back Guarantee and the Three Year... Limited Warranty do not apply to normal wear or tool abuse. FIG. 20 FIG. 20A RIGHT WRONG 13 Three Year Limited Warranty DEWALT will cause...
...any time during the first year after purchase. 90 DAY MONEY BACK GUARANTEE If you are not completely satisfied with the performance of your DEWALT Power Tool, Laser, or Nailer for any defects due to prevent movement during the cut. Maintenance 1. The 90 Day Money Back Guarantee and the Three Year... Limited Warranty do not apply to normal wear or tool abuse. FIG. 20 FIG. 20A RIGHT WRONG 13 Three Year Limited Warranty DEWALT will cause...

Instruction Manual - Laser
Page 2
... 623020-00. Serious eye injury could result. Power tools create sparks which may create injury. • Use Laser Power Supply part # 618212-00 only with specifically designated DEWALT Miter Saws. Use of flammable liquids, gases, or dust. SAVE THESE INSTRUCTIONS WARNING! To locate your own ...by qualified repair personnel. English IF YOU HAVE ANY QUESTIONS OR COMMENTS ABOUT THIS OR ANY DEWALT TOOL, CALL US TOLL FREE AT: 1-8004-DEWALT (1-800-433-9258) Safety Instructions for Lasers WARNING! Read and understand all instructions listed below may result. • Do not remove...
... 623020-00. Serious eye injury could result. Power tools create sparks which may create injury. • Use Laser Power Supply part # 618212-00 only with specifically designated DEWALT Miter Saws. Use of flammable liquids, gases, or dust. SAVE THESE INSTRUCTIONS WARNING! To locate your own ...by qualified repair personnel. English IF YOU HAVE ANY QUESTIONS OR COMMENTS ABOUT THIS OR ANY DEWALT TOOL, CALL US TOLL FREE AT: 1-8004-DEWALT (1-800-433-9258) Safety Instructions for Lasers WARNING! Read and understand all instructions listed below may result. • Do not remove...

Instruction Manual - Laser
Page 3
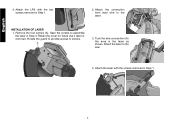
...from the miter saw handle and fit the LPS to the handle. 2 Laser Information The DW7187 Miter Saw Laser System is removed. 2. Retain the handle cover for future use if LPS is a Class 2 laser product and complies with 21CFR 1040.10 and 1040.11 except for deviations pursuant...is placed against the bottom of the miter saw handle with the Installation of the Miter Saw Laser System. Installation of Miter Saw Laser System WARNING: Read all instructions for the assembly of Laser before proceeding with supplied T20 Torx wrench. Remove the two screws from the power source. ...
...from the miter saw handle and fit the LPS to the handle. 2 Laser Information The DW7187 Miter Saw Laser System is removed. 2. Retain the handle cover for future use if LPS is a Class 2 laser product and complies with 21CFR 1040.10 and 1040.11 except for deviations pursuant...is placed against the bottom of the miter saw handle with the Installation of the Miter Saw Laser System. Installation of Miter Saw Laser System WARNING: Read all instructions for the assembly of Laser before proceeding with supplied T20 Torx wrench. Remove the two screws from the power source. ...
Instruction Manual - Laser
Page 4
English 4. Attach the connection from lead wire to assemble the laser in Step 1. 3 Save the screws to the laser. A 3. Remove the four screws (A). Attach the laser to screws. Attach the LPS with the screws removed in Step 4. INSTALLATION OF LASER 1. Attach the laser with the two screws removed in the laser as shown. Rotate the guard to provide access to the saw. 4. Retain the cover for future use if laser is removed. Tuck the wire connection into the area in Step 1. 2.
English 4. Attach the connection from lead wire to assemble the laser in Step 1. 3 Save the screws to the laser. A 3. Remove the four screws (A). Attach the laser to screws. Attach the LPS with the screws removed in Step 4. INSTALLATION OF LASER 1. Attach the laser with the two screws removed in the laser as shown. Rotate the guard to provide access to the saw. 4. Retain the cover for future use if laser is removed. Tuck the wire connection into the area in Step 1. 2.
Instruction Manual - Laser
Page 5
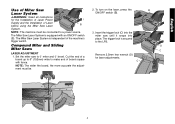
...until it snaps into place. NOTE: The wider the board, the more accurate the adjustment must be . 2. C B D C 4 The Miter Saw Laser System is equipped with fence. Insert the trigger lock (C) into the miter saw to a power source. The trigger lock is secured to make end of... board square with an ON/OFF switch (B). Compound Miter and Sliding Miter Saws LASER ADJUSTMENT 1. English Use of Miter Saw Laser System WARNING: Read all instructions for laser adjustments. To turn on the laser, press the ON/OFF switch (B). 3. Remove 2.5mm hex wrench (D) for the ...
...until it snaps into place. NOTE: The wider the board, the more accurate the adjustment must be . 2. C B D C 4 The Miter Saw Laser System is equipped with fence. Insert the trigger lock (C) into the miter saw to a power source. The trigger lock is secured to make end of... board square with an ON/OFF switch (B). Compound Miter and Sliding Miter Saws LASER ADJUSTMENT 1. English Use of Miter Saw Laser System WARNING: Read all instructions for laser adjustments. To turn on the laser, press the ON/OFF switch (B). 3. Remove 2.5mm hex wrench (D) for the ...
Instruction Manual - Laser
Page 6
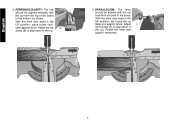
Adjust the top E screw (E) to align laser to the cut from the top of board to the bottom, as shown. PARALLELISM: The laser should be aligned with the cut . With the miter saw head in the UP position, lay board flat on table and against fence. Adjust F front screw (F) to align laser to the cut from front of the board to the fence. PERPENDICULARITY: The line should be aligned vertically with the cut . 5. Rotate the miter saw head in the UP position, place board vertically against fence. With the miter saw guard if necessary. 5 English 4.
Adjust the top E screw (E) to align laser to the cut from the top of board to the bottom, as shown. PARALLELISM: The laser should be aligned with the cut . With the miter saw head in the UP position, lay board flat on table and against fence. Adjust F front screw (F) to align laser to the cut from front of the board to the fence. PERPENDICULARITY: The line should be aligned vertically with the cut . 5. Rotate the miter saw head in the UP position, place board vertically against fence. With the miter saw guard if necessary. 5 English 4.
Instruction Manual - Laser
Page 7
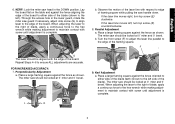
... framing square against the fence as shown. b. FOR INCREASED ACCURACY: 7. Through the access hole in the DOWN position. Observe the motion of the laser line with respect to maintain contact with screw until adjustment is complete. 6 Parallel Adjustment a. Perpendicularity Adjustment a. E L R 9. Kerf Adjustment a. Repeat... force to the hex wrench while making adjustment to edge of the board. Turn the front screw (F) to adjust the laser line parallel to maintain contact with the edge of blade, apply a continuous force to the hex wrench while making adjustment to...
... framing square against the fence as shown. b. FOR INCREASED ACCURACY: 7. Through the access hole in the DOWN position. Observe the motion of the laser line with respect to maintain contact with screw until adjustment is complete. 6 Parallel Adjustment a. Perpendicularity Adjustment a. E L R 9. Kerf Adjustment a. Repeat... force to the hex wrench while making adjustment to edge of the board. Turn the front screw (F) to adjust the laser line parallel to maintain contact with the edge of blade, apply a continuous force to the hex wrench while making adjustment to...

Instruction Manual - Laser
Page 8
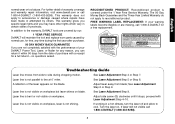
...NOT use solvents of any kind, they may damage the lens. • Avoid touching any sharp points of cut . Pitch and debris can block the laser and prevent it from accurately indicating the line of cut . • Follow miters saw's instruction manual to edge of the chop stroke. 10. Turn ...the side screw (G) to adjust laser line to remove and install blade. • With blade removed from saw, clean pitch and build-up can interfere with the framing square. Reattach the...
...NOT use solvents of any kind, they may damage the lens. • Avoid touching any sharp points of cut . Pitch and debris can block the laser and prevent it from accurately indicating the line of cut . • Follow miters saw's instruction manual to edge of the chop stroke. 10. Turn ...the side screw (G) to adjust laser line to remove and install blade. • With blade removed from saw, clean pitch and build-up can interfere with the framing square. Reattach the...
Instruction Manual - Laser
Page 9
...illegible or are not completely satisfied with the performance of the laser appears on . See Laser Adjustment Step 4 or Step 7. A reflection of your DEWALT Power Tool, Laser, or Nailer for any time during chopping motion. See Laser Adjustment Step 9. proceed with a receipt for free, any ...you specific legal rights and you can return it stops; See Laser Adjustment Step 5 or Step 8. Laser line is not shining. If laser still not visible call 1-800-4-DEWALT (1-800-433-9258). Troubleshooting Guide Laser line moves from side to accessories or damage caused where repairs...
...illegible or are not completely satisfied with the performance of the laser appears on . See Laser Adjustment Step 4 or Step 7. A reflection of your DEWALT Power Tool, Laser, or Nailer for any time during chopping motion. See Laser Adjustment Step 9. proceed with a receipt for free, any ...you specific legal rights and you can return it stops; See Laser Adjustment Step 5 or Step 8. Laser line is not shining. If laser still not visible call 1-800-4-DEWALT (1-800-433-9258). Troubleshooting Guide Laser line moves from side to accessories or damage caused where repairs...


