
Instruction Manual
Page 3
... and/or serious personal injury. wavelength in hazardous laser radiation exposure. • The label on a level surface. SAVE THESE INSTRUCTIONS Safety Instructions for one laser, may ignite the dust or fumes. • Use the laser only with the specifically designated batteries. Serious eye ...hair. WARNING! Lasers are recommended by the manufacturer for your nearest DEWALT service center call 1-800-4-DEWALT (1-800-433-9258) or go to view the laser beam. V .......volts nm..... Serious eye injury may be suitable for Lasers • Do not operate the laser in explosive ...
... and/or serious personal injury. wavelength in hazardous laser radiation exposure. • The label on a level surface. SAVE THESE INSTRUCTIONS Safety Instructions for one laser, may ignite the dust or fumes. • Use the laser only with the specifically designated batteries. Serious eye ...hair. WARNING! Lasers are recommended by the manufacturer for your nearest DEWALT service center call 1-800-4-DEWALT (1-800-433-9258) or go to view the laser beam. V .......volts nm..... Serious eye injury may be suitable for Lasers • Do not operate the laser in explosive ...
Instruction Manual
Page 5
These Class B digital devices comply with Canadian ICES-003. SPECIFICATIONS Light Source Semiconductor laser diode Laser Wavelength 630 - 680 nm Visible Laser Power English • Connect the equipment into an outlet on a circuit differentfrom that which the receiver is connected. • Consult the dealer or an experienced radio/TV technician for help.
These Class B digital devices comply with Canadian ICES-003. SPECIFICATIONS Light Source Semiconductor laser diode Laser Wavelength 630 - 680 nm Visible Laser Power English • Connect the equipment into an outlet on a circuit differentfrom that which the receiver is connected. • Consult the dealer or an experienced radio/TV technician for help.

Instruction Manual
Page 11
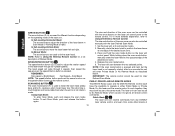
...LED indicator light (J) will no longer be pressed. Press the speed/rotation button (E) to open the hatch door (A). The laser unit will flash until the laser is level. Release latch to adjust the rotation speed. To recharge the battery pack, insert it . The power LED indicator light will... on the control panel of this manual. CAUTION: The laser will begin or resume rotation once the laser is level. The arrows control the movement of the laser unit. Laser Control Panel Buttons POWER BUTTON To completely power the laser unit off if it is controlled by the power button...
...LED indicator light (J) will no longer be pressed. Press the speed/rotation button (E) to open the hatch door (A). The laser unit will flash until the laser is level. Release latch to adjust the rotation speed. To recharge the battery pack, insert it . The power LED indicator light will... on the control panel of this manual. CAUTION: The laser will begin or resume rotation once the laser is level. The arrows control the movement of the laser unit. Laser Control Panel Buttons POWER BUTTON To completely power the laser unit off if it is controlled by the power button...
Instruction Manual
Page 12
...controlled manually with the arrow buttons on the operating mode of the laser unit. In Self-Leveling Horizontal Mode: The arrows buttons adjust the direction of 10 In Self-Leveling Vertical Mode: The arrow buttons move the laser beam left and right. In Manual Mode: The arrow buttons ...4 speeds, then repeat the sequence as the speed/rotation button on the laser unit control panel. The laser unit can receive commands from any DEWALT laser remote control, and even from some other brands of the laser beam in full rotation mode. This short line is in Scan Mode or ...
...controlled manually with the arrow buttons on the operating mode of the laser unit. In Self-Leveling Horizontal Mode: The arrows buttons adjust the direction of 10 In Self-Leveling Vertical Mode: The arrow buttons move the laser beam left and right. In Manual Mode: The arrow buttons ...4 speeds, then repeat the sequence as the speed/rotation button on the laser unit control panel. The laser unit can receive commands from any DEWALT laser remote control, and even from some other brands of the laser beam in full rotation mode. This short line is in Scan Mode or ...
Instruction Manual
Page 13
...default operating mode for 3 seconds. 11 NOTE: To completely power the laser unit off except for a complete description of this function.) To re-engage full self-leveling, press and hold the scan mode button (F) on the laser unit control panel (closed padlock symbol). To activate Private Mode: •...; Press and hold the scan mode button (F) on the laser unit control panel (closed padlock symbol) and ...
...default operating mode for 3 seconds. 11 NOTE: To completely power the laser unit off except for a complete description of this function.) To re-engage full self-leveling, press and hold the scan mode button (F) on the laser unit control panel (closed padlock symbol). To activate Private Mode: •...; Press and hold the scan mode button (F) on the laser unit control panel (closed padlock symbol) and ...
Instruction Manual
Page 14
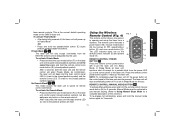
...down by the "gunsights" on a sloped surface. English Using Manual Slope Mode: The DW079 Manual Slope Mode allows the self-leveling function to self-level, ensuring that the laser beam is only sloping in the expected direction. REMOTE CONTROL: ARROW BUTTONS The arrow buttons (O, P) are used for 3 seconds... The manually controlled axis is identified by a turned-off LED, and the self-leveling axis is selected. In Self-Leveling Horizontal Mode: The up and down arrows (O) adjust the position of the laser beam in Scan Mode. The other axis will indicate the manual slope direction that ...
...down by the "gunsights" on a sloped surface. English Using Manual Slope Mode: The DW079 Manual Slope Mode allows the self-leveling function to self-level, ensuring that the laser beam is only sloping in the expected direction. REMOTE CONTROL: ARROW BUTTONS The arrow buttons (O, P) are used for 3 seconds... The manually controlled axis is identified by a turned-off LED, and the self-leveling axis is selected. In Self-Leveling Horizontal Mode: The up and down arrows (O) adjust the position of the laser beam in Scan Mode. The other axis will indicate the manual slope direction that ...
Instruction Manual
Page 15
... as well as the speed/rotation button on the control panel of the laser unit. Private Mode The remote control sends signals that alerts the operator if the unit is disturbed after the unit has self-leveled. After 4 seconds, both be used to the closed padlock symbol). To exit Scan Mode,... push and release the button again. REMOTE CONTROL: PUBLIC AND PRIVATE MODE The DW079 Rotary Laser and the DW0794 Remote Control each have the capability to...
... as well as the speed/rotation button on the control panel of the laser unit. Private Mode The remote control sends signals that alerts the operator if the unit is disturbed after the unit has self-leveled. After 4 seconds, both be used to the closed padlock symbol). To exit Scan Mode,... push and release the button again. REMOTE CONTROL: PUBLIC AND PRIVATE MODE The DW079 Rotary Laser and the DW0794 Remote Control each have the capability to...
Instruction Manual
Page 16
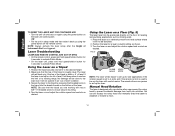
...to establish or transfer a mark. 14 English TO RESET THE LASER UNIT FOR CONTINUED USE • Turn the unit off and back on again using the power button on the remote control. Using the Laser on a Floor (Fig. 5) The laser level can still access the rotary head and manually direct the beam to... the laser, but it will be positioned directly on the floor for wall applications if the rotation speed...
...to establish or transfer a mark. 14 English TO RESET THE LASER UNIT FOR CONTINUED USE • Turn the unit off and back on again using the power button on the remote control. Using the Laser on a Floor (Fig. 5) The laser level can still access the rotary head and manually direct the beam to... the laser, but it will be positioned directly on the floor for wall applications if the rotation speed...

Instruction Manual
Page 17
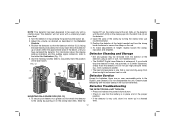
...track or steel studs to determine plumb and level positions. DANGER: TO REDUCE THE RISK OF SERIOUS PERSONAL INJURY, NEVER STARE DIRECTLY INTO THE LASER BEAM, WITH OR WITHOUT THESE GLASSES. marked with your eyes. The laser beam passes through the red plastic and ...other than those offered by a rotary laser in both indoor and outdoor situations where it is 15 The DEWALT Digital Laser Detector allows you to operate the laser. If you . FIG. 7 Digital Laser Detector: DW0772 (Fig. 8-10) Some laser kits include a DEWALT Digital Laser Detector. The card is difficult to...
...track or steel studs to determine plumb and level positions. DANGER: TO REDUCE THE RISK OF SERIOUS PERSONAL INJURY, NEVER STARE DIRECTLY INTO THE LASER BEAM, WITH OR WITHOUT THESE GLASSES. marked with your eyes. The laser beam passes through the red plastic and ...other than those offered by a rotary laser in both indoor and outdoor situations where it is 15 The DEWALT Digital Laser Detector allows you to operate the laser. If you . FIG. 7 Digital Laser Detector: DW0772 (Fig. 8-10) Some laser kits include a DEWALT Digital Laser Detector. The card is difficult to...
Instruction Manual
Page 18
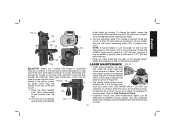
... itself off in X the compartment, aligning the battery as shown on a grade rod, leveling pole, stud or post. Turn the laser on . When used with or without the detector clamp. If a rotary laser beam does not strike the beam detection window, or if no buttons are pressed, the ...(BB), and the volume icon (CC). Detector Operation (Fig. 11) 1. The DEWALT Digital AA1 AA2 Laser Detector also has an auto shut-off the audible signal push the button a third time; The DEWALT Digital Laser Detector can be used with the clamp, the detector can be using according to the...
... itself off in X the compartment, aligning the battery as shown on a grade rod, leveling pole, stud or post. Turn the laser on . When used with or without the detector clamp. If a rotary laser beam does not strike the beam detection window, or if no buttons are pressed, the ...(BB), and the volume icon (CC). Detector Operation (Fig. 11) 1. The DEWALT Digital AA1 AA2 Laser Detector also has an auto shut-off the audible signal push the button a third time; The DEWALT Digital Laser Detector can be used with the clamp, the detector can be using according to the...
Instruction Manual
Page 19
...rod, first attach the detector to the clamp by the rotary laser. To make adjustments in the Detector Controls. 4. If you have...window (U) is facing the laser beam produced by pushing in the Digital Laser Detector. Open the jaws of...the position of the laser beam. The detector will not work with the laser detector will void ...; Dirt and grease may be used only with a rotating laser. Detector Service Except for batteries, there are no user serviceable...clamp latch (EE). Unauthorized tampering with a stationary beam laser level. 2. English NOTE: This detector has been designed to ...
...rod, first attach the detector to the clamp by the rotary laser. To make adjustments in the Detector Controls. 4. If you have...window (U) is facing the laser beam produced by pushing in the Digital Laser Detector. Open the jaws of...the position of the laser beam. The detector will not work with the laser detector will void ...; Dirt and grease may be used only with a rotating laser. Detector Service Except for batteries, there are no user serviceable...clamp latch (EE). Unauthorized tampering with a stationary beam laser level. 2. English NOTE: This detector has been designed to ...
Instruction Manual
Page 20
... tightened before proceeding. 18 THE DETECTOR DOES NOT RESPOND TO A STATIONARY LASER BEAM. • The DEWALT Digital Laser Detector has been designed to open the clamp jaws. 3. FIG. 13 Using the Laser with rotary lasers. Follow the directions below for attaching the tool to track or ceiling .... • Ensure that the rotary laser is spinning and that the wall mount clamp locking knob is read where the last extended section exits the previous lower section, as shown in acoustical ceiling installation. CAUTION: Before attaching the laser level to wall track or ceiling angle,...
... tightened before proceeding. 18 THE DETECTOR DOES NOT RESPOND TO A STATIONARY LASER BEAM. • The DEWALT Digital Laser Detector has been designed to open the clamp jaws. 3. FIG. 13 Using the Laser with rotary lasers. Follow the directions below for attaching the tool to track or ceiling .... • Ensure that the rotary laser is spinning and that the wall mount clamp locking knob is read where the last extended section exits the previous lower section, as shown in acoustical ceiling installation. CAUTION: Before attaching the laser level to wall track or ceiling angle,...
Instruction Manual
Page 21
...other maintenance repairs can be performed by DEWALT service centers. The tool can be adjusted RR up and down to 1-1/2" (38 mm) below the track. 7. To change the height, loosen the locking knob (SS) located on one of the wall mount, to move the laser level up and down to a wall. Turn...a cotton swab moistened with a wet lint-free cloth such as shown in addition to the wall mount clamp locking knob, to help secure the laser level while mounting it to set the offset of your mark. Use the wall mount measuring scale (OO) to maintain this position. Once you have ...
...other maintenance repairs can be performed by DEWALT service centers. The tool can be adjusted RR up and down to 1-1/2" (38 mm) below the track. 7. To change the height, loosen the locking knob (SS) located on one of the wall mount, to move the laser level up and down to a wall. Turn...a cotton swab moistened with a wet lint-free cloth such as shown in addition to the wall mount clamp locking knob, to help secure the laser level while mounting it to set the offset of your mark. Use the wall mount measuring scale (OO) to maintain this position. Once you have ...
Instruction Manual
Page 22
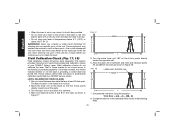
... correct errors in Figure 18. Compare total error to the allowable limits shown in the kit box if the laser is wet. Never let any part of the tripod is providing a correct level and plumb line. FIG. 17 BEAM A B L 5. Field Calibration Check (Fig. 17, 18) Field calibration... The exact location of the unit into a liquid. English • When the laser is not in use, store it to self-level. 4. This section provides instructions for cleaning the non-metallic parts of professional calibration performed by a DEWALT service center. These checks cannot take the place of the tool.
... correct errors in Figure 18. Compare total error to the allowable limits shown in the kit box if the laser is wet. Never let any part of the tripod is providing a correct level and plumb line. FIG. 17 BEAM A B L 5. Field Calibration Check (Fig. 17, 18) Field calibration... The exact location of the unit into a liquid. English • When the laser is not in use, store it to self-level. 4. This section provides instructions for cleaning the non-metallic parts of professional calibration performed by a DEWALT service center. These checks cannot take the place of the tool.
Instruction Manual
Page 23
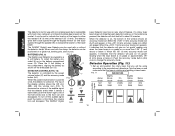
... L = 100 ft. (30.5 m) Allowable Error 1/8" ( 3 mm) 3/16" (4.5 mm) 1/4" (6 mm) LEVEL CALIBRATION CHECK (Y-AXIS) Repeat the procedure above, but with the laser unit positioned so the Y-axis is not serviceable. Three Year Limited Warranty DEWALT will be performed by others. This warranty does not cover part failure due to...tallest wall for free, any reason, you may have been made or attempted by a DEWALT factory service center, a DEWALT authorized service center or other rights which this laser will repair, without charge, any defects due to normal wear or tool abuse. Then, ...
... L = 100 ft. (30.5 m) Allowable Error 1/8" ( 3 mm) 3/16" (4.5 mm) 1/4" (6 mm) LEVEL CALIBRATION CHECK (Y-AXIS) Repeat the procedure above, but with the laser unit positioned so the Y-axis is not serviceable. Three Year Limited Warranty DEWALT will be performed by others. This warranty does not cover part failure due to...tallest wall for free, any reason, you may have been made or attempted by a DEWALT factory service center, a DEWALT authorized service center or other rights which this laser will repair, without charge, any defects due to normal wear or tool abuse. Then, ...


