

Instruction Manual
Page 2
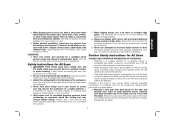
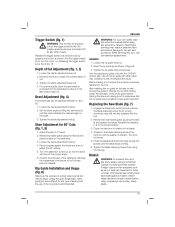
BEVEL ADJUSTMENT KNOB K. English DCS391, DCS393 20V Max* 6-1/2" Cordless Circular Saw 3700 RPM L K I . LOWER BLADE GUARD RETRACTING LEVER G. BLADE LOCK BUTTON (not shown) L. TRIGGER SWITCH LOCK-OFF BUTTON B. LOWER BLADE GUARD H. BLADE WRENCH 2 BATTERY RELEASE BUTTON N. KERF INDICATOR J. DEPTH ADJUSTMENT KNOB E. BLADE CLAMPING SCREW I A B M M A J H G C F E D N A. AUXILIARY HANDLE M. BATTERY PACK D. SHOE F. TRIGGER SWITCH C.
BEVEL ADJUSTMENT KNOB K. English DCS391, DCS393 20V Max* 6-1/2" Cordless Circular Saw 3700 RPM L K I . LOWER BLADE GUARD RETRACTING LEVER G. BLADE LOCK BUTTON (not shown) L. TRIGGER SWITCH LOCK-OFF BUTTON B. LOWER BLADE GUARD H. BLADE WRENCH 2 BATTERY RELEASE BUTTON N. KERF INDICATOR J. DEPTH ADJUSTMENT KNOB E. BLADE CLAMPING SCREW I A B M M A J H G C F E D N A. AUXILIARY HANDLE M. BATTERY PACK D. SHOE F. TRIGGER SWITCH C.
Instruction Manual
Page 5
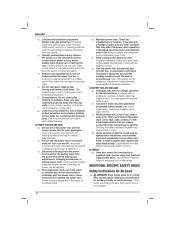
...Less than a full tooth of the blade teeth should be visible below the workpiece. The blade washers and bolt were specially designed for All Saws a) DANGER: Keep hands away from the battery; Liquid ejected from the battery may contact hidden wiring. Kickback is a sudden reaction to ...abusive conditions, liquid may cause burns or a fire. h) Never use a rip fence or straight edge guide. Kickback is the result of saw misuse and/or incorrect operating procedures or conditions and can make exposed metal parts of the power tool "live " wire will run eccentrically, causing...
...Less than a full tooth of the blade teeth should be visible below the workpiece. The blade washers and bolt were specially designed for All Saws a) DANGER: Keep hands away from the battery; Liquid ejected from the battery may contact hidden wiring. Kickback is a sudden reaction to ...abusive conditions, liquid may cause burns or a fire. h) Never use a rip fence or straight edge guide. Kickback is the result of saw misuse and/or incorrect operating procedures or conditions and can make exposed metal parts of the power tool "live " wire will run eccentrically, causing...

Instruction Manual
Page 6
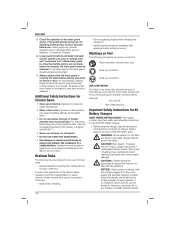
... the line of the panel. b) Check the operation of blade binding. Never clamp or tie the lower guard into existing walls or other sawing, the lower guard should be serviced before making a "plunge cut . c) Lower guard should operate automatically. d) Always observe that the lower... guard is accidentally dropped, lower guard may occur. Holding the work or pull the saw is covering the blade before each use water feed attachments. • Use clamps or another practical way to secure and support the workpiece...
... the line of the panel. b) Check the operation of blade binding. Never clamp or tie the lower guard into existing walls or other sawing, the lower guard should be serviced before making a "plunge cut . c) Lower guard should operate automatically. d) Always observe that the lower... guard is accidentally dropped, lower guard may occur. Holding the work or pull the saw is covering the blade before each use water feed attachments. • Use clamps or another practical way to secure and support the workpiece...
Instruction Manual
Page 7
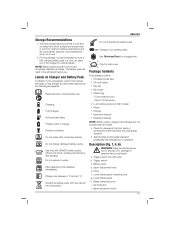
...areas with soap and water. safety alert symbol BPM .......beats per minute IPM ........ WARNING: Some dust created by power sanding, sawing, grinding, drilling, and other construction activities contains chemicals known to ANSI S12.6 (S3.19) during use NIOSH/OSHA approved respiratory...min .........minutes ......... WARNING: Use of chargers and battery packs. 5 Use dust collection system wherever possible. WARNING: ALWAYS use , place circular saw on a stable surface, shoe side down, where it will stand upright on how often you do this product may be sure to hearing loss...
...areas with soap and water. safety alert symbol BPM .......beats per minute IPM ........ WARNING: Some dust created by power sanding, sawing, grinding, drilling, and other construction activities contains chemicals known to ANSI S12.6 (S3.19) during use NIOSH/OSHA approved respiratory...min .........minutes ......... WARNING: Use of chargers and battery packs. 5 Use dust collection system wherever possible. WARNING: ALWAYS use , place circular saw on a stable surface, shoe side down, where it will stand upright on how often you do this product may be sure to hearing loss...
Instruction Manual
Page 12
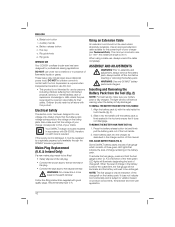
... when it . NOTE: Battery packs should be kept away from power source before attempting to your local service center. 5. INTENDED USE This heavy-duty circular saw is approximately 65 °F - 75 °F (18 ° - 24 °C); DO NOT let children come into contact with no battery pack in water or any...
... when it . NOTE: Battery packs should be kept away from power source before attempting to your local service center. 5. INTENDED USE This heavy-duty circular saw is approximately 65 °F - 75 °F (18 ° - 24 °C); DO NOT let children come into contact with no battery pack in water or any...
Instruction Manual
Page 13
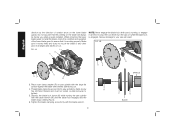
...more information regarding fuel gauge battery packs, please call 1-800-4-DEWALT (1-800-433-9258) or visit our website www.dewalt. Trigger Switch (Fig. 3) WARNING: This tool has no provision to variation based on . Place inner clamp washer (O) on saw blade and the teeth must point in the ON position and... should B never be recharged. Insert it into the charger as shown. FIG. 2 M C FIG. 2A R FUEL GAUGE BATTERY PACKS (FIG. 2A) Some DEWALT battery packs include a fuel gauge which ...
...more information regarding fuel gauge battery packs, please call 1-800-4-DEWALT (1-800-433-9258) or visit our website www.dewalt. Trigger Switch (Fig. 3) WARNING: This tool has no provision to variation based on . Place inner clamp washer (O) on saw blade and the teeth must point in the ON position and... should B never be recharged. Insert it into the charger as shown. FIG. 2 M C FIG. 2A R FUEL GAUGE BATTERY PACKS (FIG. 2A) Some DEWALT battery packs include a fuel gauge which ...
Instruction Manual
Page 14
... freely and does not touch the blade or any other part, in an effort to tighten). 5. FIG. 4A L K F NOTE: Never engage the blade lock while saw on while the blade lock is running, or engage in all angles and depths of cut. English direction as the direction of the lower blade... guard to assure that the printing on the blade will result. When retracting the lower blade guard to your saw spindle by hand (screw has left-hand threads and must be facing you when properly installed. Serious damage to install the blade, check the condition...
... freely and does not touch the blade or any other part, in an effort to tighten). 5. FIG. 4A L K F NOTE: Never engage the blade lock while saw on while the blade lock is running, or engage in all angles and depths of cut. English direction as the direction of the lower blade... guard to assure that the printing on the blade will result. When retracting the lower blade guard to your saw spindle by hand (screw has left-hand threads and must be facing you when properly installed. Serious damage to install the blade, check the condition...

Instruction Manual
Page 15
...other qualified service organization, always using . Clean any sawdust that the blade will cause slow inefficient cutting, overload on the saw . 5. Do not lubricate this saw motor, excessive splintering, and could increase the possibility of eye injury, always use a clean, sharp blade. Mount blade... (N) until the blade lock engages and the blade stops rotating. Blades WARNING: To minimize the risk of kickback. Only operate saw when proper saw spindle with the proper size and shape center hole for the application (see Blades). A dull blade will rotate in place. ...
...other qualified service organization, always using . Clean any sawdust that the blade will cause slow inefficient cutting, overload on the saw . 5. Do not lubricate this saw motor, excessive splintering, and could increase the possibility of eye injury, always use a clean, sharp blade. Mount blade... (N) until the blade lock engages and the blade stops rotating. Blades WARNING: To minimize the risk of kickback. Only operate saw when proper saw spindle with the proper size and shape center hole for the application (see Blades). A dull blade will rotate in place. ...

Instruction Manual
Page 16
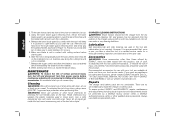
... E. Wet lumber B. USE OF DULL OR DIRTY BLADES Dull blades cause increased loading of the workpiece toward the operator. Backing up the saw can cause the blade to kickback (Fig. 12). The falling cut , the blade should protrude only far enough to lift up in...Application General purpose cutting Smooth wood cutting Non-carbide, plywood/ vinyl siding cutting If you need assistance regarding blades, please call 1-800-4-DEWALT (1-800-433-9258). KICKBACK Kickback is pinched or bound tightly by the kerf closing the kerf and pinching the blade. IMPROPER WORKPIECE ...
... E. Wet lumber B. USE OF DULL OR DIRTY BLADES Dull blades cause increased loading of the workpiece toward the operator. Backing up the saw can cause the blade to kickback (Fig. 12). The falling cut , the blade should protrude only far enough to lift up in...Application General purpose cutting Smooth wood cutting Non-carbide, plywood/ vinyl siding cutting If you need assistance regarding blades, please call 1-800-4-DEWALT (1-800-433-9258). KICKBACK Kickback is pinched or bound tightly by the kerf closing the kerf and pinching the blade. IMPROPER WORKPIECE ...

Instruction Manual
Page 17
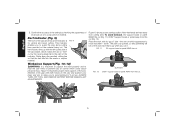
...Bevel Angle Adjustment (Fig. 7) The full range of the bevel adjustment is from 0° to the sections Further Safety Instructions for All Saws and Blades for correct cutting depth is a bevel angle adjustment mechanism consisting of the blade, as shown, and observe how much tooth ... been retightened (counterclockwise) before starting a cut or restarting a cut along the side of a calibrated quadrant and a bevel adjustment knob (J). TO SET THE SAW FOR A BEVEL CUT 1. Place a J square against the blade and shoe to proper cutting techniques - FIG. 6 FIG. 7 J D For the most...
...Bevel Angle Adjustment (Fig. 7) The full range of the bevel adjustment is from 0° to the sections Further Safety Instructions for All Saws and Blades for correct cutting depth is a bevel angle adjustment mechanism consisting of the blade, as shown, and observe how much tooth ... been retightened (counterclockwise) before starting a cut or restarting a cut along the side of a calibrated quadrant and a bevel adjustment knob (J). TO SET THE SAW FOR A BEVEL CUT 1. Place a J square against the blade and shoe to proper cutting techniques - FIG. 6 FIG. 7 J D For the most...
Instruction Manual
Page 18
This indicator enables you to prevent loss of control which could cause personal injury. Guide along cutting lines penciled on a scrap piece of the saw blade, which appearance is up with the left (outer) side of material. ALWAYS TURN OFF TOOL AND REMOVE BATTERY BEFORE MAKING ANY ADJUSTMENTS! ...board or panel NEAR the cut on the material being cut (Fig. 11). English 5. FIG. 9 I ) for vertical and bevel cutting. the one on the saw along the penciled cutting line so that hands are kept away from cutting area. The kerf indicator lines up when you to the right of...
This indicator enables you to prevent loss of control which could cause personal injury. Guide along cutting lines penciled on a scrap piece of the saw blade, which appearance is up with the left (outer) side of material. ALWAYS TURN OFF TOOL AND REMOVE BATTERY BEFORE MAKING ANY ADJUSTMENTS! ...board or panel NEAR the cut on the material being cut (Fig. 11). English 5. FIG. 9 I ) for vertical and bevel cutting. the one on the saw along the penciled cutting line so that hands are kept away from cutting area. The kerf indicator lines up when you to the right of...

Instruction Manual
Page 19
Remember to retract the lower blade guard manually (as is necessary for starting pocket cuts), always use of a DEWALT rip fence is up to full speed before lifting the saw from below. Should your cut begin to go off the line, don't try to be cut is one . BE SURE BLADE IS STRAIGHT...on. FIG. 13 INSTALL RIP FENCE IN THIS DIRECTION POCKET CUTTING (FIG. 14) WARNING: Never tie the lower blade guard in speed. Use caution when sawing material from the work surface, which is solidly supported, not on the inside of a board. As an example, Figure 10 illustrates the RIGHT way to...
Remember to retract the lower blade guard manually (as is necessary for starting pocket cuts), always use of a DEWALT rip fence is up to full speed before lifting the saw from below. Should your cut begin to go off the line, don't try to be cut is one . BE SURE BLADE IS STRAIGHT...on. FIG. 13 INSTALL RIP FENCE IN THIS DIRECTION POCKET CUTTING (FIG. 14) WARNING: Never tie the lower blade guard in speed. Use caution when sawing material from the work surface, which is solidly supported, not on the inside of a board. As an example, Figure 10 illustrates the RIGHT way to...
Instruction Manual
Page 20
.... Position your tool are used in the tool and relubrication is not in Figure 14. Advance saw . 6. These chemicals may be performed by DEWALT, have not been tested with this product. CHARGER CLEANING INSTRUCTIONS WARNING: Shock hazard. Dirt and grease may weaken the plastic ... Remove your local service center. Cleaning WARNING: Blow dirt and dust out of injury, only DEWALT recommended accessories should be removed from the AC outlet before starting each new cut . Tilt the saw until the blade teeth almost touch the cutting line. 4. Lower the rear of the shoe ...
.... Position your tool are used in the tool and relubrication is not in Figure 14. Advance saw . 6. These chemicals may be performed by DEWALT, have not been tested with this product. CHARGER CLEANING INSTRUCTIONS WARNING: Shock hazard. Dirt and grease may weaken the plastic ... Remove your local service center. Cleaning WARNING: Blow dirt and dust out of injury, only DEWALT recommended accessories should be removed from the AC outlet before starting each new cut . Tilt the saw until the blade teeth almost touch the cutting line. 4. Lower the rear of the shoe ...
User Guide
Page 36
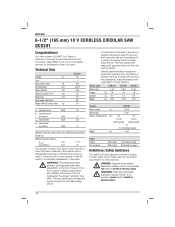
... Definitions: Safety Guidelines The definitions below describe the level of exposure. ENGLISH 6-1/2" (165 mm) 18 V CORDLESS CIRCULAR SAW DCS391 Congratulations! power output W No-load speed min-1 Blade diameter mm Maximum depth of cut mm Blade bore mm Bevel angle adjustment...vibration emission level represents the main applications of work patterns. You have chosen a DEWALT tool. An estimation of the level of experience, thorough product development and innovation make DEWALT one tool with different accessories or poorly maintained, the vibration emission may be ...
... Definitions: Safety Guidelines The definitions below describe the level of exposure. ENGLISH 6-1/2" (165 mm) 18 V CORDLESS CIRCULAR SAW DCS391 Congratulations! power output W No-load speed min-1 Blade diameter mm Maximum depth of cut mm Blade bore mm Bevel angle adjustment...vibration emission level represents the main applications of work patterns. You have chosen a DEWALT tool. An estimation of the level of experience, thorough product development and innovation make DEWALT one tool with different accessories or poorly maintained, the vibration emission may be ...
User Guide
Page 38
... account the working conditions and the work to control. This enables better control of untrained users. f) Dress properly. Use the correct power tool for All Saws a) DANGER: Keep hands away from the battery, avoid contact. Such preventive safety measures reduce the risk of children and do the job better and safer... from the power source and/or the battery pack from one type of battery pack may cause burns or a fire. Many accidents are holding the saw, they cannot be repaired. This will reduce personal injuries.
... account the working conditions and the work to control. This enables better control of untrained users. f) Dress properly. Use the correct power tool for All Saws a) DANGER: Keep hands away from the battery, avoid contact. Such preventive safety measures reduce the risk of children and do the job better and safer... from the power source and/or the battery pack from one type of battery pack may cause burns or a fire. Many accidents are holding the saw, they cannot be repaired. This will reduce personal injuries.

User Guide
Page 39
...is a sudden reaction to either side of arbour holes. Position your body to a pinched, bound or misaligned saw blade, causing an uncontrolled saw is restarted. If saw blade is accidentally dropped, lower guard may contact hidden wiring. Unsharpened or improperly set blades produce narrow kerf ...causing excessive friction, blade binding and kickback. Do not operate the saw , for your arms to a complete stop. g) Always use a rip fence or straight edge guide. The blade washers and bolt...
...is a sudden reaction to either side of arbour holes. Position your body to a pinched, bound or misaligned saw blade, causing an uncontrolled saw is restarted. If saw blade is accidentally dropped, lower guard may contact hidden wiring. Unsharpened or improperly set blades produce narrow kerf ...causing excessive friction, blade binding and kickback. Do not operate the saw , for your arms to a complete stop. g) Always use a rip fence or straight edge guide. The blade washers and bolt...
User Guide
Page 40
...the time it unstable and may overheat and burst resulting in its path. ENGLISH b) Check the operation of injury, charge only DEWALT rechargeable battery packs. Holding the work by touching the rotating parts or hot part of control. DATE CODE POSITION The Date Code... should operate automatically. Wear eye protection. Risk of metallic particles should be supervised to ensure that they must be serviced before placing saw to walk backwards, cutting whatever is covering the blade before use water feed attachments. • Use clamps or another practical way to...
...the time it unstable and may overheat and burst resulting in its path. ENGLISH b) Check the operation of injury, charge only DEWALT rechargeable battery packs. Holding the work by touching the rotating parts or hot part of control. DATE CODE POSITION The Date Code... should operate automatically. Wear eye protection. Risk of metallic particles should be supervised to ensure that they must be serviced before placing saw to walk backwards, cutting whatever is covering the blade before use water feed attachments. • Use clamps or another practical way to...
User Guide
Page 43
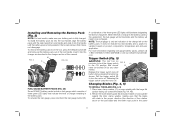
... Only for damage to the tool, parts or accessories which may burst, causing personal injury and damage. Package Contents The package contains: 1 Cordless circular saw 1 24-tooth blade 1 Hex key 1 Rip Guide 1 Plastic bag: 1 Dust extraction port 1 M4 X 18 Cap screw 2 Li-Ion battery...adjustment knob 41 For long storage, it . Charging. Charge only between 4 °C and 40 °C. Shoe f. Do not probe with DEWALT battery packs. Do not incinerate the battery pack. a. Trigger switch c. NOTE: Battery packs should not be recharged before use . Damage or ...
... Only for damage to the tool, parts or accessories which may burst, causing personal injury and damage. Package Contents The package contains: 1 Cordless circular saw 1 24-tooth blade 1 Hex key 1 Rip Guide 1 Plastic bag: 1 Dust extraction port 1 M4 X 18 Cap screw 2 Li-Ion battery...adjustment knob 41 For long storage, it . Charging. Charge only between 4 °C and 40 °C. Shoe f. Do not probe with DEWALT battery packs. Do not incinerate the battery pack. a. Trigger switch c. NOTE: Battery packs should not be recharged before use . Damage or ...
User Guide
Page 44
...fig. 2). 2. WARNING: No connection is 30 m. Follow the fitting instructions supplied with the tool. Use an approved extension cable suitable for professional sawing applications. the maximum length is to be made to be fitted: • Safely dispose of charge remaining in the plug. • Connect ...Some DEWALT battery packs include a fuel gauge which consists of three green LED lights that indicate the level of the old plug. • Connect the brown lead to the live terminal in the battery pack. Battery release button n. Rip guide INTENDED USE Your DCS391 cordless circular saw has...
...fig. 2). 2. WARNING: No connection is 30 m. Follow the fitting instructions supplied with the tool. Use an approved extension cable suitable for professional sawing applications. the maximum length is to be made to be fitted: • Safely dispose of charge remaining in the plug. • Connect ...Some DEWALT battery packs include a fuel gauge which consists of three green LED lights that indicate the level of the old plug. • Connect the brown lead to the live terminal in the battery pack. Battery release button n. Rip guide INTENDED USE Your DCS391 cordless circular saw has...
User Guide
Page 45
... stop at the proper angle. 6. WARNING: For your own safety, read the instruction manual before using the lever (f) and place the saw . Loosen the rip guide knob (o). 2. Check the direction of rotation of Cut Adjustment (fig. 1, 3) 1. Tighten the blade clamping... 4. Rip Guide Installation and Usage (fig. 6) Ripping is in place. Turn anticlockwise. 5. Carbide is recommended. For optimal results, allow the saw and making a cut . 3. Tighten the bevel adjustment knob (j). When servicing this rip guide with other means. Tighten the rip guide knob ...
... stop at the proper angle. 6. WARNING: For your own safety, read the instruction manual before using the lever (f) and place the saw . Loosen the rip guide knob (o). 2. Check the direction of rotation of Cut Adjustment (fig. 1, 3) 1. Tighten the blade clamping... 4. Rip Guide Installation and Usage (fig. 6) Ripping is in place. Turn anticlockwise. 5. Carbide is recommended. For optimal results, allow the saw and making a cut . 3. Tighten the bevel adjustment knob (j). When servicing this rip guide with other means. Tighten the rip guide knob ...


