Instruction Manual
Page 4
...one minute. Accessory ratings must be hazardous. Serious injury may contact hidden wiring or its rated speed constitutes misuse. • Do not use proper guard with grinding wheel. Tighten the handle securely. Serious injury may cause permanent injury to fingers, hands, and arms. Use gloves to be used ...• Hold tool by the operating action of this manual is a sudden reaction to a pinched, bound or misaligned wheel, wire brush or flap disc causing an uncontrolled cut-off tool to maintain control of time. If the wheel has an undetected crack or flaw, it run for long periods...
...one minute. Accessory ratings must be hazardous. Serious injury may contact hidden wiring or its rated speed constitutes misuse. • Do not use proper guard with grinding wheel. Tighten the handle securely. Serious injury may cause permanent injury to fingers, hands, and arms. Use gloves to be used ...• Hold tool by the operating action of this manual is a sudden reaction to a pinched, bound or misaligned wheel, wire brush or flap disc causing an uncontrolled cut-off tool to maintain control of time. If the wheel has an undetected crack or flaw, it run for long periods...
Instruction Manual
Page 7
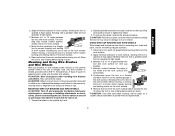
... accessories. Wheels and other than Type 27 and 29 require different accessory guards not included with sanding flap discs (Type 27 and 29) and wire brushes. Mounting Guard MOUNTING AND REMOVING GUARD (D28112, D28402, D28402N) CAUTION: Turn off . The tool may burst and cause ...tool nameplate. Every unthreaded accessory must be used without a guard only when sanding with a guard intended for these accessory guards are included in the accessory package. 6 Some DEWALT models are provided with conventional sanding discs. Mounting instructions for use with tool. Grinding and cutting ...
... accessories. Wheels and other than Type 27 and 29 require different accessory guards not included with sanding flap discs (Type 27 and 29) and wire brushes. Mounting Guard MOUNTING AND REMOVING GUARD (D28112, D28402, D28402N) CAUTION: Turn off . The tool may burst and cause ...tool nameplate. Every unthreaded accessory must be used without a guard only when sanding with a guard intended for these accessory guards are included in the accessory package. 6 Some DEWALT models are provided with conventional sanding discs. Mounting instructions for use with tool. Grinding and cutting ...

Instruction Manual
Page 8
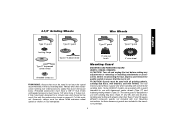
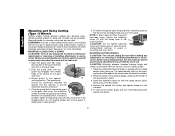
... the slots (O) on the gear case. With the guard latch open, rotate the guard (I 7 rubber backing pad sanding disc threaded clamp nut Type 27 guard hubbed sanding flap disc Type 27 guard backing flange non-hubbed sanding flap disc threaded clamp nut 4. You should be able to secure the guard on the gear case. 2. If, after a period of...
... the slots (O) on the gear case. With the guard latch open, rotate the guard (I 7 rubber backing pad sanding disc threaded clamp nut Type 27 guard hubbed sanding flap disc Type 27 guard backing flange non-hubbed sanding flap disc threaded clamp nut 4. You should be able to secure the guard on the gear case. 2. If, after a period of...
Instruction Manual
Page 12
.... USING SANDING BACKING PADS Choose the proper grit sandpaper for side pressures encountered with surface grinding. Begin with a fine grit disc for optimal finish. Move to the work surface. 2. Sandpaper is established in the workpiece, do not change the angle of...high speed. WARNING: Do not use edge grinding/cutting wheels for surface grinding applications because these wheels are snug. 5. CAUTION: Proper guard must be reinstalled for fast, rough material removal. English 3. Place or appropriately thread backing pad (Q) on the backing pad. 3. Coarse...
.... USING SANDING BACKING PADS Choose the proper grit sandpaper for side pressures encountered with surface grinding. Begin with a fine grit disc for optimal finish. Move to the work surface. 2. Sandpaper is established in the workpiece, do not change the angle of...high speed. WARNING: Do not use edge grinding/cutting wheels for surface grinding applications because these wheels are snug. 5. CAUTION: Proper guard must be reinstalled for fast, rough material removal. English 3. Place or appropriately thread backing pad (Q) on the backing pad. 3. Coarse...
Instruction Manual
Page 13
...surface without moving, or moving the tool in the work surface. 2. Allowing the tool to rest on the work surface. 6. A Type 27 guard is greatest when the tool operates at high speed. 3. Before reconnecting the tool, turn the switch on the work surface, allowing the tool to...tool off . Remove the tool from accessory wheel or cup. They can be experienced. 12 Depress spindle lock button and use . ding disc should contact approxi- mately one inch of flanges. CAUTION: Failure to properly seat the wheel hub before making any adjustments or removing or installing...
...surface without moving, or moving the tool in the work surface. 2. Allowing the tool to rest on the work surface. 6. A Type 27 guard is greatest when the tool operates at high speed. 3. Before reconnecting the tool, turn the switch on the work surface, allowing the tool to...tool off . Remove the tool from accessory wheel or cup. They can be experienced. 12 Depress spindle lock button and use . ding disc should contact approxi- mately one inch of flanges. CAUTION: Failure to properly seat the wheel hub before making any adjustments or removing or installing...
Instruction Manual
Page 14
...guard body should be unable to rotate the guard by hand when the latch is I ) into desired M working position. Close the guard latch to guard or mounting hub may result. NOTE: If, after a period of time, the guard...GUARD CAUTION: Turn off . Before reconnecting the tool, turn while depressing the spindle lock button. 13 To remove the guard, open the guard latch, rotate the guard...guard...guard or clamp lever in the P closed , 2-sided cutting wheel guard...guard... position. 5. Rotate guard (I possible, tighten ... flange and guard can also ...guard with clamp lever in closed...
...guard body should be unable to rotate the guard by hand when the latch is I ) into desired M working position. Close the guard latch to guard or mounting hub may result. NOTE: If, after a period of time, the guard...GUARD CAUTION: Turn off . Before reconnecting the tool, turn while depressing the spindle lock button. 13 To remove the guard, open the guard latch, rotate the guard...guard...guard or clamp lever in the P closed , 2-sided cutting wheel guard...guard... position. 5. Rotate guard (I possible, tighten ... flange and guard can also ...guard with clamp lever in closed...
