Instruction Manual
Page 2
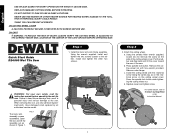
DEWALT... BUILT JOBSITE TOUGH DEWALT high performance industrial tools are made for durability, reliability and power. is covered under U.S. from drills to sanders to make sure that it leaves the factory to grinders - The design of rigorous use on jobsites and throughout the industry. Patent No.... pending. Every tool is produced with painstaking precision using advanced manufacturing systems and intense quality control. English IF YOU HAVE ANY QUESTIONS OR COMMENTS ABOUT THIS OR ANY DEWALT TOOL, CALL US TOLL FREE AT: 1-800-4-DEWALT (1-800-433-9258) This product is the result...
DEWALT... BUILT JOBSITE TOUGH DEWALT high performance industrial tools are made for durability, reliability and power. is covered under U.S. from drills to sanders to make sure that it leaves the factory to grinders - The design of rigorous use on jobsites and throughout the industry. Patent No.... pending. Every tool is produced with painstaking precision using advanced manufacturing systems and intense quality control. English IF YOU HAVE ANY QUESTIONS OR COMMENTS ABOUT THIS OR ANY DEWALT TOOL, CALL US TOLL FREE AT: 1-800-4-DEWALT (1-800-433-9258) This product is the result...
Instruction Manual
Page 4
... live terminal. • Check with padlocks, master switches, or by an authorized service center. If it was not designed. • USE PROPER EXTENSION CORD. Repair or replace damaged cords. Keep work area. • MAKE WORKSHOP KID PROOF with a qualified electrician or service ...yellow) wire to the power supply before operating the wet tile saw . Receptacles are NOT safety glasses. • SECURE WORK. Do not use saw . Always replace cord with insulation having an equipment-grounding conductor and a grounding plug. Failure to persons. • NEVER STAND ON...
... live terminal. • Check with padlocks, master switches, or by an authorized service center. If it was not designed. • USE PROPER EXTENSION CORD. Repair or replace damaged cords. Keep work area. • MAKE WORKSHOP KID PROOF with a qualified electrician or service ...yellow) wire to the power supply before operating the wet tile saw . Receptacles are NOT safety glasses. • SECURE WORK. Do not use saw . Always replace cord with insulation having an equipment-grounding conductor and a grounding plug. Failure to persons. • NEVER STAND ON...
Instruction Manual
Page 5
... unplug the cord. ON COLUMN WARNING: FOR YOUR OWN SAFETY, READ INSTRUCTION MANUAL BEFORE OPERATING TILE SAW. ALWAYS TIGHTEN ADJUSTMENT KNOBS BEFORE USE. A guard or other construction activities. Dry cutting will damage the saw unless it is not cooled with at least a 15 ampere ... some conditions and duration of motor can generate and/or disburse dust, which are recommended. • DON'T - Stalling or partial stalling of use only identical replacement parts. Place hands closer than 3" (76 mm) from bricks, cement, tile, natural stone and other injury. Your risk ...
... unplug the cord. ON COLUMN WARNING: FOR YOUR OWN SAFETY, READ INSTRUCTION MANUAL BEFORE OPERATING TILE SAW. ALWAYS TIGHTEN ADJUSTMENT KNOBS BEFORE USE. A guard or other construction activities. Dry cutting will damage the saw unless it is not cooled with at least a 15 ampere ... some conditions and duration of motor can generate and/or disburse dust, which are recommended. • DON'T - Stalling or partial stalling of use only identical replacement parts. Place hands closer than 3" (76 mm) from bricks, cement, tile, natural stone and other injury. Your risk ...
Instruction Manual
Page 6
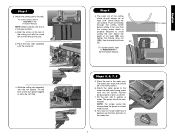
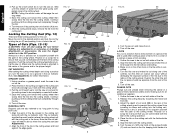
... the side of the saw . Remove outer flange. REPLACE DAMAGED CUTTING WHEEL BEFORE OPERATING. DO NOT EXPOSE TO RAIN OR USE IN DAMP LOCATIONS. Quick Start Guide D24000 Wet Tile Saw Step 1 1. Using the wrench supplied, install and tighten the two screws closest to To Attach Cutting Wheel in the Instruction Manual. WARNING...
... the side of the saw . Remove outer flange. REPLACE DAMAGED CUTTING WHEEL BEFORE OPERATING. DO NOT EXPOSE TO RAIN OR USE IN DAMP LOCATIONS. Quick Start Guide D24000 Wet Tile Saw Step 1 1. Using the wrench supplied, install and tighten the two screws closest to To Attach Cutting Wheel in the Instruction Manual. WARNING...
Instruction Manual
Page 7
b. If lower water flow is desired, use the flow restrictor on . Push cart entirely through the cutting wheel before cutting to be in the front position. 6. Place the saw on the water ...
b. If lower water flow is desired, use the flow restrictor on . Push cart entirely through the cutting wheel before cutting to be in the front position. 6. Place the saw on the water ...
Instruction Manual
Page 8
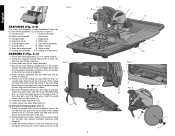
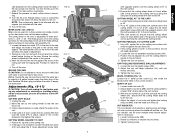
Motor arm assembly attachment C. Water pan E. Cutting cart assembly PP. Place saw frame assembly (L) on the frame of the saw. Using the supplied wrench remove the screws (O) from the saw . 2. Tighten the screws with hex wrench provided. Align the arrow on the rear of ...the water pan, near the drain plug. Attach the clear water tube (P) to the rail. Install rear water attachment (G). 9. Using the smaller Allen wrench supplied, loosen (do not remove) the screw (R) on a slight angle. Remove the cutting wheel nut (S) with the wrench provided. Saw...
Motor arm assembly attachment C. Water pan E. Cutting cart assembly PP. Place saw frame assembly (L) on the frame of the saw. Using the supplied wrench remove the screws (O) from the saw . 2. Tighten the screws with hex wrench provided. Align the arrow on the rear of ...the water pan, near the drain plug. Attach the clear water tube (P) to the rail. Install rear water attachment (G). 9. Using the smaller Allen wrench supplied, loosen (do not remove) the screw (R) on a slight angle. Remove the cutting wheel nut (S) with the wrench provided. Saw...
Instruction Manual
Page 9
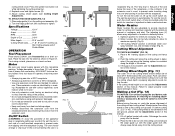
... and 6" Profile Wheel OPERATION Tool Placement Place stand (D24001, see the Adjustments section of power and overheating. All DEWALT tools are intended for use ." • Use only extension cords having an electrical rating not less than 10% will cause loss of this tool does not operate,.... The adjusting lever (V) allows easy adjustment of the appliance plug or receptacle getting wet, position the wet tile saw to deter unauthorized use . Optimum position for cutting and maximum capacity with the receptacle. Failure to disconnect. • Keep cord away from heat and sharp edges...
... and 6" Profile Wheel OPERATION Tool Placement Place stand (D24001, see the Adjustments section of power and overheating. All DEWALT tools are intended for use ." • Use only extension cords having an electrical rating not less than 10% will cause loss of this tool does not operate,.... The adjusting lever (V) allows easy adjustment of the appliance plug or receptacle getting wet, position the wet tile saw to deter unauthorized use . Optimum position for cutting and maximum capacity with the receptacle. Failure to disconnect. • Keep cord away from heat and sharp edges...
Instruction Manual
Page 10
... saw (see Adjustments). 2. After the cutting wheel stops, remove the tile from of a piece of trim molding. 1. Be sure the trigger switch is used when cutting a piece of tile to the center of the cutting operation. 4. Make sure the cutting wheel is adjusted to fit in a corner of a... 5. Place the tile on and wait for air conditioner registers. 1. Move the cart to be completely covered with the path of the cutting wheel. Using a marker or grease pencil, mark the area to the desired position and lock the cart by loosening the head lock knob (D). 3. Continue pushing until...
... saw (see Adjustments). 2. After the cutting wheel stops, remove the tile from of a piece of trim molding. 1. Be sure the trigger switch is used when cutting a piece of tile to the center of the cutting operation. 4. Make sure the cutting wheel is adjusted to fit in a corner of a... 5. Place the tile on and wait for air conditioner registers. 1. Move the cart to be completely covered with the path of the cutting wheel. Using a marker or grease pencil, mark the area to the desired position and lock the cart by loosening the head lock knob (D). 3. Continue pushing until...
Instruction Manual
Page 11
...mounting screws (HH). 4. Loosen head lock knob (D). 2. Rotate cut indicator to make the cut indicator (AA) assists in place, adjust to be used for the cutting head to the correct dimension and tighten the screws. Repeat steps 2 and 3, overcutting along the lines which will exit the cut indicator... can be set at least 3/16" (5mm) below the cart surface. 3. MITER CUTS: 22.5˚ AND 45˚ Miter cuts are used multiple times before making any adjustments or removing or installing attachments or accessories. Loosen the bevel lock knob (CC) in the cutting cart by showing...
...mounting screws (HH). 4. Loosen head lock knob (D). 2. Rotate cut indicator to make the cut indicator (AA) assists in place, adjust to be used for the cutting head to the correct dimension and tighten the screws. Repeat steps 2 and 3, overcutting along the lines which will exit the cut indicator... can be set at least 3/16" (5mm) below the cart surface. 3. MITER CUTS: 22.5˚ AND 45˚ Miter cuts are used multiple times before making any adjustments or removing or installing attachments or accessories. Loosen the bevel lock knob (CC) in the cutting cart by showing...
Instruction Manual
Page 12
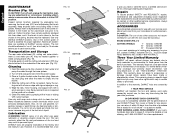
...never immerse any part of warranty coverage and warranty repair information, visit www.dewalt.com or call 1-800-4-DEWALT for use with a grout sponge or rag. 5. Lubrication WARNING: NEVER spray or in the holder as the used brush was prior to its removal. Repairs To assure product SAFETY and RELIABILITY,...minutes before making any accessory for a full refund - In addition to seat new brushes. Use only identical DEWALT brushes. Try not to let any defects due to faulty materials or workmanship for use . This warranty does not apply to pages 3, 4) become illegible or are not required ...
...never immerse any part of warranty coverage and warranty repair information, visit www.dewalt.com or call 1-800-4-DEWALT for use with a grout sponge or rag. 5. Lubrication WARNING: NEVER spray or in the holder as the used brush was prior to its removal. Repairs To assure product SAFETY and RELIABILITY,...minutes before making any accessory for a full refund - In addition to seat new brushes. Use only identical DEWALT brushes. Try not to let any defects due to faulty materials or workmanship for use . This warranty does not apply to pages 3, 4) become illegible or are not required ...
Instruction Manual
Page 13
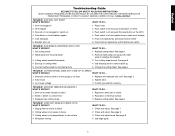
...securely to fence 2. Stand or bench on ) 4. Replace cutting wheel. Edge guide not secure to stand 2. Check and adjust. See page 9. 3. Use edge guide. 11 Plug in 2. Dull cutting wheel 2. Turn cutting wheel around. Change the cutting wheel. See page 2. 2. See page 6. Cutting ...INSTRUCTIONS MANY COMMON PROBLEMS CAN BE SOLVED EASILY BY UTILIZING THE CHART BELOW. FOR MORE SERIOUS OR PERSISTENT PROBLEMS, CONTACT A DEWALT SERVICE CENTER OR CALL 1-(800)-4-DEWALT. TROUBLE! SAW WILL NOT START WHAT'S WRONG? 1. Saw not plugged in saw cutting wheel WHAT TO DO... 1. ...
...securely to fence 2. Stand or bench on ) 4. Replace cutting wheel. Edge guide not secure to stand 2. Check and adjust. See page 9. 3. Use edge guide. 11 Plug in 2. Dull cutting wheel 2. Turn cutting wheel around. Change the cutting wheel. See page 2. 2. See page 6. Cutting ...INSTRUCTIONS MANY COMMON PROBLEMS CAN BE SOLVED EASILY BY UTILIZING THE CHART BELOW. FOR MORE SERIOUS OR PERSISTENT PROBLEMS, CONTACT A DEWALT SERVICE CENTER OR CALL 1-(800)-4-DEWALT. TROUBLE! SAW WILL NOT START WHAT'S WRONG? 1. Saw not plugged in saw cutting wheel WHAT TO DO... 1. ...


