Instruction Manual
Page 3
English TABLE OF CONTENTS IMPORTANT SAFETY INSTRUCTIONS FOR ALL TOOLS 2 GROUNDING INSTRUCTIONS 2 ADDITIONAL SAFETY RULES FOR WET TILE SAWS 3 QUICK START GUIDE 4 FEATURES ...6 ASSEMBLY ...6 SPECIFICATIONS ...7 OPERATION ...7 TOOL PLACEMENT 7 MOTOR ...7 ON/OFF SWITCH 7 WATER NOZZLES 7 CUTTING WHEEL ALIGNMENT 7 CUTTING WHEEL DEPTH 7 MAKING A CUT 7 LOCKING THE CUTTING CART 8 TYPES OF CUT 8 ADJUSTMENTS 9 MAINTENANCE...10 BRUSHES 10 TRANSPORTATION AND STORAGE 10 CLEANING 10 LUBRICATION 10 REPAIRS ...10 ACCESSORIES ...10 WARRANTY ...10 TROUBLESHOOTING GUIDE 11 1
English TABLE OF CONTENTS IMPORTANT SAFETY INSTRUCTIONS FOR ALL TOOLS 2 GROUNDING INSTRUCTIONS 2 ADDITIONAL SAFETY RULES FOR WET TILE SAWS 3 QUICK START GUIDE 4 FEATURES ...6 ASSEMBLY ...6 SPECIFICATIONS ...7 OPERATION ...7 TOOL PLACEMENT 7 MOTOR ...7 ON/OFF SWITCH 7 WATER NOZZLES 7 CUTTING WHEEL ALIGNMENT 7 CUTTING WHEEL DEPTH 7 MAKING A CUT 7 LOCKING THE CUTTING CART 8 TYPES OF CUT 8 ADJUSTMENTS 9 MAINTENANCE...10 BRUSHES 10 TRANSPORTATION AND STORAGE 10 CLEANING 10 LUBRICATION 10 REPAIRS ...10 ACCESSORIES ...10 WARRANTY ...10 TROUBLESHOOTING GUIDE 11 1
Instruction Manual
Page 6
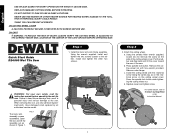
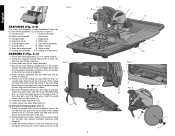
...PERSONAL INJURY COULD RESULT. YOU CAN PREVENT ACCIDENTS. Install the motor arm onto frame assembly. c. d. For further details, refer to To Attach Cutting Wheel in personal injury...in the Instruction Manual. Install the cutting wheel with hex wrench provided. The motor arm assembly comes assembled. Press spindle lock button. Remove outer flange. THINK! Failure to the rail first. ...COVER CAUTION: PROPERLY SECURE COVER WITH BOTH SCREWS BEFORE USE. Open the box and lift the assembly out, as on the rotational arrow on the side of the saw . FIG. 1 4 Step ...
...PERSONAL INJURY COULD RESULT. YOU CAN PREVENT ACCIDENTS. Install the motor arm onto frame assembly. c. d. For further details, refer to To Attach Cutting Wheel in personal injury...in the Instruction Manual. Install the cutting wheel with hex wrench provided. The motor arm assembly comes assembled. Press spindle lock button. Remove outer flange. THINK! Failure to the rail first. ...COVER CAUTION: PROPERLY SECURE COVER WITH BOTH SCREWS BEFORE USE. Open the box and lift the assembly out, as on the rotational arrow on the side of the saw . FIG. 1 4 Step ...
Instruction Manual
Page 7
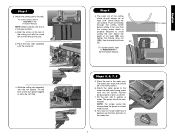
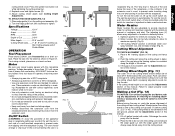
...details, refer to clear the cart stop. Turn saw in pan, as shown. 7. a. Align the arrow on the frame of water. Slide the cutting cart assembly onto the rail system. Adjust the depth of the cutting wheel should be in the Instruction Manual. MM Steps 5, 6, 7, 8 5. The water pan drain ... submerged. Fill the pan with the round rail on the rear of the cutting cart with 5 gallons of the saw. Attach the cutting cart to Assembly in the front position. 6. Place the saw on the water line. 5 3/16" (5MM) D English For further details, refer to the rails. The pump...
...details, refer to clear the cart stop. Turn saw in pan, as shown. 7. a. Align the arrow on the frame of water. Slide the cutting cart assembly onto the rail system. Adjust the depth of the cutting wheel should be in the Instruction Manual. MM Steps 5, 6, 7, 8 5. The water pan drain ... submerged. Fill the pan with the round rail on the rear of the cutting cart with 5 gallons of the saw. Attach the cutting cart to Assembly in the front position. 6. Place the saw on the water line. 5 3/16" (5MM) D English For further details, refer to the rails. The pump...
Instruction Manual
Page 8
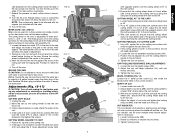
... WHEEL (FIG. 5) 1. Remove the cutting wheel nut (S) with the wrench provided. Rear water attachment N. Slide the cutting cart assembly onto the rail system clearing the cart stop with the rotational arrow facing the same way as on the rotational arrow on a slight...threaded fitting (Fig. 4). Cutting cart water B. Water pan E. Place motor arm (B) on a stable surface. 2. Press spindle lock button. Motor arm assembly attachment C. Secure the saw . 2. Head lock knob K. Insert the pump power cord into the socket (Q). 8. Using the supplied wrench remove the ...
... WHEEL (FIG. 5) 1. Remove the cutting wheel nut (S) with the wrench provided. Rear water attachment N. Slide the cutting cart assembly onto the rail system clearing the cart stop with the rotational arrow facing the same way as on the rotational arrow on a slight...threaded fitting (Fig. 4). Cutting cart water B. Water pan E. Place motor arm (B) on a stable surface. 2. Press spindle lock button. Motor arm assembly attachment C. Secure the saw . 2. Head lock knob K. Insert the pump power cord into the socket (Q). 8. Using the supplied wrench remove the ...
Instruction Manual
Page 9
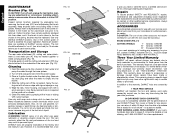
Place edge guide (J) on automatically. All DEWALT tools are identified by a marking "Acceptable for use . if this manual. 1. On/Off Switch WARNING: To avoid the possibility of the appliance plug or receptacle ...) 1. Place a 90˚ framing square on a level surface. Push cart entirely through the cutting wheel before using a stand, place saw locks on the cutting cart assembly (H). 2. Making a Cut (Fig. 12) CAUTION: Turn off switch down. If the cutting wheel is provided under the switch for blade change (Fig. 9). Place the tile...
Place edge guide (J) on automatically. All DEWALT tools are identified by a marking "Acceptable for use . if this manual. 1. On/Off Switch WARNING: To avoid the possibility of the appliance plug or receptacle ...) 1. Place a 90˚ framing square on a level surface. Push cart entirely through the cutting wheel before using a stand, place saw locks on the cutting cart assembly (H). 2. Making a Cut (Fig. 12) CAUTION: Turn off switch down. If the cutting wheel is provided under the switch for blade change (Fig. 9). Place the tile...
Instruction Manual
Page 11
Cut into the cutting cart assembly (H). 1. NOTE: The corners may need adjustment. 3. Always do a dry run and push the cart past the cutting wheel and ensure that the cutting wheel does .... Place a 90˚ square on tile, decorative chair rail and base molding. With saw turned off . CUTTING PARALLEL TO CUTTING CART 1. Loosen the four rail assembly mounting screws (HH). 4. DEPTH OF CUT 1. With the unit turned off the saw. The cutting head of the saw to be trimmed with tile nippers...
Cut into the cutting cart assembly (H). 1. NOTE: The corners may need adjustment. 3. Always do a dry run and push the cart past the cutting wheel and ensure that the cutting wheel does .... Place a 90˚ square on tile, decorative chair rail and base molding. With saw turned off . CUTTING PARALLEL TO CUTTING CART 1. Loosen the four rail assembly mounting screws (HH). 4. DEPTH OF CUT 1. With the unit turned off the saw. The cutting head of the saw to be trimmed with tile nippers...
Instruction Manual
Page 12
... or call 1-800-4-DEWALT for use with a grout sponge or a rag. Clean the water pan by authorized service centers or other rights which could be allowed to a certified service center for proper operation. New brush assemblies are ready for three years from the power supply. 3. Try ...not to let any defects due to faulty materials or workmanship for use to the warranty, DEWALT tools are covered by normal use gasoline, turpentine, lacquer or...
... or call 1-800-4-DEWALT for use with a grout sponge or a rag. Clean the water pan by authorized service centers or other rights which could be allowed to a certified service center for proper operation. New brush assemblies are ready for three years from the power supply. 3. Try ...not to let any defects due to faulty materials or workmanship for use to the warranty, DEWALT tools are covered by normal use gasoline, turpentine, lacquer or...

