
User Guide
Page 1
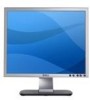
... you how to either potential damage to change without the written permission of Dell Inc. Dell Inc. A01 Dell™ SP1908FP Flat Panel Monitor User's Guide About Your Monitor Front View Back View Side View Bottom View Monitor Specifications Cleaning Your Monitor Using Your Adjustable Monitor Stand Attaching the Stand Organizing Your Cables Using the Tilt Removing the Stand...
... you how to either potential damage to change without the written permission of Dell Inc. Dell Inc. A01 Dell™ SP1908FP Flat Panel Monitor User's Guide About Your Monitor Front View Back View Side View Bottom View Monitor Specifications Cleaning Your Monitor Using Your Adjustable Monitor Stand Attaching the Stand Organizing Your Cables Using the Tilt Removing the Stand...

User Guide
Page 2
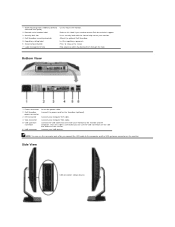
Back to Contents Page About Your Monitor Dell™ SP1908FP Flat Panel Monitor User's Guide Front View Back View Bottom View Side View Monitor Specifications Cleaning Your Monitor Front View 1. Video input select 2. OSD menu / select button 3. Auto-Adjust / Up (+) button 5. Brightness & Contrast / Down (-) button 4. Power button (with power light indicator) Back View
Back to Contents Page About Your Monitor Dell™ SP1908FP Flat Panel Monitor User's Guide Front View Back View Bottom View Side View Monitor Specifications Cleaning Your Monitor Front View 1. Video input select 2. OSD menu / select button 3. Auto-Adjust / Up (+) button 5. Brightness & Contrast / Down (-) button 4. Power button (with power light indicator) Back View
User Guide
Page 3
... only after you need to the monitor and the computer. Press to mount the monitor. Connect your computer VGA cable. Side View USB connectors (downstream) List the regulatory approvals. Help organize cables by placing them through the hole. Connect your computer DVI cable. Bottom View 1 Power connector 2 Dell Soundbar power connector 3 DVI connector...
... only after you need to the monitor and the computer. Press to mount the monitor. Connect your computer VGA cable. Side View USB connectors (downstream) List the regulatory approvals. Help organize cables by placing them through the hole. Connect your computer DVI cable. Bottom View 1 Power connector 2 Dell Soundbar power connector 3 DVI connector...
User Guide
Page 4
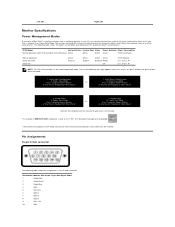
... achieved by disconnecting the main cable from the keyboard, mouse, or other input devices. The monitor automatically resumes functioning when the computer detects input from the monitor. This monitor is referred to the OSD. Digital Input In Power Save Mode Press Computer Power Button or... and signaling of this automatic power saving feature: VESA Modes Horizontal Sync Vertical Sync Video Power Indicator Power Consumption Normal operation (with Dell Soundbar and USB active) Active Active Active Green 75 W (maximum) Normal operation Active-off mode Switch off mode. 1. This ...
... achieved by disconnecting the main cable from the keyboard, mouse, or other input devices. The monitor automatically resumes functioning when the computer detects input from the monitor. This monitor is referred to the OSD. Digital Input In Power Save Mode Press Computer Power Button or... and signaling of this automatic power saving feature: VESA Modes Horizontal Sync Vertical Sync Video Power Indicator Power Consumption Normal operation (with Dell Soundbar and USB active) Active Active Active Green 75 W (maximum) Normal operation Active-off mode Switch off mode. 1. This ...

User Guide
Page 5
... Data 1 Shield 19 T.M.D.S. Clock + 8 No Connect 16 Hot Plug Detect 24 T.M.D.S. attached peripherals may take a few seconds to resume normal functionality. Most monitor installations are automatic; NOTE: The USB interface of the monitor works ONLY when monitor is at the top...Mbps 2.5W (Max., each port) USB ports: l 1 upstream - The monitor automatically provides the computer system with its USB interface; Data 1- 17 T.M.D.S. Data 2 Shield 11 T.M.D.S. General Model number Flat Panel SP1908FP Data 2- 9 T.M.D.S. 11 GND 12 DDC data 13 H-sync 14 V-sync...
... Data 1 Shield 19 T.M.D.S. Clock + 8 No Connect 16 Hot Plug Detect 24 T.M.D.S. attached peripherals may take a few seconds to resume normal functionality. Most monitor installations are automatic; NOTE: The USB interface of the monitor works ONLY when monitor is at the top...Mbps 2.5W (Max., each port) USB ports: l 1 upstream - The monitor automatically provides the computer system with its USB interface; Data 1- 17 T.M.D.S. Data 2 Shield 11 T.M.D.S. General Model number Flat Panel SP1908FP Data 2- 9 T.M.D.S. 11 GND 12 DDC data 13 H-sync 14 V-sync...

User Guide
Page 6
DVI-D, white connector Digital: Detachable, DVI-D, Solid pins, shipped detached from the monitor TFT LCD 19 inches (19-inch viewable image size) 380 mm (14.96 inches) 300 mm (11.81 inches) 0.294 mm 160° (vertical) typ, 160° (horizontal) ... / 50 or 60 Hz + 3 Hz / 2.0A (Max.) 120V:42A (Max.) 240V:80A (Max.) Physical Characteristics The following table shows the Physical Characteristics of monitor: Connector type Signal cable type 15-pin D-subminiature, blue connector; Screen type Screen dimensions Preset display area: Horizontal Vertical Pixel pitch Viewing angle Luminance output...
DVI-D, white connector Digital: Detachable, DVI-D, Solid pins, shipped detached from the monitor TFT LCD 19 inches (19-inch viewable image size) 380 mm (14.96 inches) 300 mm (11.81 inches) 0.294 mm 160° (vertical) typ, 160° (horizontal) ... / 50 or 60 Hz + 3 Hz / 2.0A (Max.) 120V:42A (Max.) 240V:80A (Max.) Physical Characteristics The following table shows the Physical Characteristics of monitor: Connector type Signal cable type 15-pin D-subminiature, blue connector; Screen type Screen dimensions Preset display area: Horizontal Vertical Pixel pitch Viewing angle Luminance output...

User Guide
Page 7
...176; to 140°F) 10% to 80% (noncondensing) Nonoperating Altitude: Operating Storage: 5% to 90% (noncondensing) Shipping: 5% to use the monitor correctly. If possible, use benzene, thinner, ammonia, abrasive cleaners, or compressed air. Do not use a special screen-cleaning tissue or solution suitable for... antistatic coating. Avoid using detergent of any kind as darker-colored monitor may scratch and show white scuff marks more than lighter-colored monitor. l Handle your monitor, use . l To clean your monitor when not in use a dynamically changing screen saver and power off...
...176; to 140°F) 10% to 80% (noncondensing) Nonoperating Altitude: Operating Storage: 5% to 90% (noncondensing) Shipping: 5% to use the monitor correctly. If possible, use benzene, thinner, ammonia, abrasive cleaners, or compressed air. Do not use a special screen-cleaning tissue or solution suitable for... antistatic coating. Avoid using detergent of any kind as darker-colored monitor may scratch and show white scuff marks more than lighter-colored monitor. l Handle your monitor, use . l To clean your monitor when not in use a dynamically changing screen saver and power off...
User Guide
Page 9
... protection against harmful interference in room temperature conditions. l Do not store or use the LCD monitor in your location. l Avoid moving the LCD monitor between locations with Part 15 of the display. For example, do not place the LCD monitor inside of Dell Inc. Excessive cold or hot conditions can have a voltage selection switch for a Class B digital...
... protection against harmful interference in room temperature conditions. l Do not store or use the LCD monitor in your location. l Avoid moving the LCD monitor between locations with Part 15 of the display. For example, do not place the LCD monitor inside of Dell Inc. Excessive cold or hot conditions can have a voltage selection switch for a Class B digital...

User Guide
Page 10
... back cover, as you may block the ventilation openings in particular, if there are listed. l Do not attempt to support.dell.com. l Unplug the monitor when it away from the electric outlet before any unusual sounds or smells coming from an electric socket. NOTE:The contact information...exposed to use within the country for ventilation. l Be sure to provide adequate ventilation and air flow. l support.dell.com (support) For specific web addresses for your monitor does not operate normally - The screen is specific for XPS computers only toll-free: 1300 790 877 Home and ...
... back cover, as you may block the ventilation openings in particular, if there are listed. l Do not attempt to support.dell.com. l Unplug the monitor when it away from the electric outlet before any unusual sounds or smells coming from an electric socket. NOTE:The contact information...exposed to use within the country for ventilation. l Be sure to provide adequate ventilation and air flow. l support.dell.com (support) For specific web addresses for your monitor does not operate normally - The screen is specific for XPS computers only toll-free: 1300 790 877 Home and ...
User Guide
Page 18
... and Local Government Federal Government Healthcare K-12 Education Higher Education Employee Purchase Program (EPP) Financial Services Leases and Loans Dell Preferred Accounts (DPA) Sales Dell Outlet Store Software and Peripherals Sales Online Support Venezuela Technical Support, Customer Service, Sales Online Support Technical Support, Customer ...3355 toll-free:1-888-798-7561 toll-free:1-800-671-3355 www.dell.com/vi la-techsupport@dell.com toll-free: 1-877-702-4360 www.dell.com/ve la-techsupport@dell.com 0800-100-4752 Your Monitor Set-up Guide To view PDF files (files with an extension of...
... and Local Government Federal Government Healthcare K-12 Education Higher Education Employee Purchase Program (EPP) Financial Services Leases and Loans Dell Preferred Accounts (DPA) Sales Dell Outlet Store Software and Peripherals Sales Online Support Venezuela Technical Support, Customer Service, Sales Online Support Technical Support, Customer ...3355 toll-free:1-888-798-7561 toll-free:1-800-671-3355 www.dell.com/vi la-techsupport@dell.com toll-free: 1-877-702-4360 www.dell.com/ve la-techsupport@dell.com 0800-100-4752 Your Monitor Set-up Guide To view PDF files (files with an extension of...

User Guide
Page 19
... cable that was included with your monitor. If you begin any USB devices. 5. Connect either the white DVI or the blue VGA cables to Contents Page Setting Up Your Monitor Dell™ SP1908FP Flat Panel Monitor User's Guide Connecting Your Monitor Using the Front Panel Using the ...OSD Menu Setting the Optimal Resolution Using the Dell Soundbar (Optional) Connecting Your Monitor CAUTION: Before you do not 6. Connect any of...
... cable that was included with your monitor. If you begin any USB devices. 5. Connect either the white DVI or the blue VGA cables to Contents Page Setting Up Your Monitor Dell™ SP1908FP Flat Panel Monitor User's Guide Connecting Your Monitor Using the Front Panel Using the ...OSD Menu Setting the Optimal Resolution Using the Dell Soundbar (Optional) Connecting Your Monitor CAUTION: Before you do not 6. Connect any of...

User Guide
Page 20
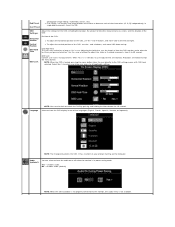
... input to the exact times. Use this button to the incoming video signal. Using the Front Panel Use the buttons on the front of the monitor to activate automatic setup and adjustment. The following dialog appears on a black screen as a video signal is present in the OSD. If both VGA...card and the Dell Self-test Feature Check dialogue box will activate that may be tested either the VGA or DVI outputs. or or OSD menu / select The Menu button is operating correctly. Down (-) and Up (+) Use these buttons to open and exit the on a black background if the monitor cannot sense...
... input to the exact times. Use this button to the incoming video signal. Using the Front Panel Use the buttons on the front of the monitor to activate automatic setup and adjustment. The following dialog appears on a black screen as a video signal is present in the OSD. If both VGA...card and the Dell Self-test Feature Check dialogue box will activate that may be tested either the VGA or DVI outputs. or or OSD menu / select The Menu button is operating correctly. Down (-) and Up (+) Use these buttons to open and exit the on a black background if the monitor cannot sense...

User Guide
Page 21
... Digital (DVI) Input or Main Menu for Analog (VGA) Input Main Menu for the OSD menu to another menu, or exit the OSD menu, the monitor automatically saves those changes. An amber light indicates power save mode. The changes are no active video input signals or attached cables. Use the power... button to open the OSD menu and display the main menu. The green light indicates the monitor is on and off. NOTE: Auto Adjust does not occur if you press the button while there are also saved if you change the settings...
... Digital (DVI) Input or Main Menu for Analog (VGA) Input Main Menu for the OSD menu to another menu, or exit the OSD menu, the monitor automatically saves those changes. An amber light indicates power save mode. The changes are no active video input signals or attached cables. Use the power... button to open the OSD menu and display the main menu. The green light indicates the monitor is on and off. NOTE: Auto Adjust does not occur if you press the button while there are also saved if you change the settings...

User Guide
Page 22
... the contrast and push the - or NOTE: Auto Adjust, Positioning and Image Settings are only available when you move between darkness and lightness on the monitor screen. button to activate the highlighted option. 4. Push the Menu button once to decrease luminance (min 0 ~ max 100). Icon Menu and Submenus Exit Description Select... your changes. 6. Contrast adjusts the degree of the viewing area. and + button to decrease the contrast (min 0 ~ max 100). See the table below for the monitor. 3. Push the Menu button once to return to the main menu to the indicators on the...
... the contrast and push the - or NOTE: Auto Adjust, Positioning and Image Settings are only available when you move between darkness and lightness on the monitor screen. button to activate the highlighted option. 4. Push the Menu button once to decrease luminance (min 0 ~ max 100). Icon Menu and Submenus Exit Description Select... your changes. 6. Contrast adjusts the degree of the viewing area. and + button to decrease the contrast (min 0 ~ max 100). See the table below for the monitor. 3. Push the Menu button once to return to the main menu to the indicators on the...

User Guide
Page 23
.... After using Auto Adjustment, you to more closely adjust your monitor on a black screen as the monitor self-adjusts to the current input: Auto Adjust In Progress Image settings: Auto Adjustment allows the monitor to self-adjust to activate automatic setup and adjustment. Use the...buttons to access these settings. l Red Preset is not available. The Phase and Pixel Clock adjustments allow you can further tune your monitor by using DVI source, the Image Settings option is typically used for color-intensive applications Normal Preset Blue Preset l Normal Preset is also...
.... After using Auto Adjustment, you to more closely adjust your monitor on a black screen as the monitor self-adjusts to the current input: Auto Adjust In Progress Image settings: Auto Adjustment allows the monitor to self-adjust to activate automatic setup and adjustment. Use the...buttons to access these settings. l Red Preset is not available. The Phase and Pixel Clock adjustments allow you can further tune your monitor by using DVI source, the Image Settings option is typically used for color-intensive applications Normal Preset Blue Preset l Normal Preset is also...
User Guide
Page 24
...directly to have the audio on the computer. Select to the OSD settings menu, with OSD Lock selected. disables audio (default) NOTE: When the Dell Soundbar is not properly connected to the left and right. OSD Lock: Controls user access to all applicable settings. Select No (-) to unlock and... editing, multimedia, movies, etc.). Use the - NOTE: The change only affects the OSD. enables audio No - and + buttons, and move OSD to the monitor, the audio menu is in use. All buttons are allowed. Language NOTE: You can select to have the OSD display in one of the three...
...directly to have the audio on the computer. Select to the OSD settings menu, with OSD Lock selected. disables audio (default) NOTE: When the Dell Soundbar is not properly connected to the left and right. OSD Lock: Controls user access to all applicable settings. Select No (-) to unlock and... editing, multimedia, movies, etc.). Use the - NOTE: The change only affects the OSD. enables audio No - and + buttons, and move OSD to the monitor, the audio menu is in use. All buttons are allowed. Language NOTE: You can select to have the OSD display in one of the three...

User Guide
Page 25
...original factory settings and set the default setting for Normal Preset. Enable LCD Conditioning: If an image appears to be stuck on the monitor to terminate LCD Conditioning at any button on the monitor, select LCD Conditioning to help reduce minor cases of image retention. Severe cases ...of Reset to adjust the monitor parameters (brightness, color balance, etc) via software applications on your monitor, keep this feature. NOTE: If you select "Enable LCD Conditioning": NOTE: Press any time. Change the Red, Green, and Blue...
...original factory settings and set the default setting for Normal Preset. Enable LCD Conditioning: If an image appears to be stuck on the monitor to terminate LCD Conditioning at any button on the monitor, select LCD Conditioning to help reduce minor cases of image retention. Severe cases ...of Reset to adjust the monitor parameters (brightness, color balance, etc) via software applications on your monitor, keep this feature. NOTE: If you select "Enable LCD Conditioning": NOTE: Press any time. Change the Red, Green, and Blue...

User Guide
Page 26
Setting the Optimal Resolution 1. Right-click on -screen if the monitor cannot sense a video signal. If you are using a non-Dell computer (portable or desktop): ¡ Go to the support site for your graphics card. Select the Settings tab. 3. If you may appear on your computer,... appears, but the screen is too high or too low for the monitor to use. See Specifications for more information. If you do not see 1280 x 1024 as an option, you have a Dell desktop or portable computer: ¡ Go to support.dell.com, enter your service tag, and download the latest driver for...
Setting the Optimal Resolution 1. Right-click on -screen if the monitor cannot sense a video signal. If you are using a non-Dell computer (portable or desktop): ¡ Go to the support site for your graphics card. Select the Settings tab. 3. If you may appear on your computer,... appears, but the screen is too high or too low for the monitor to use. See Specifications for more information. If you do not see 1280 x 1024 as an option, you have a Dell desktop or portable computer: ¡ Go to support.dell.com, enter your service tag, and download the latest driver for...

User Guide
Page 27
The Soundbar has a rotary volume and on the back of the monitor, attach the Soundbar aligning the two slots with any device other than Dell Soundbar NOTE: Soundbar Power Connector +12V DC output is a stereo two channel system adaptable to the left ...blue LED for optional only. Headphone connectors Soundbar Attachment to Contents Page Slide the Soundbar to mount on Dell flat panel displays. Back to the Monitor 1. Power/volume control 2. Power indicator 3. Using the Dell Soundbar (Optional) The Dell Soundbar is for power indication, and two audio headset jacks. 1.
The Soundbar has a rotary volume and on the back of the monitor, attach the Soundbar aligning the two slots with any device other than Dell Soundbar NOTE: Soundbar Power Connector +12V DC output is a stereo two channel system adaptable to the left ...blue LED for optional only. Headphone connectors Soundbar Attachment to Contents Page Slide the Soundbar to mount on Dell flat panel displays. Back to the Monitor 1. Power/volume control 2. Power indicator 3. Using the Dell Soundbar (Optional) The Dell Soundbar is for power indication, and two audio headset jacks. 1.
User Guide
Page 28
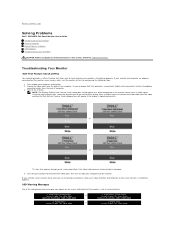
... system operation if the video cable becomes disconnected or damaged. 4. If your monitor screen remains blank after you use the previous procedure, check your computer and monitor. 2. Back to Contents Page Solving Problems Dell™ SP1908FP Flat Panel Monitor User's Guide Troubleshooting Your Monitor General Problems Product Specific Problems USB Problems Troubleshooting Your Soundbar CAUTION: Before...
... system operation if the video cable becomes disconnected or damaged. 4. If your monitor screen remains blank after you use the previous procedure, check your computer and monitor. 2. Back to Contents Page Solving Problems Dell™ SP1908FP Flat Panel Monitor User's Guide Troubleshooting Your Monitor General Problems Product Specific Problems USB Problems Troubleshooting Your Soundbar CAUTION: Before...


