Rack Installation Guide
Page 5
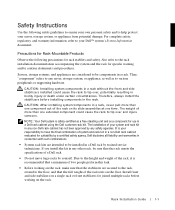
...working on a single rack or front stabilizers for joined multiple racks before installing components in a Dell rack cabinet using the Dell customer rack kit. Also refer to your responsibility to the height and weight of the rack, it is safety-certified as a free-standing unit and as to the ... move large racks by trained service technicians. Therefore, always install the stabilizers before working on the floor. NOTE: Your Dell system is recommended that the full weight of the rack rests on the rack, make sure that the rack meets the specifications of the rack on its slide...
...working on a single rack or front stabilizers for joined multiple racks before installing components in a Dell rack cabinet using the Dell customer rack kit. Also refer to your responsibility to the height and weight of the rack, it is safety-certified as a free-standing unit and as to the ... move large racks by trained service technicians. Therefore, always install the stabilizers before working on the floor. NOTE: Your Dell system is recommended that the full weight of the rack rests on the rack, make sure that the rack meets the specifications of the rack on its slide...
Rack Installation Guide
Page 8
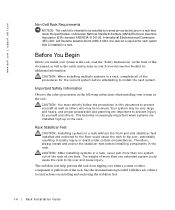
The weight of American National Standards Institute (ANSI)/Electronic Industries Association (EIA) standard ANSI/EIA-310-D-92, International Electrotechnical Commission (IEC) 297, and Deutsche Industrie Norm (DIN) ... stabilizer feet. 1-4 Rack Installation Guide Before You Begin Before you install your System Information booklet for the current system before installing components in a rack. www.dell.com | support.dell.com Non-Dell Rack Requirements NOTICE: This rack kit is intended to install the next system.
The weight of American National Standards Institute (ANSI)/Electronic Industries Association (EIA) standard ANSI/EIA-310-D-92, International Electrotechnical Commission (IEC) 297, and Deutsche Industrie Norm (DIN) ... stabilizer feet. 1-4 Rack Installation Guide Before You Begin Before you install your System Information booklet for the current system before installing components in a rack. www.dell.com | support.dell.com Non-Dell Rack Requirements NOTICE: This rack kit is intended to install the next system.
Rack Installation Guide
Page 9
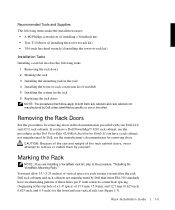
...Dell 24-U and 42-U rack cabinets. Dell rack cabinets and rack cabinets not manufactured by Dell, see the manufacturer's documentation for the front and rear vertical rails (see the procedures in the Dell...have a rack cabinet not manufactured by Dell that follow apply to both Dell rack cabinets and rack cabinets not manufactured... doors, never attempt to remove or install them by Dell unless identified as specific to one or the other. Rack...rack doors NOTE: The procedures that meet EIA-310 standards have a Dell PowerEdge™ 4210 rack cabinet, see Figure 1-3). If you are installing...
...Dell 24-U and 42-U rack cabinets. Dell rack cabinets and rack cabinets not manufactured by Dell, see the manufacturer's documentation for the front and rear vertical rails (see the procedures in the Dell...have a rack cabinet not manufactured by Dell that follow apply to both Dell rack cabinets and rack cabinets not manufactured... doors, never attempt to remove or install them by Dell unless identified as specific to one or the other. Rack...rack doors NOTE: The procedures that meet EIA-310 standards have a Dell PowerEdge™ 4210 rack cabinet, see Figure 1-3). If you are installing...
Rack Installation Guide
Page 15
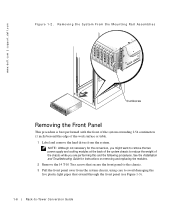
... the left and right cover back, away from the chassis front to disengage, and pull the covers up, away from the base to reduce the weight of the chassis while you are performing this procedure (see your system Installation and Troubleshooting Guide for instructions for removing and replacing these modules). 4 To...
... the left and right cover back, away from the chassis front to disengage, and pull the covers up, away from the base to reduce the weight of the chassis while you are performing this procedure (see your system Installation and Troubleshooting Guide for instructions for removing and replacing these modules). 4 To...
Rack Installation Guide
Page 18
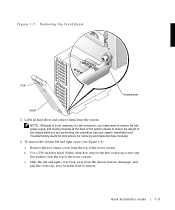
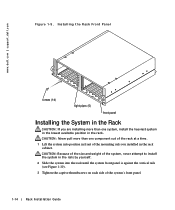
.... 2 Slide the system into position in front of the system, never attempt to install the system in the rack. CAUTION: Because of the size and weight of the mounting rails you installed in the rack cabinet. Installing the Rack Front Panel screws (14) light pipes (5) front panel Installing the System in... is against the vertical rails (see Figure 1-10). 3 Tighten the captive thumbscrews on each side of the system's front panel. 1-14 Rack Installation Guide www.dell.com | support.dell.com Figure 1-9.
.... 2 Slide the system into position in front of the system, never attempt to install the system in the rack. CAUTION: Because of the size and weight of the mounting rails you installed in the rack cabinet. Installing the Rack Front Panel screws (14) light pipes (5) front panel Installing the System in... is against the vertical rails (see Figure 1-10). 3 Tighten the captive thumbscrews on each side of the system's front panel. 1-14 Rack Installation Guide www.dell.com | support.dell.com Figure 1-9.
Rack-to-Tower Conversion Guide
Page 3
... system/components in a rack, never pull more than one extended component could cause the rack to any safety agencies. The weight of more Dell™ systems from a rack version system to the rack installation documentation accompanying the system and the rack for specific warning and.../or caution statements and procedures. NOTE: Your Dell system is safety-certified as a free-standing unit and as to the height and weight of the rack, Dell recommends a minimum of system and rack kit in a non-Dell rack cabinet evaluated for suitability by yourself. For complete...
... system/components in a rack, never pull more than one extended component could cause the rack to any safety agencies. The weight of more Dell™ systems from a rack version system to the rack installation documentation accompanying the system and the rack for specific warning and.../or caution statements and procedures. NOTE: Your Dell system is safety-certified as a free-standing unit and as to the height and weight of the rack, Dell recommends a minimum of system and rack kit in a non-Dell rack cabinet evaluated for suitability by yourself. For complete...

Rack-to-Tower Conversion Guide
Page 4
...airflow is inserted into the rack, carefully extend the rail into a locking position, and then slide the component into or out of a rack; www.dell.com | support.dell.com • Before working on the rack. • Always load the rack from the bottom up, and load the heaviest item in a rack.... multiple racks before working on the rack, make sure that the stabilizers are secured to the rack, extend to the floor, and that the full weight of the branch circuit rating. • Ensure that provides power to -tower kit includes the following items (see Figure 1-1): • One tower bezel, ...
...airflow is inserted into the rack, carefully extend the rail into a locking position, and then slide the component into or out of a rack; www.dell.com | support.dell.com • Before working on the rack. • Always load the rack from the bottom up, and load the heaviest item in a rack.... multiple racks before working on the rack, make sure that the stabilizers are secured to the rack, extend to the floor, and that the full weight of the branch circuit rating. • Ensure that provides power to -tower kit includes the following items (see Figure 1-1): • One tower bezel, ...
Rack-to-Tower Conversion Guide
Page 8
www.dell.com | support.dell.com Figure 1-2. NOTE: Although not necessary for instructions on removing and replacing the modules. 2 Remove the 14 T-10 Torx screws that extend through the front ... plastic light pipes that secure the front panel to the chassis. 3 Pull the front panel away from the system chassis, using care to reduce the weight of the work surface or table. 1 Label and remove the hard drives from the system. See the Installation and Troubleshooting Guide for the conversion, you...
www.dell.com | support.dell.com Figure 1-2. NOTE: Although not necessary for instructions on removing and replacing the modules. 2 Remove the 14 T-10 Torx screws that extend through the front ... plastic light pipes that secure the front panel to the chassis. 3 Pull the front panel away from the system chassis, using care to reduce the weight of the work surface or table. 1 Label and remove the hard drives from the system. See the Installation and Troubleshooting Guide for the conversion, you...