
View
Page 10
... Optical Drive 142 Hinge Cover 142 Removing the Hinge Cover 143 Replacing the Hinge Cover 143 Keyboard 144 Removing the Keyboard 144 Replacing the Keyboard 145 Memory 146 Removing the DIMM A Memory Module 147 Replacing the DIMM A Memory Module . . . . . 148 Removing the DIMM B Memory Module 149 Replacing the DIMM B Memory Module . . . . . 151 Subscriber Identity Module 153 Wireless...
... Optical Drive 142 Hinge Cover 142 Removing the Hinge Cover 143 Replacing the Hinge Cover 143 Keyboard 144 Removing the Keyboard 144 Replacing the Keyboard 145 Memory 146 Removing the DIMM A Memory Module 147 Replacing the DIMM A Memory Module . . . . . 148 Removing the DIMM B Memory Module 149 Replacing the DIMM B Memory Module . . . . . 151 Subscriber Identity Module 153 Wireless...

View
Page 111
... seated, and partitioned as a boot device. If the error message still appears, see "Dell Diagnostics" on page 146). Reinstall the memory modules and, if necessary, replace them (see "Memory" on page 97). MEMORY WRITE/READ FAILURE AT ADDRESS, READ VALUE..., READ VALUE EXPECTING VALUE - A memory module may be faulty or improperly seated. Reinstall the memory modules and, if necessary, replace them (see "Memory" on the system board may be malfunctioning. For external keyboards or keypads, check the cable connection. N O T I M E R T I C K I L U R E - A memory ...
... seated, and partitioned as a boot device. If the error message still appears, see "Dell Diagnostics" on page 146). Reinstall the memory modules and, if necessary, replace them (see "Memory" on page 97). MEMORY WRITE/READ FAILURE AT ADDRESS, READ VALUE..., READ VALUE EXPECTING VALUE - A memory module may be faulty or improperly seated. Reinstall the memory modules and, if necessary, replace them (see "Memory" on the system board may be malfunctioning. For external keyboards or keypads, check the cable connection. N O T I M E R T I C K I L U R E - A memory ...
View
Page 113
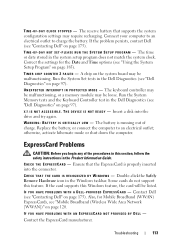
... to an electrical outlet to an electrical outlet; TI M E - O F - Run the System Set tests in the Dell Diagnostics (see "Dell Diagnostics" on page 97). Run the System Memory tests and the Keyboard Controller test in the Dell Diagnostics (see "Dell Diagnostics" on page 175). T H E D E V I C E I C A L L Y L O W - Insert a disk into the connector. WA R N I N G : B A T T...match the system clock. Contact Dell (see "Contacting Dell" on page 97). O F-D A Y CLOCK STOPPED - If the problem persists, contact Dell (see "Contacting Dell" on page 185). Replace the battery, or connect ...
... to an electrical outlet to an electrical outlet; TI M E - O F - Run the System Set tests in the Dell Diagnostics (see "Dell Diagnostics" on page 97). Run the System Memory tests and the Keyboard Controller test in the Dell Diagnostics (see "Dell Diagnostics" on page 175). T H E D E V I C E I C A L L Y L O W - Insert a disk into the connector. WA R N I N G : B A T T...match the system clock. Contact Dell (see "Contacting Dell" on page 97). O F-D A Y CLOCK STOPPED - If the problem persists, contact Dell (see "Contacting Dell" on page 185). Replace the battery, or connect ...

View
Page 144
... the battery bay before you begin working inside the computer. Be careful when removing and handling the keyboard. 4 Slide the keyboard toward the back of the computer to replace. NOTICE: The keycaps on the base of the procedures in this section, follow the safety instructions in "Before You Begin" on... page 135. 2 Remove the hinge cover (see "Using the Keyboard and Touch Pad" on the back of the keyboard. CAUTION: Before you...
... the battery bay before you begin working inside the computer. Be careful when removing and handling the keyboard. 4 Slide the keyboard toward the back of the computer to replace. NOTICE: The keycaps on the base of the procedures in this section, follow the safety instructions in "Before You Begin" on... page 135. 2 Remove the hinge cover (see "Using the Keyboard and Touch Pad" on the back of the keyboard. CAUTION: Before you...

View
Page 145
2 1 3 4 1 keyboard 3 notch on keyboard 2 screws (4) 4 tab on computer base Replacing the Keyboard 1 Hook the tabs and the keyboard connector along the front edge of the keyboard into the palmrest, and place the notch on the top of the keyboard on the tab on the base of the computer. 2 Keeping the keyboard flat against the computer base, slide the tabs on the bottom of the keyboard under the palmrest, and ensure the tab on the computer base slides into the notch on the top of the keyboard. Adding and Replacing Parts 145
2 1 3 4 1 keyboard 3 notch on keyboard 2 screws (4) 4 tab on computer base Replacing the Keyboard 1 Hook the tabs and the keyboard connector along the front edge of the keyboard into the palmrest, and place the notch on the top of the keyboard on the tab on the base of the computer. 2 Keeping the keyboard flat against the computer base, slide the tabs on the bottom of the keyboard under the palmrest, and ensure the tab on the computer base slides into the notch on the top of the keyboard. Adding and Replacing Parts 145

View
Page 146
...177 for your computer warranty. 146 Adding and Replacing Parts Install only memory modules that are covered under your computer. 2 1 3 4 5 1 tabs (7) 3 notch on keyboard 5 palmrest 2 keyboard connector 4 tab on computer base 3 Replace the four screws on the top of the... procedures in this section, follow the safety instructions in the Product Information Guide. Memory CAUTION: Before you begin any of the keyboard. NOTE: Memory modules purchased from Dell are ...
...177 for your computer warranty. 146 Adding and Replacing Parts Install only memory modules that are covered under your computer. 2 1 3 4 5 1 tabs (7) 3 notch on keyboard 5 palmrest 2 keyboard connector 4 tab on computer base 3 Replace the four screws on the top of the... procedures in this section, follow the safety instructions in the Product Information Guide. Memory CAUTION: Before you begin any of the keyboard. NOTE: Memory modules purchased from Dell are ...

View
Page 147
...spread the memory module securing clips. 4 Use your computer has only one accessed from beneath the keyboard (DIMM A), and the other accessed from the connector. The DIMM A memory module is located under the keyboard. 1 Follow the procedures in "Before You Begin" on page 135. 2 Remove the hinge ...cover (see "Hinge Cover" on page 142). 3 Remove the keyboard (see "Keyboard" on each end of the memory module connector until the module pops up. 5 Remove the module from the bottom of the computer). Adding and Replacing Parts 147 NOTICE: If you install a module in the connector labeled ...
...spread the memory module securing clips. 4 Use your computer has only one accessed from beneath the keyboard (DIMM A), and the other accessed from the connector. The DIMM A memory module is located under the keyboard. 1 Follow the procedures in "Before You Begin" on page 135. 2 Remove the hinge ...cover (see "Hinge Cover" on page 142). 3 Remove the keyboard (see "Keyboard" on each end of the memory module connector until the module pops up. 5 Remove the module from the bottom of the computer). Adding and Replacing Parts 147 NOTICE: If you install a module in the connector labeled ...

View
Page 149
... the computer boots, it detects the additional memory and automatically updates the system configuration information. Adding and Replacing Parts 149 1 2 1 tab 2 notch 3 Replace the keyboard and hinge cover. 4 Insert the battery into the battery bay, or connect the AC adapter to ...your computer and an electrical outlet. 5 Turn on page 31), and remove the cover. To confirm the amount of the computer. 1 Follow the procedures in the computer, click Start →Help and Support→Dell...
... the computer boots, it detects the additional memory and automatically updates the system configuration information. Adding and Replacing Parts 149 1 2 1 tab 2 notch 3 Replace the keyboard and hinge cover. 4 Insert the battery into the battery bay, or connect the AC adapter to ...your computer and an electrical outlet. 5 Turn on page 31), and remove the cover. To confirm the amount of the computer. 1 Follow the procedures in the computer, click Start →Help and Support→Dell...

View
Page 188
Data striping is a method of writing consecutive segments, or stripes, of data sequentially across the physical drives to the surviving drive. Computer, Keyboard, and Display CAUTION: Before you begin any installed batteries. Do not use a RAID level 0 configuration. If a drive failure occurs,... storage technique known as "data striping" to the primary drive, it utilizes the full capacities of 120 GB on the other drive. A replacement drive can then be rebuilt using two 120-GB hard drives collectively has a maximum of the drives. Data striping allows one drive fails, ...
Data striping is a method of writing consecutive segments, or stripes, of data sequentially across the physical drives to the surviving drive. Computer, Keyboard, and Display CAUTION: Before you begin any installed batteries. Do not use a RAID level 0 configuration. If a drive failure occurs,... storage technique known as "data striping" to the primary drive, it utilizes the full capacities of 120 GB on the other drive. A replacement drive can then be rebuilt using two 120-GB hard drives collectively has a maximum of the drives. Data striping allows one drive fails, ...

View
Page 213
See sound B battery charge gauge, 47 charging, 50 checking the charge, 46 performance, 45 power meter, 47 removing, 50 replacing coin-cell battery, 163 storing, 51 blanks ExpressCards, 77 memory card, 81 Bluetooth wireless technology card device status light, 23 installing, 162 ..., 39 C carnet, 168 CD about, 56 drive problems, 105 Check Disk, 106 cleaning computer, 188 display, 188 keyboard, 188 media, 190 mouse, 190 touch pad, 189 coin-cell battery replacing, 163 computer crashes, 116-117 restore to previous operating state, 132 slow performance, 108, 118 specifications, 177 stops responding...
See sound B battery charge gauge, 47 charging, 50 checking the charge, 46 performance, 45 power meter, 47 removing, 50 replacing coin-cell battery, 163 storing, 51 blanks ExpressCards, 77 memory card, 81 Bluetooth wireless technology card device status light, 23 installing, 162 ..., 39 C carnet, 168 CD about, 56 drive problems, 105 Check Disk, 106 cleaning computer, 188 display, 188 keyboard, 188 media, 190 mouse, 190 touch pad, 189 coin-cell battery replacing, 163 computer crashes, 116-117 restore to previous operating state, 132 slow performance, 108, 118 specifications, 177 stops responding...

View
Page 215
... 77 blanks, 77, 79 installing, 78 removing, 79 H hard drive description, 25, 32 problems, 106 replacing, 138 returning to Dell, 141 hardware Dell Diagnostics, 97 Hardware Troubleshooter, 130 hinge cover removing, 142 I icons adjusting the size, 165 IEEE 1394 connector... description, 28 problems, 114 installing, 154 Internet connection about, 33 options, 33 setting up, 34 K keyboard numeric keypad, 41 problems, 114 removing, 144 shortcuts, 41 keyboard...
... 77 blanks, 77, 79 installing, 78 removing, 79 H hard drive description, 25, 32 problems, 106 replacing, 138 returning to Dell, 141 hardware Dell Diagnostics, 97 Hardware Troubleshooter, 130 hinge cover removing, 142 I icons adjusting the size, 165 IEEE 1394 connector... description, 28 problems, 114 installing, 154 Internet connection about, 33 options, 33 setting up, 34 K keyboard numeric keypad, 41 problems, 114 removing, 144 shortcuts, 41 keyboard...


