User Guide
Page 1
... CAUTION: Monitor Safety Instructions Contacting Dell Regulatory Notices Your Monitor Setup Guide.... A02 Dell™ E157FPT Touch Screen Monitor Contents About Your Monitor Front View... Back View Side View Bottom view Specifications Caring for property damage, personal injury, or death. Intel, Pentium, and Celeron are registered trademarks of Dell Inc.; Dell Inc. All rights reserved. Reproduction in any proprietary interest in this text: Dell, the DELL logo, Inspiron, Dell...2007 Dell Inc. NOTICE: A NOTICE...
... CAUTION: Monitor Safety Instructions Contacting Dell Regulatory Notices Your Monitor Setup Guide.... A02 Dell™ E157FPT Touch Screen Monitor Contents About Your Monitor Front View... Back View Side View Bottom view Specifications Caring for property damage, personal injury, or death. Intel, Pentium, and Celeron are registered trademarks of Dell Inc.; Dell Inc. All rights reserved. Reproduction in any proprietary interest in this text: Dell, the DELL logo, Inspiron, Dell...2007 Dell Inc. NOTICE: A NOTICE...
User Guide
Page 7
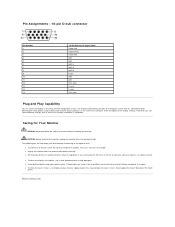
... solvent. Do not use window or glass cleaner. l Avoid getting liquids inside , have a qualified service technician check it on again. Apply cleaner to the touch screen. Pin Assignments - 15-pin D-sub connector Pin Number 1 2 3 4 5 6 7 8 9 10 11 12 13 14 15 15-Pin Side of electric shock..., do not use alcohol (methyl, ethyl or isopropyl) or any Plug and Play-compatible system. If desired, you power it before cleaning the monitor. Caring for Your Monitor CAUTION: Read and follow the safety instructions before you can...
... solvent. Do not use window or glass cleaner. l Avoid getting liquids inside , have a qualified service technician check it on again. Apply cleaner to the touch screen. Pin Assignments - 15-pin D-sub connector Pin Number 1 2 3 4 5 6 7 8 9 10 11 12 13 14 15 15-Pin Side of electric shock..., do not use alcohol (methyl, ethyl or isopropyl) or any Plug and Play-compatible system. If desired, you power it before cleaning the monitor. Caring for Your Monitor CAUTION: Read and follow the safety instructions before you can...
User Guide
Page 12
...discounts or concessions. Clean your device with a soft cloth dampened with a soft, clean cloth and water. Do not use a commercial window cleaner to Dell. Do not use liquids or aerosol cleaners, which may contain Optical Disk Drives (ODD), such as a CD-ROM, CDR/W, DVD drive... for any media, documentation, and all portable devices (computers, port replicators, media bases, docking stations, and similar devices), desktop computers, and monitors. As a result, they can damage the display. l Do not stack equipment or place equipment so close together that directly or indirectly contacts ...
...discounts or concessions. Clean your device with a soft cloth dampened with a soft, clean cloth and water. Do not use a commercial window cleaner to Dell. Do not use liquids or aerosol cleaners, which may contain Optical Disk Drives (ODD), such as a CD-ROM, CDR/W, DVD drive... for any media, documentation, and all portable devices (computers, port replicators, media bases, docking stations, and similar devices), desktop computers, and monitors. As a result, they can damage the display. l Do not stack equipment or place equipment so close together that directly or indirectly contacts ...
User Guide
Page 33
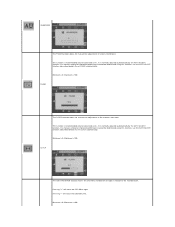
...right. It is normally adjusted automatically by the AUTO ADJUST function. Maximum is 0. CLOCK The OSD H-POSITION function moves the OSD Menu window left . Minimum is 100. It is normally adjusted automatically by the AUTO ADJUST function. SHARPNESS The PHASE function allows for manual fine ... only for improved performance cannot be determined using this function, use the AUTO ADJUST function (described below ) to the monitor bezel. This function is 100. If a manual setting for advanced users. PHASE The CLOCK function allows for manual fine adjustment of the...
...right. It is normally adjusted automatically by the AUTO ADJUST function. Maximum is 0. CLOCK The OSD H-POSITION function moves the OSD Menu window left . Minimum is 100. It is normally adjusted automatically by the AUTO ADJUST function. SHARPNESS The PHASE function allows for manual fine ... only for improved performance cannot be determined using this function, use the AUTO ADJUST function (described below ) to the monitor bezel. This function is 100. If a manual setting for advanced users. PHASE The CLOCK function allows for manual fine adjustment of the...
User Guide
Page 34
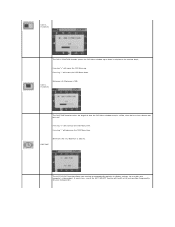
... result in relation to automatically optimize its display settings, for your computer's video output. OSD TIME The AUTO ADJUST function allows your monitor to the monitor bezel. Pressing "-" will increase the OSD Menu time. Pressing "+" will move the OSD Menu up or down . OSD HPOSITION The... OSD V-POSITION function moves the OSD Menu window up . The OSD TIME function varies the length of the AUTO ADJUST function will ...
... result in relation to automatically optimize its display settings, for your computer's video output. OSD TIME The AUTO ADJUST function allows your monitor to the monitor bezel. Pressing "-" will increase the OSD Menu time. Pressing "+" will move the OSD Menu up or down . OSD HPOSITION The... OSD V-POSITION function moves the OSD Menu window up . The OSD TIME function varies the length of the AUTO ADJUST function will ...
User Guide
Page 36
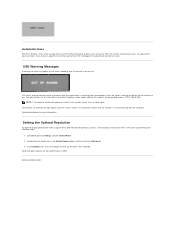
...any OSD adjustments. OSD LOCK and UNLOCK Operation of the OSD Menu may be disabled, thereby preventing unauthorized personnel from switching the monitor power off. A small window will appear, showing the present state of Power Button operation. 2. Immediately release both buttons. 3. Immediately release both buttons. ... the Power Button operation changes. To "Unlock" (enable) OSD operation, perform the above steps again, releasing both buttons when the window shows "OSD UNLOCK". While the Power Button operation is in the "Lock" state, the Power Button is in the "Lock" state...
...any OSD adjustments. OSD LOCK and UNLOCK Operation of the OSD Menu may be disabled, thereby preventing unauthorized personnel from switching the monitor power off. A small window will appear, showing the present state of Power Button operation. 2. Immediately release both buttons. 3. Immediately release both buttons. ... the Power Button operation changes. To "Unlock" (enable) OSD operation, perform the above steps again, releasing both buttons when the window shows "OSD UNLOCK". While the Power Button operation is in the "Lock" state, the Power Button is in the "Lock" state...
User Guide
Page 37
...screen indicating that the monitor cannot synchronize with the computer. In the Desktop area, move the slidebar to 1024 x 768 pixels by 768 pixels, then click OK. Either the signal is out of sync. Double-click the Display icon in the Control Panel window, and then click the...tab. 3. Setting the Optimal Resolution For optimal display performance while using the Microsoft® Windows® operating systems, set the display resolution to 1024 by performing the following steps: 1. This means that the monitor is too high or too low for more information. Automatic Save With the OSD open...
...screen indicating that the monitor cannot synchronize with the computer. In the Desktop area, move the slidebar to 1024 x 768 pixels by 768 pixels, then click OK. Either the signal is out of sync. Double-click the Display icon in the Control Panel window, and then click the...tab. 3. Setting the Optimal Resolution For optimal display performance while using the Microsoft® Windows® operating systems, set the display resolution to 1024 by performing the following steps: 1. This means that the monitor is too high or too low for more information. Automatic Save With the OSD open...

User Guide
Page 39
...Dell OpenManage are trademarks of Dell Inc.; Trademarks used in this text: Dell, the DELL logo, Inspiron, Dell Precision, Dimension, OptiPlex, Latitude, PowerEdge, PowerVault, PowerApp, and Dell OpenManage are trademarks of Dell Inc.; Pin Assignments - 15-pin D-sub connector Plug and Play Capability Performing a Silent Install Disabling Touch Functionality FCC Notice (U.S. Dell™ E157FPT Touch Screen Monitor...helps you make better use of your computer. Microsoft and Windows are registered trademarks of Dell Inc. Reproduction in trademarks and trade names other than its...
...Dell OpenManage are trademarks of Dell Inc.; Trademarks used in this text: Dell, the DELL logo, Inspiron, Dell Precision, Dimension, OptiPlex, Latitude, PowerEdge, PowerVault, PowerApp, and Dell OpenManage are trademarks of Dell Inc.; Pin Assignments - 15-pin D-sub connector Plug and Play Capability Performing a Silent Install Disabling Touch Functionality FCC Notice (U.S. Dell™ E157FPT Touch Screen Monitor...helps you make better use of your computer. Microsoft and Windows are registered trademarks of Dell Inc. Reproduction in trademarks and trade names other than its...
User Guide
Page 40
... from your computer and removes all Dell components in cases where Windows XP and Windows 2000 differ. NOTE: The selected language is connected, select Auto-detect Dell devices . To change the user language you touch the screen. Back to Contents Page Using the Touch Screen Software Dell™ E157FPT Touch Screen Monitor Contents About Your Touch Screen...
... from your computer and removes all Dell components in cases where Windows XP and Windows 2000 differ. NOTE: The selected language is connected, select Auto-detect Dell devices . To change the user language you touch the screen. Back to Contents Page Using the Touch Screen Software Dell™ E157FPT Touch Screen Monitor Contents About Your Touch Screen...
User Guide
Page 42
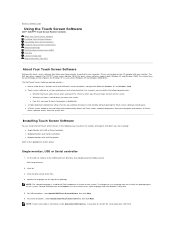
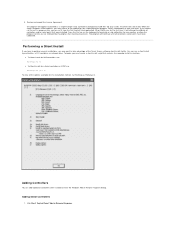
When EloVA runs for the first time, it from the Dell Control Panel application. The program will also install. l To Silent install for USB controllers use: EloSetup /iu /s l To Silent install for a Serial controller on the ... maximum). When the Setup Complete screen appears, you may choose to calibrate all the options available for any monitor, or allow the program to run this installation method, run a silent install from the Windows Add or Remove Programs dialog. Adding Serial Controllers 1. Performing a Silent Install If you have been calibrated. The program...
When EloVA runs for the first time, it from the Dell Control Panel application. The program will also install. l To Silent install for USB controllers use: EloSetup /iu /s l To Silent install for a Serial controller on the ... maximum). When the Setup Complete screen appears, you may choose to calibrate all the options available for any monitor, or allow the program to run this installation method, run a silent install from the Windows Add or Remove Programs dialog. Adding Serial Controllers 1. Performing a Silent Install If you have been calibrated. The program...
User Guide
Page 43
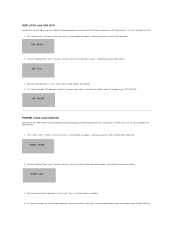
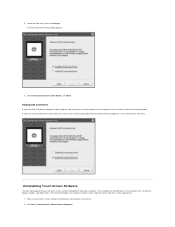
... Control Panel "Add or Remove Programs. The Dell Touchscreen Setup dialog appears. 3. Make sure the touch screen software and Windows control panels are no Dell USB devices attached to calibrate the touchmonitors. Adding USB Controllers If there are Dell USB devices already installed, plug the USB cable...on the Change option from the Add or Remove programs in the Control Panel, Dell entry. If there are closed. 2. Select Install Serial Touchscreen Drivers, click Next. 2. Locate the Dell entry, then click Change. Uninstalling Touch Screen Software The Uninstall program removes all ...
... Control Panel "Add or Remove Programs. The Dell Touchscreen Setup dialog appears. 3. Make sure the touch screen software and Windows control panels are no Dell USB devices attached to calibrate the touchmonitors. Adding USB Controllers If there are Dell USB devices already installed, plug the USB cable...on the Change option from the Add or Remove programs in the Control Panel, Dell entry. If there are closed. 2. Select Install Serial Touchscreen Drivers, click Next. 2. Locate the Dell entry, then click Change. Uninstalling Touch Screen Software The Uninstall program removes all ...

User Guide
Page 44
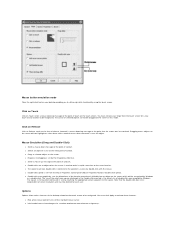
... could not be disabled. To re-enable touch functionality, click Enable Touch. Right-click the Dell icon in the Windows system tray and choose Dell Touch screen Properties. The Dell Touch Screen Properties dialog appears. 2. You should calibrate the touch screen in use until you ...touch screen driver remains in the following message when the Uninstall is complete. l When you must restart your monitor. l Select Start "Settings" Control Panel and double-click the Dell Touch Screen icon. To calibrate the touch screen: 1. Click Details to confirm removal. NOTE: If you ...
... could not be disabled. To re-enable touch functionality, click Enable Touch. Right-click the Dell icon in the Windows system tray and choose Dell Touch screen Properties. The Dell Touch Screen Properties dialog appears. 2. You should calibrate the touch screen in use until you ...touch screen driver remains in the following message when the Uninstall is complete. l When you must restart your monitor. l Select Start "Settings" Control Panel and double-click the Dell Touch Screen icon. To calibrate the touch screen: 1. Click Details to confirm removal. NOTE: If you ...
User Guide
Page 46
... size of screen resolution and must be defined for a new touch at the time of untouch. l Double-click speed is touched twice in size by Windows. The size of the wire-frame square displayed in this mode. Note that the screen was at the initial point of touch on Release sends... any location to dragging is set from the touch screen for each clickable icon or object on an object when the screen is set by Windows as a double-click. l Hide arrow mouse pointer turns off the standard mouse cursor. The cursor or selected objects cannot be configured. Click on Release Click...
... size of screen resolution and must be defined for a new touch at the time of untouch. l Double-click speed is touched twice in size by Windows. The size of the wire-frame square displayed in this mode. Note that the screen was at the initial point of touch on Release sends... any location to dragging is set from the touch screen for each clickable icon or object on an object when the screen is set by Windows as a double-click. l Hide arrow mouse pointer turns off the standard mouse cursor. The cursor or selected objects cannot be configured. Click on Release Click...
User Guide
Page 47
.... The frequency (Tone) and the Duration of this tab. Each Properties page contains information extracted from the touch screen controller and the system about the monitor, touch screen, controller, and internal driver. The beep is enabled by EloSetup and for each time a valid touch occurs. Properties A Properties page is created for... Tool Tray for each touch screen controller installed by default when the driver is related to activate the changes made on touch box in the Windows Task Bar.
.... The frequency (Tone) and the Duration of this tab. Each Properties page contains information extracted from the touch screen controller and the system about the monitor, touch screen, controller, and internal driver. The beep is enabled by EloSetup and for each time a valid touch occurs. Properties A Properties page is created for... Tool Tray for each touch screen controller installed by default when the driver is related to activate the changes made on touch box in the Windows Task Bar.
User Guide
Page 48
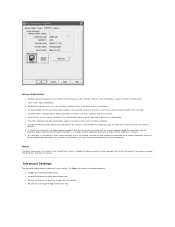
... for a touch screen controller that a serial touch screen is desired. It also lists the revision of the Windows COM port. l The Identify Monitor button displays the Dell logo on . l Driver Version lists the version number of the associated Properties page is touched. About The ... includes the following options: l A toggle for the monitor associated with the current Properties page. l An option to the "Windows Monitor" from the controller. Running EloVA from the Properties page avoids the need to the Dell website, the readme included with this button is the ...
... for a touch screen controller that a serial touch screen is desired. It also lists the revision of the Windows COM port. l The Identify Monitor button displays the Dell logo on . l Driver Version lists the version number of the associated Properties page is touched. About The ... includes the following options: l A toggle for the monitor associated with the current Properties page. l An option to the "Windows Monitor" from the controller. Running EloVA from the Properties page avoids the need to the Dell website, the readme included with this button is the ...
User Guide
Page 49
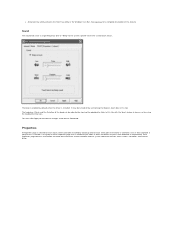
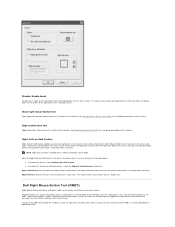
...for this touch screen. Right click delay defines the right click delay value in the Control Panel. Dell Right Mouse Button Tool (RMBT) Right Mouse Button tool allows a Windows right mouse button simulation on the operation of this feature for all touchscreens, select the Apply to ...a left button is enabled only in the RMBT will produce a right button click. This feature may also be activated from reaching Windows for this monitor. Show right mouse button tool Show right mouse button tool launches this feature for a complete description of 25 milliseconds. Right click Area...
...for this touch screen. Right click delay defines the right click delay value in the Control Panel. Dell Right Mouse Button Tool (RMBT) Right Mouse Button tool allows a Windows right mouse button simulation on the operation of this feature for all touchscreens, select the Apply to ...a left button is enabled only in the RMBT will produce a right button click. This feature may also be activated from reaching Windows for this monitor. Show right mouse button tool Show right mouse button tool launches this feature for a complete description of 25 milliseconds. Right click Area...
User Guide
Page 50
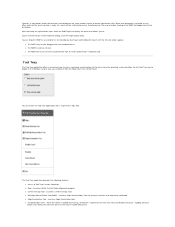
... - l Center Desktop Tool - When the driver is touched, or any location on the touch monitor is made, this segment of the driver from the Mode tab in the Windows system tray, you to display the menu that have been calibrated. Typically, a right button action will...l The RMBT can launch the Tool Tray application with the standard mouse. You can be a left or righ- Launches EloVA, the Dell Video Alignment program. l Dell Right Mouse Button Tool (RMBT) - l Disable/Enable Touch - Launches Edge Acceleration tool. click. l Edge Acceleration Tool - After ...
... - l Center Desktop Tool - When the driver is touched, or any location on the touch monitor is made, this segment of the driver from the Mode tab in the Windows system tray, you to display the menu that have been calibrated. Typically, a right button action will...l The RMBT can launch the Tool Tray application with the standard mouse. You can be a left or righ- Launches EloVA, the Dell Video Alignment program. l Dell Right Mouse Button Tool (RMBT) - l Disable/Enable Touch - Launches Edge Acceleration tool. click. l Edge Acceleration Tool - After ...
User Guide
Page 51
...of this segment of the Tool Tray menu changes from the Windows Taskbar. Clicking "Enable" in a multiple monitor configuration l Can be launched from the Tool Tray (for single monitor) or command line (for the selected monitor to allow touches towards the edge of the video image in...each execution of the video prior to running the EloVA video alignment program l Configurable parameters are not buffered by running eloalmon /h. Quick link to Dell's website l Exit - l Program terminates when green "check" mark is a special feature provided to allow proper adjustment of the program. ...
...of this segment of the Tool Tray menu changes from the Windows Taskbar. Clicking "Enable" in a multiple monitor configuration l Can be launched from the Tool Tray (for single monitor) or command line (for the selected monitor to allow touches towards the edge of the video image in...each execution of the video prior to running the EloVA video alignment program l Configurable parameters are not buffered by running eloalmon /h. Quick link to Dell's website l Exit - l Program terminates when green "check" mark is a special feature provided to allow proper adjustment of the program. ...


