Dell DS-16B Support and Manuals
Get Help and Manuals for this Dell item
Popular Dell DS-16B Manual Pages
Installation Guide - Page 1
... 3 • Device Placement Requirements 4 • Switch Mounting Kit (DS16B2 - It also describes the kits available for the 16-port EMC departmental switch shown in EMC and non-EMC Racks and includes installation instructions as well. RKH/RKL 5 • Installing the DS-16B2 Rails 10 • Installing the DS-16B2 Switch 21
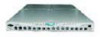
EMC Departmental Switch DS-16B Installation Guide
1
Installation Guide - Page 4
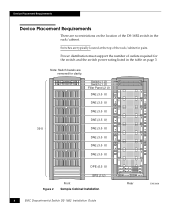
... DAE (3.5 U)
DAE (3.5 U)
DPE (6.5 U)
Figure 2
SPS (1 U)
Front Sample Cabinet Installation
4
EMC Departmental Switch DS-16B2 Installation Guide
Rear
EMC2056
Power distribution must support the number of the DS-16B2 switch in the rack/cabinet. Switches are removed for the switch and the switch power rating listed in pairs. Note: Switch bezels are typically located at the top of the...
Installation Guide - Page 5
... as listed in the table below for your PDU)
DS-16B2-RKL kit only)
EMC Departmental Switch DS-16B2 Installation Guide
5
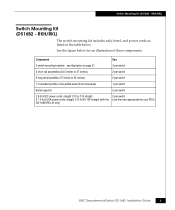
RKH/RKL)
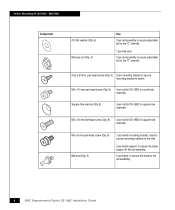
Switch Mounting Kit (DS16B2 - Component
Use
2 switch mounting brackets - See the figure below . see illustration on page 21.
2 per switch
2 short rail assemblies (20.5 inches to 27 inches)
2 per switch
2 long rail assemblies (27 inches to 34 inches...
Installation Guide - Page 6
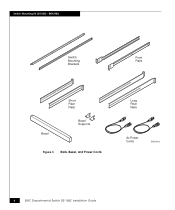
Bezel, and Power Cords
Long Rear Rails
Ac Power Cords
EMC2042
6
EMC Departmental Switch DS-16B2 Installation Guide Switch Mounting Kit (DS16B2 - RKH/RKL)
Switch Mounting Brackets
Front Rails
Bezel
Short Rear Rails
Bezel Supports
Figure 3 Rails.
Installation Guide - Page 8
...6) 3 per bezel, to secure the bezel to the rail assembly.
8
EMC Departmental Switch DS-16B2 Installation Guide Used to secure mounting brackets to the rails.
2 per bezel support, to secure the bezel support to the rail assembly.
2 per mounting bracket to secure mounting bracket to the....
1 per ball stud.
2 per rail assembly to secure adjustable rail to switch. Switch Mounting Kit (DS16B2 -
Installation Guide - Page 12
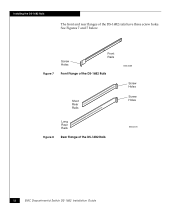
Screw Holes
Front Rails
Figure 7 Front Flange of the DS-16B2 Rails
Short Rear Rails
EMC2069
Screw Holes Screw Holes
Figure 8
Long Rear Rails
Rear Flange of the DS-16B2 rails have three screw holes. Installing the DS-16B2 Rails
The front and rear flanges of the DS-16B2 Rails
EMC2070
12
EMC Departmental Switch DS-16B2 Installation Guide See Figures 7 and 7 below.
Installation Guide - Page 13
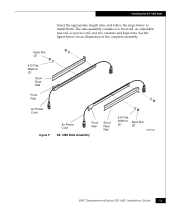
Keps Nut (2)
#10 Flat Washer (2)
Short Rear Rail
Front Rail
Ac Power Cord
Figure 9
Ac Power Cord
Front Rail
DS-16B2 Rails Assembly
Short Rear Rail
#10 Flat Washer (2)
Keps Nut (2)
EMC2044
EMC Departmental Switch DS-16B2 Installation Guide
13
Installing the DS-16B2 Rails
Select the appropriate length rails, and follow the steps below for an illustration of a front rail, an...
Installation Guide - Page 14

...these rail assembly instructions only if you ...EMC Departmental Switch DS-16B2 Installation Guide Installing the DS-16B2 Rails
Assembling the Rails
If this is installed on a table.
2. The length can be adjusted once the switch is a new installation in an EMC CLARiiON rack, the rails are installing the switch in the Front Rail
Rack Rear/ Plug into Switch
Front Rail
Figure 10 Installing...
Installation Guide - Page 15
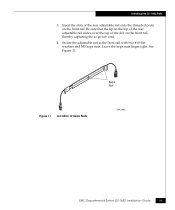
.... Insert the slots of the rear adjustable rail onto the threaded posts on the front rail, thereby capturing the ac power cord.
4. Installing the DS-16B2 Rails
3. See Figure 11. Be sure that the lip on the top of the rear adjustable rail slides over the top of Keps Nuts
EMC2066
EMC Departmental Switch DS-16B2 Installation Guide
15
Installation Guide - Page 16

... skins are adjusted to fit between the channels in the rack/cabinet you will locate the switch. 6. Adjust the length of the rail to the correct length, tighten the keps
nuts on the rack/cabinet, the keps nuts can be tightened after the rails have been installed.
16
EMC Departmental Switch DS-16B2 Installation Guide
See Figure 12.
Installation Guide - Page 17
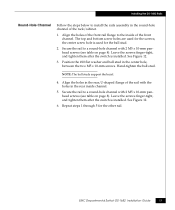
... the round-hole channel of the rack/cabinet.
1. Installing the DS-16B2 Rails
Round-Hole Channel
Follow the steps below to a round-hole channel with the holes in the rear inside of the rail with 2 M5 x 10-mm panhead screws (see table on page 8). EMC Departmental Switch DS-16B2 Installation Guide
17 Repeat steps 1 through 5 for the ball stud...
Installation Guide - Page 18
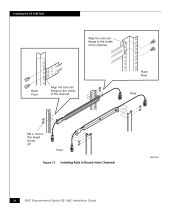
Rack Front
Align the front rail flange to the inside of the channel. Rack Rear
Rear
M5 x 10-mm Pan Head Screw (8)
Front
Figure 13 Installing Rails in Round-Hole Channels
EMC2046
18
EMC Departmental Switch DS-16B2 Installation Guide Installing the DS-16B2 Rails
Align the rear rail flange to the inside of the channel.
Installation Guide - Page 19

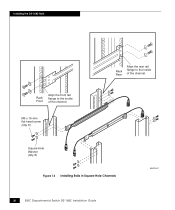
... Figure 14.
2. Align the holes in the rear, U-shaped flange of the rail with the holes in Figure 14.
4. EMC Departmental Switch DS-16B2 Installation Guide
19 Repeat steps 1 through 4 for the screws. Secure the rail to a square-hole channel with 2 square-hole washers and M5 x 16-mm flat head screws (...
Installation Guide - Page 20
Installing the DS-16B2 Rails
Rack Front
Align the front rail flange to the inside of the channel. M5 x 16-mm flat head screw (Qty. 8)
Rack Rear
Align the rear rail flange to the inside of the channel. Square-Hole Washer (Qty. 8)
Figure 14 Installing Rails in Square-Hole Channels
EMC2047
20
EMC Departmental Switch DS-16B2 Installation Guide
Installation Guide - Page 28
... WARRANTIES OF MERCHANTIBILITY AND FITNESS FOR A PARTICULAR PURPOSE. Trademark Information
EMC2, EMC, CLARiiON, and Navisphere are the property of EMC Corporation. All other trademarks mentioned herein are registered trademarks of their respective owners.
28
EMC Departmental Switch DS-16B2 Installation Guide EMC Corporation makes no responsibility for (a) incidental, indirect, special, or...
Dell DS-16B Reviews
We have not received any reviews for Dell yet.