User Guide
Page 4
Turning On the Printer 36 6 Setting Up Your Printer 37 Setting Initial Settings on the Operator Panel (Dell™ C1660w Color Printer Only 37 Printer Setup Using the Software and Documentation Disc 38 7 Setting the IP Address 39 Assigning an IP Address ...Operator Panel 41 The System Settings Report 41 The Ping Command 41 8 Loading Paper 43 Loading Print Media in the Multipurpose Feeder (MPF 43 Loading Print Media in the Priority Sheet Inserter (PSI) (Dell C1760nw Color Printer only 48 9 Installing Printer Drivers on Computers Running Windows® 51 Identifying Printer Driver ...
Turning On the Printer 36 6 Setting Up Your Printer 37 Setting Initial Settings on the Operator Panel (Dell™ C1660w Color Printer Only 37 Printer Setup Using the Software and Documentation Disc 38 7 Setting the IP Address 39 Assigning an IP Address ...Operator Panel 41 The System Settings Report 41 The Ping Command 41 8 Loading Paper 43 Loading Print Media in the Multipurpose Feeder (MPF 43 Loading Print Media in the Priority Sheet Inserter (PSI) (Dell C1760nw Color Printer only 48 9 Installing Printer Drivers on Computers Running Windows® 51 Identifying Printer Driver ...
User Guide
Page 5
... Panel 77 Using the Operator Panel Buttons 77 Status of Wi-Fi | WPS Button Backlight 78 Using the Operator Panel to Change Printer Settings 79 Printing a Device Settings Page 79 Changing the Language 80 The Operator Panel 80 The Tool Box 80 Setting the PowerSaver Time Option 80 12... Dell™ Printer Configuration Web Tool 81 Overview 81 Setting Up the Dell Printer Configuration Web Tool 81 Setting Up From Web Browser 81 Setting Up From Operator Panel 83 Starting the...
... Panel 77 Using the Operator Panel Buttons 77 Status of Wi-Fi | WPS Button Backlight 78 Using the Operator Panel to Change Printer Settings 79 Printing a Device Settings Page 79 Changing the Language 80 The Operator Panel 80 The Tool Box 80 Setting the PowerSaver Time Option 80 12... Dell™ Printer Configuration Web Tool 81 Overview 81 Setting Up the Dell Printer Configuration Web Tool 81 Setting Up From Web Browser 81 Setting Up From Operator Panel 83 Starting the...
User Guide
Page 6
Printer Status 89 Printer Jobs 90 Printer Settings 91 Print Server Settings 98 Copy Printer Settings 110 Print Volume 110 13 Understanding the Tool Box Menus 111 Starting the Tool Box 111 Using the Tool Box to Change the Printer Settings 111 Printer ... Settings 114 Paper Density 116 Adjust BTR 116 Adjust Fusing Unit 117 Color Registration Adjustment 117 Adjust Altitude 118 Reset Defaults 119 Non-Dell Toner 119 BTR Refresh Mode 119 TCP/IP Settings 120 Network Settings 120 Diagnosis 121 Chart Print 121 Machine Check 121 Environment Sensor Info 122 Developer Stir Mode 122...
Printer Status 89 Printer Jobs 90 Printer Settings 91 Print Server Settings 98 Copy Printer Settings 110 Print Volume 110 13 Understanding the Tool Box Menus 111 Starting the Tool Box 111 Using the Tool Box to Change the Printer Settings 111 Printer ... Settings 114 Paper Density 116 Adjust BTR 116 Adjust Fusing Unit 117 Color Registration Adjustment 117 Adjust Altitude 118 Reset Defaults 119 Non-Dell Toner 119 BTR Refresh Mode 119 TCP/IP Settings 120 Network Settings 120 Diagnosis 121 Chart Print 121 Machine Check 121 Environment Sensor Info 122 Developer Stir Mode 122...
User Guide
Page 7
Job History 125 Error History 125 Color Test Page 125 Printing a Report/List Using the Operator Panel 125 Printing a Report/List Using the Tool Box 126 Admin Menu 126 Network 126 USB Settings 131 System Settings 131 Maintenance 133 Secure Settings 138 Panel... Language 140 Panel Lock Function 140 Enabling the Panel Lock 140 Disabling the Panel Lock 140 Resetting Defaults 141 15 Print Media Guidelines 143 Paper 143 Paper Characteristics 143 Recommended Paper 144 Unacceptable Paper 144 Selecting Paper 144 Selecting Preprinted Media and Letterhead 145...
Job History 125 Error History 125 Color Test Page 125 Printing a Report/List Using the Operator Panel 125 Printing a Report/List Using the Tool Box 126 Admin Menu 126 Network 126 USB Settings 131 System Settings 131 Maintenance 133 Secure Settings 138 Panel... Language 140 Panel Lock Function 140 Enabling the Panel Lock 140 Disabling the Panel Lock 140 Resetting Defaults 141 15 Print Media Guidelines 143 Paper 143 Paper Characteristics 143 Recommended Paper 144 Unacceptable Paper 144 Selecting Paper 144 Selecting Preprinted Media and Letterhead 145...
User Guide
Page 8
... Feeder (MPF 164 When Using the Priority Sheet Inserter (PSI) (Dell C1760nw Color Printer only 165 Using the Output Tray Extension 166 Printing 167 17 Printing 169 Tips for Successful Printing 169 Tips on Storing Print Media 169 Avoiding Paper Jams 169 Sending a Job to Print 169 Canceling a Print Job 170 Canceling From the Operator Panel 170 Canceling a Job...
... Feeder (MPF 164 When Using the Priority Sheet Inserter (PSI) (Dell C1760nw Color Printer only 165 Using the Output Tray Extension 166 Printing 167 17 Printing 169 Tips for Successful Printing 169 Tips on Storing Print Media 169 Avoiding Paper Jams 169 Sending a Job to Print 169 Canceling a Print Job 170 Canceling From the Operator Panel 170 Canceling a Job...
User Guide
Page 9
... Maintaining Your Printer 185 21 Maintaining Your Printer 187 Determining the Status of Supplies 187 Conserving Supplies 187 Storing Print Media 187 Storing Consumables 188 Replacing Toner Cartridges 188 Removing the Toner Cartridges 188 Installing a Toner Cartridge 190 ...Cleaning Inside the Printer 192 Cleaning the Color Toner Density (CTD) Sensor 195 Adjusting Color Registration 196 Performing Auto Correct 196 Printing the Color Registration Chart 196 Determining Values 197 Entering Values 198 Template Last Updated - 2/7/2007...
... Maintaining Your Printer 185 21 Maintaining Your Printer 187 Determining the Status of Supplies 187 Conserving Supplies 187 Storing Print Media 187 Storing Consumables 188 Replacing Toner Cartridges 188 Removing the Toner Cartridges 188 Installing a Toner Cartridge 190 ...Cleaning Inside the Printer 192 Cleaning the Color Toner Density (CTD) Sensor 195 Adjusting Color Registration 196 Performing Auto Correct 196 Printing the Color Registration Chart 196 Determining Values 197 Entering Values 198 Template Last Updated - 2/7/2007...
User Guide
Page 10
... From the Output Tray 206 Troubleshooting 209 23 Troubleshooting 211 Basic Printer Problems 211 Display Problems 211 Printing Problems 211 Print Quality Problems 213 The output is too light 213 Toner smears or print comes off/Stain on back side 214 Random spots/Blurred images 215 The entire output is blank... 215 Streaks appear on the output 215 Pitched color dots 216 Vertical blanks 216 Mottle 216 Ghosting 217 Fog 218 Bead...
... From the Output Tray 206 Troubleshooting 209 23 Troubleshooting 211 Basic Printer Problems 211 Display Problems 211 Printing Problems 211 Print Quality Problems 213 The output is too light 213 Toner smears or print comes off/Stain on back side 214 Random spots/Blurred images 215 The entire output is blank... 215 Streaks appear on the output 215 Pitched color dots 216 Vertical blanks 216 Mottle 216 Ghosting 217 Fog 218 Bead...
User Guide
Page 21
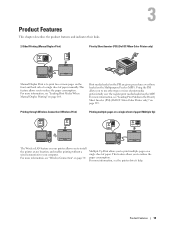
... chapter describes the product features and indicates their links. 2-Sided Printing (Manual Duplex Print) Priority Sheet Inserter (PSI) (Dell C1760nw Color Printer only) Manual Duplex Print is to print two or more pages on the MPF. Multiple Up Print allows you to use other types or sizes of print media preferentially over those loaded on a single sheet of paper...
... chapter describes the product features and indicates their links. 2-Sided Printing (Manual Duplex Print) Priority Sheet Inserter (PSI) (Dell C1760nw Color Printer only) Manual Duplex Print is to print two or more pages on the MPF. Multiple Up Print allows you to use other types or sizes of print media preferentially over those loaded on a single sheet of paper...
User Guide
Page 23
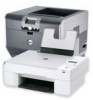
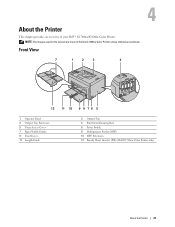
Front View 7 1 2 3 4 12 11 10 9 8 7 6 5 1 Operator Panel 3 Output Tray Extension 5 Toner Access Cover 7 Paper Width Guides 9 Front Cover 11 Length Guide 2 Output Tray 4 Print Head Cleaning Rod 6 Power Switch 8 Multipurpose Feeder (MPF) 10 MPF Extension 12 Priority Sheet Inserter (PSI) (Dell C1760nw Color Printer only) About the Printer 21 4 About the Printer This chapter provides an overview of the Dell C1760nw Color Printer unless otherwise mentioned. NOTE: The images used in this manual are those of your Dell™ C1760nw/C1660w Color Printer.
Front View 7 1 2 3 4 12 11 10 9 8 7 6 5 1 Operator Panel 3 Output Tray Extension 5 Toner Access Cover 7 Paper Width Guides 9 Front Cover 11 Length Guide 2 Output Tray 4 Print Head Cleaning Rod 6 Power Switch 8 Multipurpose Feeder (MPF) 10 MPF Extension 12 Priority Sheet Inserter (PSI) (Dell C1760nw Color Printer only) About the Printer 21 4 About the Printer This chapter provides an overview of the Dell C1760nw Color Printer unless otherwise mentioned. NOTE: The images used in this manual are those of your Dell™ C1760nw/C1660w Color Printer.
User Guide
Page 34
... on SSID broadcast from the operator panel. When the encryption type of 8 to apply the settings. For details, refer to Enable. The PIN code is printed. 7 Ensure that Operate Wireless Router is not detected turn it on again to 63 alphanumeric characters. Auto SSID Setup NOTE: A Password is required to enter... the access point or router. 7 Ensure that PIN Code appears, and then press the (Set) button. 6 Write down the displayed 8-digit PIN code or select Print PIN Code.
... on SSID broadcast from the operator panel. When the encryption type of 8 to apply the settings. For details, refer to Enable. The PIN code is printed. 7 Ensure that Operate Wireless Router is not detected turn it on again to 63 alphanumeric characters. Auto SSID Setup NOTE: A Password is required to enter... the access point or router. 7 Ensure that PIN Code appears, and then press the (Set) button. 6 Write down the displayed 8-digit PIN code or select Print PIN Code.
User Guide
Page 37
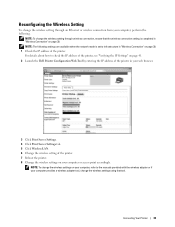
... address of the printer, see "Verifying the IP Settings" on page 41. 2 Launch the Dell Printer Configuration Web Tool by entering the IP address of the printer in "Wireless Connection" on your web browser. 3 Click Print Server Settings. 4 Click Print Server Settings tab. 5 Click Wireless LAN. 6 Change the wireless setting of the printer...
... address of the printer, see "Verifying the IP Settings" on page 41. 2 Launch the Dell Printer Configuration Web Tool by entering the IP address of the printer in "Wireless Connection" on your web browser. 3 Click Print Server Settings. 4 Click Print Server Settings tab. 5 Click Wireless LAN. 6 Change the wireless setting of the printer...
User Guide
Page 41
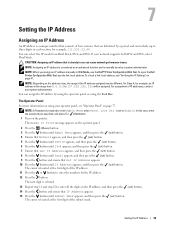
..., and IPv6. On Class A, for the IP address. 12 Press the button. The next digit is selected. 13 Repeat step 11 and step 12 to Print message appears on page 77. Setting the IP Address 39 To check a link local address, see "Operator Panel" on the operator panel. 2 Press the (Menu... that Get IP Address appears. 10 Press the button until IP Address appears, and then press the (set) button. To open the Dell Printer Configuration Web Tool, use the Dell™ Printer Configuration Web Tool. For assignment of the IP address. 11 Press the or button to 127.255.255.255 will...
..., and IPv6. On Class A, for the IP address. 12 Press the button. The next digit is selected. 13 Repeat step 11 and step 12 to Print message appears on page 77. Setting the IP Address 39 To check a link local address, see "Operator Panel" on the operator panel. 2 Press the (Menu... that Get IP Address appears. 10 Press the button until IP Address appears, and then press the (set) button. To open the Dell Printer Configuration Web Tool, use the Dell™ Printer Configuration Web Tool. For assignment of the IP address. 11 Press the or button to 127.255.255.255 will...

User Guide
Page 42
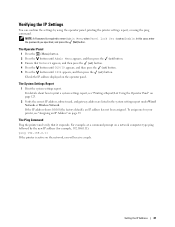
16 Press the or the button to enter the numbers for network printing, the Tool Box cannot be used to assign an IP address. 1 Click Start → All Programs → Dell Printers → Dell C1760nw Color Printer or Dell C1660w Color Printer → Tool Box. The cursor is located at the left side of the page... Name, and then click OK. The IP address is displayed. 4 Select the mode from the list at the first digit of Dell C1760nw Color Printer or Dell C1660w Color Printer listed in this case, click the name of the gateway address. 21 Press the or button to the desired IP address on...
16 Press the or the button to enter the numbers for network printing, the Tool Box cannot be used to assign an IP address. 1 Click Start → All Programs → Dell Printers → Dell C1760nw Color Printer or Dell C1660w Color Printer → Tool Box. The cursor is located at the left side of the page... Name, and then click OK. The IP address is displayed. 4 Select the mode from the list at the first digit of Dell C1760nw Color Printer or Dell C1660w Color Printer listed in this case, click the name of the gateway address. 21 Press the or button to the desired IP address on...
User Guide
Page 43
...(set) button. 3 Ensure that it responds. Verifying the IP Settings You can confirm the settings by the new IP address (for your printer, see "Printing a Report/List Using the Operator Panel" on the network, you specified, and press the (Set) button. For details about how to enter Admin Menu ... button. 2 Press the button until IPv4 appears, and then press the (set to Enable. Setting the IP Address 41 NOTE: A Password is required to print a system settings report, see "Assigning an IP Address" on page 39. To assign one for example, 192.168.0.11): ping 192.168.0.11 If the...
...(set) button. 3 Ensure that it responds. Verifying the IP Settings You can confirm the settings by the new IP address (for your printer, see "Printing a Report/List Using the Operator Panel" on the network, you specified, and press the (Set) button. For details about how to enter Admin Menu ... button. 2 Press the button until IPv4 appears, and then press the (set to Enable. Setting the IP Address 41 NOTE: A Password is required to print a system settings report, see "Assigning an IP Address" on page 39. To assign one for example, 192.168.0.11): ping 192.168.0.11 If the...
User Guide
Page 45
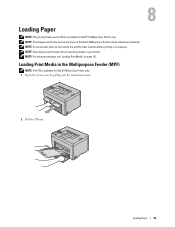
...Dell C1760nw Color Printer unless otherwise mentioned. NOTE: For printing envelopes, see "Loading Print Media" on page 151. 8 Loading Paper NOTE: The priority sheet inserter (PSI) is available for Dell™ C1760nw Color Printer only. Loading Print Media in progress. NOTE: The images used in your printer. NOTE: Use only laser print... media. NOTE: To avoid paper jams, do not remove the priority sheet inserter while a printing is in the Multipurpose Feeder (MPF) NOTE: The PSI is available for Dell C1760nw Color Printer only. 1 Open the front...
...Dell C1760nw Color Printer unless otherwise mentioned. NOTE: For printing envelopes, see "Loading Print Media" on page 151. 8 Loading Paper NOTE: The priority sheet inserter (PSI) is available for Dell™ C1760nw Color Printer only. Loading Print Media in progress. NOTE: The images used in your printer. NOTE: Use only laser print... media. NOTE: To avoid paper jams, do not remove the priority sheet inserter while a printing is in the Multipurpose Feeder (MPF) NOTE: The PSI is available for Dell C1760nw Color Printer only. 1 Open the front...
User Guide
Page 47
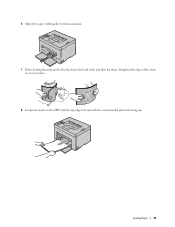
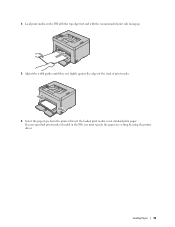
Loading Paper 45 Straighten the edges of the stack on a level surface. 8 Load print media on the MPF with the top edge first and with the recommended print side facing up. 6 Adjust the paper width guides to their maximum. 7 Before loading the print media, flex the sheets back and forth, and then fan them.
Loading Paper 45 Straighten the edges of the stack on a level surface. 8 Load print media on the MPF with the top edge first and with the recommended print side facing up. 6 Adjust the paper width guides to their maximum. 7 Before loading the print media, flex the sheets back and forth, and then fan them.

User Guide
Page 48
NOTE: Depending on the size of print media. 10 Slide the length guide towards the printer until it touches the print media. 9 Adjust the width guides until they rest lightly against the edges of the stack of print media, first slide the length guide backward until it stops, and then slide the MPF extension until it touches print media. 46 Loading Paper
NOTE: Depending on the size of print media. 10 Slide the length guide towards the printer until it touches the print media. 9 Adjust the width guides until they rest lightly against the edges of the stack of print media, first slide the length guide backward until it stops, and then slide the MPF extension until it touches print media. 46 Loading Paper

User Guide
Page 49
Loading Paper 47 If a user-specified print media is not standard plain paper. 11 Insert the PSI into the printer and then align the PSI to the marking on the paper tray. 12 Select the paper type from the printer driver if the loaded print media is loaded in the MPF, you must specify the paper size setting by using the printer driver.
Loading Paper 47 If a user-specified print media is not standard plain paper. 11 Insert the PSI into the printer and then align the PSI to the marking on the paper tray. 12 Select the paper type from the printer driver if the loaded print media is loaded in the MPF, you must specify the paper size setting by using the printer driver.
User Guide
Page 50
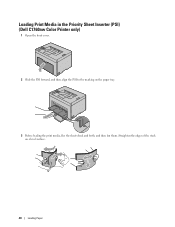
Straighten the edges of the stack on the paper tray. 3 Before loading the print media, flex the sheets back and forth, and then fan them. Loading Print Media in the Priority Sheet Inserter (PSI) (Dell C1760nw Color Printer only) 1 Open the front cover. 2 Slide the PSI forward, and then align the PSI to the marking on a level surface. 48 Loading Paper
Straighten the edges of the stack on the paper tray. 3 Before loading the print media, flex the sheets back and forth, and then fan them. Loading Print Media in the Priority Sheet Inserter (PSI) (Dell C1760nw Color Printer only) 1 Open the front cover. 2 Slide the PSI forward, and then align the PSI to the marking on a level surface. 48 Loading Paper
User Guide
Page 51
If a user-specified print media is not standard plain paper. 4 Load print media on the PSI with the top edge first and with the recommended print side facing up. 5 Adjust the width guides until they rest lightly against the edges of the stack of print media. 6 Select the paper type from the printer driver if the loaded print media is loaded in the PSI, you must specify the paper size setting by using the printer driver. Loading Paper 49
If a user-specified print media is not standard plain paper. 4 Load print media on the PSI with the top edge first and with the recommended print side facing up. 5 Adjust the width guides until they rest lightly against the edges of the stack of print media. 6 Select the paper type from the printer driver if the loaded print media is loaded in the PSI, you must specify the paper size setting by using the printer driver. Loading Paper 49


