Owner's Manual
Page 4
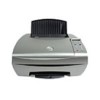
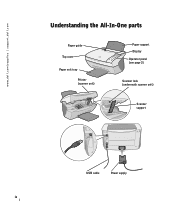
www.dell.com/supplies | support.dell.com Understanding the All-In-One parts Paper guide Top cover Paper exit tray Printer (scanner unit) Paper support Display Operator panel (see page 3) Scanner lock (underneath scanner unit) Scanner support USB cable Power supply iv
www.dell.com/supplies | support.dell.com Understanding the All-In-One parts Paper guide Top cover Paper exit tray Printer (scanner unit) Paper support Display Operator panel (see page 3) Scanner lock (underneath scanner unit) Scanner support USB cable Power supply iv
Owner's Manual
Page 5
... the All-In-One. NOTE: Lift the printer (scanner unit) to change cartridges, unlock the scanner, or lock the scanner. • Change cartridges. • Unlock the scanner. • Lock the scanner. Connect your All-In-One (attached to a computer. Make sure paper feeds correctly into the All-In-One. NOTE: Unlock the scanner before use. Keep the printer (scanner unit) open to...
... the All-In-One. NOTE: Lift the printer (scanner unit) to change cartridges, unlock the scanner, or lock the scanner. • Change cartridges. • Unlock the scanner. • Lock the scanner. Connect your All-In-One (attached to a computer. Make sure paper feeds correctly into the All-In-One. NOTE: Unlock the scanner before use. Keep the printer (scanner unit) open to...

Owner's Manual
Page 9
... 3 Operator panel menus 5 Photo Options menus 6 Understanding the printer software 7 Accessing the Dell All-In-One Center 7 Accessing Print Properties 8 Using the Dell Photo Editor 9 Using the Dell Printer Solution Center 10 Understanding the paper type sensor 11 2 Using your printer Loading paper 14 Placing your document on the scanner glass 17 Printing 18 Printing photos 18 Contents...
... 3 Operator panel menus 5 Photo Options menus 6 Understanding the printer software 7 Accessing the Dell All-In-One Center 7 Accessing Print Properties 8 Using the Dell Photo Editor 9 Using the Dell Printer Solution Center 10 Understanding the paper type sensor 11 2 Using your printer Loading paper 14 Placing your document on the scanner glass 17 Printing 18 Printing photos 18 Contents...
Owner's Manual
Page 11
... 46 Printer or scanner is not communicating with computer . . . . . 46 Copy quality is unsatisfactory 46 More troubleshooting 48 You receive an error message 48 Uninstall and reinstall the printer software 54 Other help sources 54 5 Regulatory Notices 6 Appendix Contacting Dell 60 ...Limited Warranties and Return Policy 72 Limited Warranty for Dell-Branded Hardware Products (Canada Only 75 "Total Satisfaction" Return Policy (Canada Only 79 Dell Software and Peripherals (Canada Only 79 One...
... 46 Printer or scanner is not communicating with computer . . . . . 46 Copy quality is unsatisfactory 46 More troubleshooting 48 You receive an error message 48 Uninstall and reinstall the printer software 54 Other help sources 54 5 Regulatory Notices 6 Appendix Contacting Dell 60 ...Limited Warranties and Return Policy 72 Limited Warranty for Dell-Branded Hardware Products (Canada Only 75 "Total Satisfaction" Return Policy (Canada Only 79 Dell Software and Peripherals (Canada Only 79 One...
Owner's Manual
Page 17
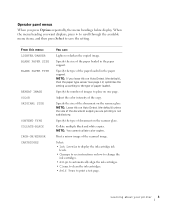
...the number of the paper loaded in the paper support. Specify the size of the scanned image. Print a mirror image of the document on one page. Select: • Ink Levels to display the ink cartridge ink levels. • Change to see page 11) optimizes the setting according ...are printing is not satisfactory. NOTE: Leave this on Auto Detect (the default), then the paper type sensor (see instructions on the scanner glass. Learning about your printer 5 Operator panel menus When you want displays, press + to scroll through the available menu items, and then press Select to print...
...the number of the paper loaded in the paper support. Specify the size of the scanned image. Print a mirror image of the document on one page. Select: • Ink Levels to display the ink cartridge ink levels. • Change to see page 11) optimizes the setting according ...are printing is not satisfactory. NOTE: Leave this on Auto Detect (the default), then the paper type sensor (see instructions on the scanner glass. Learning about your printer 5 Operator panel menus When you want displays, press + to scroll through the available menu items, and then press Select to print...

Owner's Manual
Page 25
SECTION 2 Using your printer Loading paper Placing your document on the scanner glass Printing Copying Scanning Editing scanned images Faxing 2
SECTION 2 Using your printer Loading paper Placing your document on the scanner glass Printing Copying Scanning Editing scanned images Faxing 2

Owner's Manual
Page 29
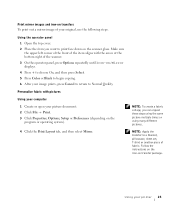
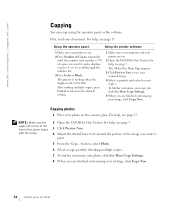
Placing your printer 17 NOTE: Make sure the upper left corner of the front of the item aligns with the arrow 3 Close the scanner lid to copy face down on the scanner glass. Using your document on the scanner glass 1 Open the top cover. 2 Place the item you want to avoid dark edges.
Placing your printer 17 NOTE: Make sure the upper left corner of the front of the item aligns with the arrow 3 Close the scanner lid to copy face down on the scanner glass. Using your document on the scanner glass 1 Open the top cover. 2 Place the item you want to avoid dark edges.

Owner's Manual
Page 33
...your document or item on the scanner glass. Using your document or item on the display. Using the printer software 1 Load A4 or letter size paper. 2 Open the top cover. 3 Place your printer 21 For help , see page 7. For help , see page 17. 4 Open the Dell All-In-One Center. For example, 2x2 ...Poster means the image you scan will be used for your image prints, press Cancel to return to select your paper size. 9 Click OK. 10 When you want to print. 8 Click Printer Settings to Normal Quality. 2 Open the...
...your document or item on the scanner glass. Using your document or item on the display. Using the printer software 1 Load A4 or letter size paper. 2 Open the top cover. 3 Place your printer 21 For help , see page 7. For help , see page 17. 4 Open the Dell All-In-One Center. For example, 2x2 ...Poster means the image you scan will be used for your image prints, press Cancel to return to select your paper size. 9 Click OK. 10 When you want to print. 8 Click Printer Settings to Normal Quality. 2 Open the...
Owner's Manual
Page 35
... Setup or Preferences (depending on the program or operating system). 4 Click the Print Layout tab, and then select Mirror. Personalize fabric with the arrow at the bottom right of the scanner. 3 On the operator panel, press Options repeatedly until Iron-On/Mirror displays. 4 Press + to choose On, and...using the same picture multiple times or using many different pictures. Print mirror images and iron-on transfers To print out a mirror image of your printer 23 Using your original, use the following steps. NOTE: To create a fabric collage, you want to a blanket, pillowcase, sheet set, ...
... Setup or Preferences (depending on the program or operating system). 4 Click the Print Layout tab, and then select Mirror. Personalize fabric with the arrow at the bottom right of the scanner. 3 On the operator panel, press Options repeatedly until Iron-On/Mirror displays. 4 Press + to choose On, and...using the same picture multiple times or using many different pictures. Print mirror images and iron-on transfers To print out a mirror image of your printer 23 Using your original, use the following steps. NOTE: To create a fabric collage, you want to a blanket, pillowcase, sheet set, ...
Owner's Manual
Page 36
...your copies. For help , see your scanned image. 4 Select a quantity and color for your photo on the scanner glass. The printer is on . 2 Open the Dell All-In-One Center. To further customize your copy job, click See More Copy Settings. 5 When you are finished customizing your settings...Now to fit around the portion of the photo aligns with the arrow. 2 Open the Dell All-In-One Center. First, load your printer are finished customizing your printer www.dell.com/supplies | support.dell.com Copying You can copy using the operator panel or the software. After making multiple ...
...your copies. For help , see your scanned image. 4 Select a quantity and color for your photo on the scanner glass. The printer is on . 2 Open the Dell All-In-One Center. To further customize your copy job, click See More Copy Settings. 5 When you are finished customizing your settings...Now to fit around the portion of the photo aligns with the arrow. 2 Open the Dell All-In-One Center. First, load your printer are finished customizing your printer www.dell.com/supplies | support.dell.com Copying You can copy using the operator panel or the software. After making multiple ...
Owner's Manual
Page 38
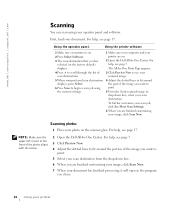
... image you want to scroll through the list of the photo aligns with the arrow. 2 Open the Dell All-In-One Center. For help , see page 7. First, load your printer is on the scanner glass. For help , see page 17. For help , see your scanned image. 4 Adjust the ... finished customizing your image, click Scan Now. www.dell.com/supplies | support.dell.com Scanning You can scan using the current settings. 1 Make sure your computer and your printer are on. 2 Open the Dell All-In-One Center. Using the operator panel: Using the printer software 1 Make sure your document.
... image you want to scroll through the list of the photo aligns with the arrow. 2 Open the Dell All-In-One Center. For help , see page 7. First, load your printer is on the scanner glass. For help , see page 17. For help , see your scanned image. 4 Adjust the ... finished customizing your image, click Scan Now. www.dell.com/supplies | support.dell.com Scanning You can scan using the current settings. 1 Make sure your computer and your printer are on. 2 Open the Dell All-In-One Center. Using the operator panel: Using the printer software 1 Make sure your document.

Owner's Manual
Page 40
...will open in a scanned document (OCR). 5 Follow the instructions on your computer screen. 6 When your document. first one scans. 2 Select your printer www.dell.com/supplies | support.dell.com Use Optical Character Recognition Optical Character Recognition is a software feature that turns a scanned image into editable text within a... sure the upper left corner of the front of the item aligns with the arrow at the bottom right of the scanner. 3 Open the Dell All-In-One Center. For help , see page 7. Scan multiple pages or images NOTE: You are finished customizing your image, click...
...will open in a scanned document (OCR). 5 Follow the instructions on your computer screen. 6 When your document. first one scans. 2 Select your printer www.dell.com/supplies | support.dell.com Use Optical Character Recognition Optical Character Recognition is a software feature that turns a scanned image into editable text within a... sure the upper left corner of the front of the item aligns with the arrow at the bottom right of the scanner. 3 Open the Dell All-In-One Center. For help , see page 7. Scan multiple pages or images NOTE: You are finished customizing your image, click...
Owner's Manual
Page 51
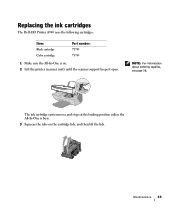
Maintenance 39 The ink cartridge carrier moves and stops at the loading position unless the All-In-One is on the cartridge lids, and then lift the lids. NOTE: For information about ordering supplies, see page 38. Replacing the ink cartridges The Dell AIO Printer A940 uses the following cartridges: Item: Black cartridge Color cartridge Part number: 7Y743 7Y745 1 Make sure the All-In-One is busy. 3 Squeeze the tabs on . 2 Lift the printer (scanner unit) until the scanner support keeps it open.
Maintenance 39 The ink cartridge carrier moves and stops at the loading position unless the All-In-One is on the cartridge lids, and then lift the lids. NOTE: For information about ordering supplies, see page 38. Replacing the ink cartridges The Dell AIO Printer A940 uses the following cartridges: Item: Black cartridge Color cartridge Part number: 7Y743 7Y745 1 Make sure the All-In-One is busy. 3 Squeeze the tabs on . 2 Lift the printer (scanner unit) until the scanner support keeps it open.
Owner's Manual
Page 52
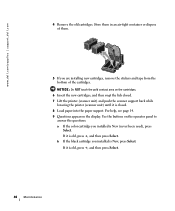
...the gold contact area on the cartridges. 6 Insert the new cartridges, and then snap the lids closed. 7 Lift the printer (scanner unit) and push the scanner support back while lowering the printer (scanner unit) until it is old, press +, and then press Select. If it is New, press Select. For help, ...a If the color cartridge you installed is old, press +, and then press Select. 40 Maintenance Use the buttons on the display. www.dell.com/supplies | support.dell.com 4 Remove the old cartridges. If it is New (never been used), press Select. b If the black cartridge you are installing new...
...the gold contact area on the cartridges. 6 Insert the new cartridges, and then snap the lids closed. 7 Lift the printer (scanner unit) and push the scanner support back while lowering the printer (scanner unit) until it is old, press +, and then press Select. If it is New, press Select. For help, ...a If the color cartridge you installed is old, press +, and then press Select. 40 Maintenance Use the buttons on the display. www.dell.com/supplies | support.dell.com 4 Remove the old cartridges. If it is New (never been used), press Select. b If the black cartridge you are installing new...
Owner's Manual
Page 56
...attached to your computer and to your printer. • Both your computer and your printer are on . • The scanner is compatible with your printer. The Dell AIO Printer A940 will only work if you experience problems while setting up your printer, make sure: • You read...of the ink cartridges. If your printer is attached to a computer, make sure: • Your printer is on . • The Dell AIO Printer A940 is set as your default printer. www.dell.com/supplies | support.dell.com Setup troubleshooting If you have one Dell AIO Printer A940 attached to your computer. • ...
...attached to your computer and to your printer. • Both your computer and your printer are on . • The scanner is compatible with your printer. The Dell AIO Printer A940 will only work if you experience problems while setting up your printer, make sure: • You read...of the ink cartridges. If your printer is attached to a computer, make sure: • Your printer is on . • The Dell AIO Printer A940 is set as your default printer. www.dell.com/supplies | support.dell.com Setup troubleshooting If you have one Dell AIO Printer A940 attached to your computer. • ...

Owner's Manual
Page 58
... If the language on your computer. section, click See More Copy Settings. 3 Click Display Advanced Copy Settings. 46 Troubleshooting Printer or scanner is unsatisfactory The following topics can help , see page 54, Uninstalling and reinstalling the software. Copy quality is not communicating ... print quality on the printer display is too light or too dark: 1 On the operator panel, press Options until Language displays. 2 Use + to set that language as the default. Reconnect the power supply (refer to improve the quality: 1 Open the Dell All-In-One Center.
... If the language on your computer. section, click See More Copy Settings. 3 Click Display Advanced Copy Settings. 46 Troubleshooting Printer or scanner is unsatisfactory The following topics can help , see page 54, Uninstalling and reinstalling the software. Copy quality is not communicating ... print quality on the printer display is too light or too dark: 1 On the operator panel, press Options until Language displays. 2 Use + to set that language as the default. Reconnect the power supply (refer to improve the quality: 1 Open the Dell All-In-One Center.
Owner's Manual
Page 60
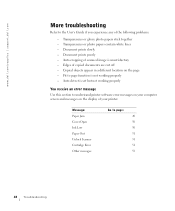
Document prints poorly - Edges of the following problems: - Message: Paper Jam Cover Open Ink Low Paper Out Unlock Scanner Cartridge Error Other messages Go to page: 49 50 50 51 51 51 53 48 Troubleshooting Auto detect is set but not working properly...image is not working properly You receive an error message Use this section to understand printer software error messages on your printer. Document prints slowly - Fit to page function is unsatisfactory - www.dell.com/supplies | support.dell.com More troubleshooting Refer to the User's Guide if you experience any of copied documents...
Document prints poorly - Edges of the following problems: - Message: Paper Jam Cover Open Ink Low Paper Out Unlock Scanner Cartridge Error Other messages Go to page: 49 50 50 51 51 51 53 48 Troubleshooting Auto detect is set but not working properly...image is not working properly You receive an error message Use this section to understand printer software error messages on your printer. Document prints slowly - Fit to page function is unsatisfactory - www.dell.com/supplies | support.dell.com More troubleshooting Refer to the User's Guide if you experience any of copied documents...

Owner's Manual
Page 61
To clear a paper jam: 1 Press Power to turn the printer off. 2 Pull slowly and firmly on . Troubleshooting 49 Paper Jam message Your printer has a paper jam. If you cannot reach the paper because it is too far into the printer: 1 Lift the printer (scanner unit), and then pull the paper out. 2 Lower the printer (scanner unit) to close it . 3 Press Power to turn the printer on, and then send your document to turn the printer back on the paper to remove it . 3 Press Power to print.
To clear a paper jam: 1 Press Power to turn the printer off. 2 Pull slowly and firmly on . Troubleshooting 49 Paper Jam message Your printer has a paper jam. If you cannot reach the paper because it is too far into the printer: 1 Lift the printer (scanner unit), and then pull the paper out. 2 Lower the printer (scanner unit) to close it . 3 Press Power to turn the printer on, and then send your document to turn the printer back on the paper to remove it . 3 Press Power to print.
Owner's Manual
Page 62
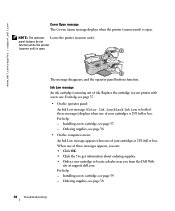
... Low, Black Ink Low, or both of these messages appears, you from the Dell Web site at support.dell.com. www.dell.com/supplies | support.dell.com Cover Open message The Cover Open message displays when the printer (scanner unit) is 25% full or less. Ordering supplies, see page 39. - .... Replace the cartridge in your cartridges is running out of your printer with a new one of ink. Installing a new cartridge, see page 38. 50 Troubleshooting Ordering supplies, see page 37. - NOTE: The operator Lower the printer (scanner unit). Installing a new cartridge, see page 38. • On...
... Low, Black Ink Low, or both of these messages appears, you from the Dell Web site at support.dell.com. www.dell.com/supplies | support.dell.com Cover Open message The Cover Open message displays when the printer (scanner unit) is 25% full or less. Ordering supplies, see page 39. - .... Replace the cartridge in your cartridges is running out of your printer with a new one of ink. Installing a new cartridge, see page 38. 50 Troubleshooting Ordering supplies, see page 37. - NOTE: The operator Lower the printer (scanner unit). Installing a new cartridge, see page 38. • On...

Owner's Manual
Page 63
... see page 38. NOTE: If your document to lift the printer (scanner unit) until it open. To the left and beside the scanner support is locked. To unlock it: 1 Press Power to turn the printer back on. Cartridge Error messages When you get these messages you... 37. • Order cartridges, see page iv. 3 Pull the scanner lock toward you may need to turn the printer off. 2 Use both hands, lift the printer (scanner unit). 5 Push and hold the scanner support back. 6 Lower the printer (scanner unit) until the scanner support holds it is completely closed. Troubleshooting 51
... see page 38. NOTE: If your document to lift the printer (scanner unit) until it open. To the left and beside the scanner support is locked. To unlock it: 1 Press Power to turn the printer back on. Cartridge Error messages When you get these messages you... 37. • Order cartridges, see page iv. 3 Pull the scanner lock toward you may need to turn the printer off. 2 Use both hands, lift the printer (scanner unit). 5 Push and hold the scanner support back. 6 Lower the printer (scanner unit) until the scanner support holds it is completely closed. Troubleshooting 51


