User Guide
Page 1
.... Microsoft and Windows are trademarks of Microsoft Corporation in trademarks and trade names other countries. EMC is strictly forbidden. UNITED STATES GOVERNMENT RESTRICTED RIGHTS This software and documentation are registered trademarks of your desktop. 2. Finding Information Faxing About Your Printer Understanding the Software Understanding the Operator Installing the Dell 966 Internal Panel Menus...
.... Microsoft and Windows are trademarks of Microsoft Corporation in trademarks and trade names other countries. EMC is strictly forbidden. UNITED STATES GOVERNMENT RESTRICTED RIGHTS This software and documentation are registered trademarks of your desktop. 2. Finding Information Faxing About Your Printer Understanding the Software Understanding the Operator Installing the Dell 966 Internal Panel Menus...
User Guide
Page 4
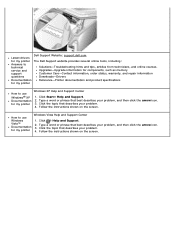
...topic that describes your problem. 4. Vista™ Documentation for my printer The Dell Support website provides several online tools, including: Answers to use Windows Vista Help and Support Center Windows 1. Follow the instructions shown on the screen. Upgrades-Upgrade information for components...warranty, and repair information questions Downloads-Drivers Documentation Reference-Printer documentation and product specifications for my printer Windows XP Help and Support Center 1. Click the topic that describes your problem. 4. Follow the instructions shown on the...
...topic that describes your problem. 4. Vista™ Documentation for my printer The Dell Support website provides several online tools, including: Answers to use Windows Vista Help and Support Center Windows 1. Follow the instructions shown on the screen. Upgrades-Upgrade information for components...warranty, and repair information questions Downloads-Drivers Documentation Reference-Printer documentation and product specifications for my printer Windows XP Help and Support Center 1. Click the topic that describes your problem. 4. Follow the instructions shown on the...
User Guide
Page 9
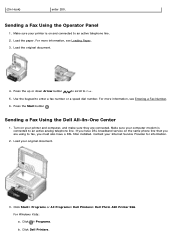
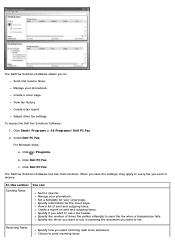
...information, see Entering a Fax Number. 6. Turn on and connected to an active analog telephone line. Use the keypad to Fax. 5. Click Dell Printers. Make sure your printer is connected to an active telephone line. 2. Contact your original document. 3. Make sure your computer modem is... Internet Service Provider for information. 2. Load the original document. 4. Click Start® Programs or All Programs® Dell Printers® Dell Photo AIO Printer 966. Sending a Fax Using the Dell All-In-One Center 1. (On Hook) enter 200. For Windows Vista: a.
...information, see Entering a Fax Number. 6. Turn on and connected to an active analog telephone line. Use the keypad to Fax. 5. Click Dell Printers. Make sure your printer is connected to an active telephone line. 2. Contact your original document. 3. Make sure your computer modem is... Internet Service Provider for information. 2. Load the original document. 4. Click Start® Programs or All Programs® Dell Printers® Dell Photo AIO Printer 966. Sending a Fax Using the Dell All-In-One Center 1. (On Hook) enter 200. For Windows Vista: a.
User Guide
Page 15
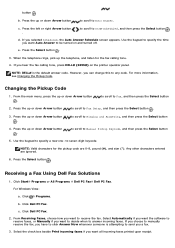
...- Press the up the telephone, and listen for the pickup code are ignored. 6. NOTE: Valid characters for the fax calling tone. 4. Receiving a Fax Using Dell Fax Solutions 1. For Windows Vista: a. Changing the Pickup Code 1. If you want to any code. Any other characters entered are 0-9, pound (#), and star (*). to scroll to Manual...
...- Press the up the telephone, and listen for the pickup code are ignored. 6. NOTE: Valid characters for the fax calling tone. 4. Receiving a Fax Using Dell Fax Solutions 1. For Windows Vista: a. Changing the Pickup Code 1. If you want to any code. Any other characters entered are 0-9, pound (#), and star (*). to scroll to Manual...
User Guide
Page 16
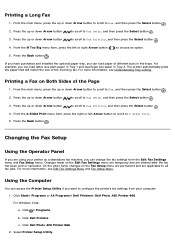
...button to scroll to Fax Setup, and then press the Select button . 3. Click Start® Programs or All Programs® Dell Printers® Dell Photo AIO Printer 966. For more information, see Understanding Tray Linking. Changing the Fax Setup Using the Operator Panel If you are using your printer ...Press the Back button . Using the Computer You can access the Printer Setup Utility if you can change the fax settings from your computer. 1. For Windows Vista: a. Press the Back button . For example, you can load letter size plain paper in Tray 1 and load legal size paper in the...
...button to scroll to Fax Setup, and then press the Select button . 3. Click Start® Programs or All Programs® Dell Printers® Dell Photo AIO Printer 966. For more information, see Understanding Tray Linking. Changing the Fax Setup Using the Operator Panel If you are using your printer ...Press the Back button . Using the Computer You can access the Printer Setup Utility if you can change the fax settings from your computer. 1. For Windows Vista: a. Press the Back button . For example, you can load letter size plain paper in Tray 1 and load legal size paper in the...
User Guide
Page 20
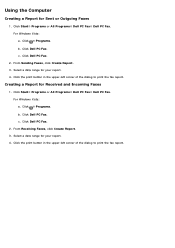
...button in the upper-left corner of the dialog to print the fax report. Click Start® Programs or All Programs® Dell PC Fax® Dell PC Fax. Click Dell PC Fax. Click the print button in the upper-left corner of the dialog to print the fax report. Click ® ...Programs. b. Using the Computer Creating a Report for your report. 4. For Windows Vista: a. Click Start® Programs or All Programs® Dell PC Fax® Dell PC Fax. From Sending Faxes, click Create Report. 3. For...
...button in the upper-left corner of the dialog to print the fax report. Click Start® Programs or All Programs® Dell PC Fax® Dell PC Fax. Click Dell PC Fax. Click the print button in the upper-left corner of the dialog to print the fax report. Click ® ...Programs. b. Using the Computer Creating a Report for your report. 4. For Windows Vista: a. Click Start® Programs or All Programs® Dell PC Fax® Dell PC Fax. From Sending Faxes, click Create Report. 3. For...
User Guide
Page 26
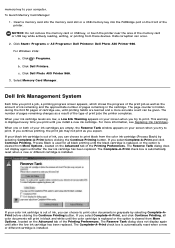
... You cannot scan over a network using PC modem. Click Start® Programs or All Programs® Dell Printers® Dell Photo AIO Printer 966. Click ® Programs. b. Click Dell Photo AIO Printer 966. 2. Select a quality setting for your copies. Select Fax Now. Select the quality and color of your... an image of the preview image to scan or copy. Fax using the Dell All-In-One Center. For more information, click Help in a scanned document (Optical Character Recognition). For Windows Vista: a. The Dell All-In-One Center includes four main sections: In this can : Select ...
... You cannot scan over a network using PC modem. Click Start® Programs or All Programs® Dell Printers® Dell Photo AIO Printer 966. Click ® Programs. b. Click Dell Photo AIO Printer 966. 2. Select a quality setting for your copies. Select Fax Now. Select the quality and color of your... an image of the preview image to scan or copy. Fax using the Dell All-In-One Center. For more information, click Help in a scanned document (Optical Character Recognition). For Windows Vista: a. The Dell All-In-One Center includes four main sections: In this can : Select ...
User Guide
Page 27
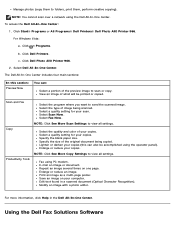
.... Create a fax report. To access the Dell Fax Solutions Software: 1. Select Dell PC Fax. Click Dell PC Fax. c. Manage your cover page. Specify information for your phonebook. Click Start® Programs or All Programs® Dell PC Fax. 2. For Windows Vista: a. Create a report on sent and... outgoing faxes. Choose to be answered. Adjust other fax settings. Click Dell PC Fax. Set a template for the cover page. Specify if...
.... Create a fax report. To access the Dell Fax Solutions Software: 1. Select Dell PC Fax. Click Dell PC Fax. c. Manage your cover page. Specify information for your phonebook. Click Start® Programs or All Programs® Dell PC Fax. 2. For Windows Vista: a. Create a report on sent and... outgoing faxes. Choose to be answered. Adjust other fax settings. Click Dell PC Fax. Set a template for the cover page. Specify if...

User Guide
Page 28
... Automatic, Draft, Normal, or Photo depending on each tab, and change your desired output quality. The Print dialog box opens. 2. In Windows XP, click Start® Settings® Control Panel® Printers and Other Hardware® Printers and Faxes. b. Right-click the printer ...View a list of received and incoming faxes. Click File® Print. The Printing Preferences dialog box opens. Click Hardware and Sound. In Windows Vista: a. Create a report of received and incoming faxes. Click Preferences, Properties, Options, or Setup (depending on the type of rings ...
... Automatic, Draft, Normal, or Photo depending on each tab, and change your desired output quality. The Print dialog box opens. 2. In Windows XP, click Start® Settings® Control Panel® Printers and Other Hardware® Printers and Faxes. b. Right-click the printer ...View a list of received and incoming faxes. Click File® Print. The Printing Preferences dialog box opens. Click Hardware and Sound. In Windows Vista: a. Create a report of received and incoming faxes. Click Preferences, Properties, Options, or Setup (depending on the type of rings ...
User Guide
Page 30
... cartridge has been replaced. For more accurate count can be given. Click Start® Programs or All Programs® Dell Printers® Dell Photo AIO Printer 966. If your black ink cartridge is out of ink, you select Complete-A-Print, and click Continue Printing, all black ...printing until you try to print. The Complete-A-Print check box is automatically reset when a new or different cartridge is installed. For Windows Vista...
... cartridge has been replaced. For more accurate count can be given. Click Start® Programs or All Programs® Dell Printers® Dell Photo AIO Printer 966. If your black ink cartridge is out of ink, you select Complete-A-Print, and click Continue Printing, all black ...printing until you try to print. The Complete-A-Print check box is automatically reset when a new or different cartridge is installed. For Windows Vista...

User Guide
Page 31
...Utilities CD, and then follow the instructions on the screen. 4. In Windows XP, click Start® My Computer. Follow the instructions on your computer. 5. Click Uninstall Dell Photo AIO Printer 966. 3. Removing and Reinstalling Software If your printer does not function properly, ...or communication error messages appear when using your desktop. In Windows 2000, double-click My Computer from your printer,...
...Utilities CD, and then follow the instructions on the screen. 4. In Windows XP, click Start® My Computer. Follow the instructions on your computer. 5. Click Uninstall Dell Photo AIO Printer 966. 3. Removing and Reinstalling Software If your printer does not function properly, ...or communication error messages appear when using your desktop. In Windows 2000, double-click My Computer from your printer,...
User Guide
Page 36
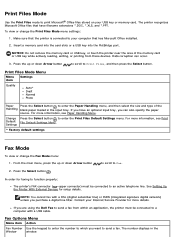
...settings Fax Mode To view or change the Print Files Mode menu settings: 1. NOTE: You cannot fax with a USB cable. If you are using the Dell Fax to a computer with a DSL (digital subscriber line) or ISDN (integrated signature digital network) unless you have filename extensions *.DOC, *.XLS, and ...: Do not remove the memory card or USB key, or touch the printer near the area of the Handling blank paper loaded in the Window window. Data corruption can also specify the paper source. See Setting Up the Printer With External Devices for faxing to function properly: The printer's FAX...
...settings Fax Mode To view or change the Print Files Mode menu settings: 1. NOTE: You cannot fax with a USB cable. If you are using the Dell Fax to a computer with a DSL (digital subscriber line) or ISDN (integrated signature digital network) unless you have filename extensions *.DOC, *.XLS, and ...: Do not remove the memory card or USB key, or touch the printer near the area of the Handling blank paper loaded in the Window window. Data corruption can also specify the paper source. See Setting Up the Printer With External Devices for faxing to function properly: The printer's FAX...
User Guide
Page 37
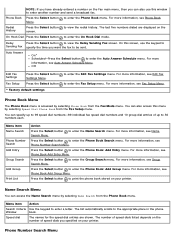
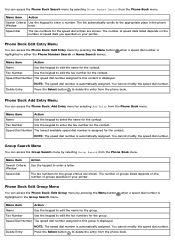
... redial history. Press the Select button Search Menu. to view the Delay Sending Fax screen. Name Search Menu You can also access this window to enter another number and send a broadcast fax. The last five numbers dialed are shown. Delay Press the Select button to enter the... Select button to enter a letter. Phone Number Search Menu Press the Select button * Factory default settings to the appropriate place in the phone Window book. The list automatically scrolls to enter the Edit Fax Settings menu. For more information, see Phone Book Add Entry Menu. Press the Select...
... redial history. Press the Select button Search Menu. to view the Delay Sending Fax screen. Name Search Menu You can also access this window to enter another number and send a broadcast fax. The last five numbers dialed are shown. Delay Press the Select button to enter the... Select button to enter a letter. Phone Number Search Menu Press the Select button * Factory default settings to the appropriate place in the phone Window book. The list automatically scrolls to enter the Edit Fax Settings menu. For more information, see Phone Book Add Entry Menu. Press the Select...
User Guide
Page 38
... number. Menu item Action Name Use the keypad to edit the name for the contact. Menu item Search Criteria Window Speed dial Action Use the keypad to the appropriate place in the phone Window book. The fax numbers for the group entries are shown. Phone Book Edit Group Menu You can access...
... number. Menu item Action Name Use the keypad to edit the name for the contact. Menu item Search Criteria Window Speed dial Action Use the keypad to the appropriate place in the phone Window book. The fax numbers for the group entries are shown. Phone Book Edit Group Menu You can access...

User Guide
Page 39
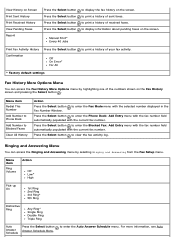
... are temporary and will not apply to enter a name for the group. When Auto Answer is turned on the screen. Menu item Name Fax number window Name Search Phone Number Search Redial History Speed Dial Number Action Use the keypad to your subsequent faxes. Use the keypad to specify the time...
... are temporary and will not apply to enter a name for the group. When Auto Answer is turned on the screen. Menu item Name Fax number window Name Search Phone Number Search Redial History Speed Dial Number Action Use the keypad to your subsequent faxes. Use the keypad to specify the time...
User Guide
Page 41
... with the fax number field automatically populated with the current fax number. to Blocked Faxes Clear All History Action Press the Select button Fax Number Window. For more information, see Auto Menu item Redial This Number Add Number to Phone Book Add Number to enter the Auto Answer Schedule menu. Ringing...
... with the fax number field automatically populated with the current fax number. to Blocked Faxes Clear All History Action Press the Select button Fax Number Window. For more information, see Auto Menu item Redial This Number Add Number to Phone Book Add Number to enter the Auto Answer Schedule menu. Ringing...
User Guide
Page 44
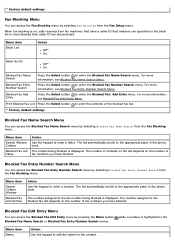
For more information, see Blocked Fax Name Search Menu. Menu item Search Window Criteria Blocked Fax List Value Action Use the keypad to the fax number being blocked is highlighted in the Menu item Name Action Use the ... blocked. while a number is displayed. Blocked Fax Entry Number Search Press the Select button to edit the name for the contact. Menu item Search Criteria Window Blocked Fax List Number Action Use the keypad to the appropriate place in the phone book. The list automatically scrolls to enter a number. The number...
For more information, see Blocked Fax Name Search Menu. Menu item Search Window Criteria Blocked Fax List Value Action Use the keypad to the fax number being blocked is highlighted in the Menu item Name Action Use the ... blocked. while a number is displayed. Blocked Fax Entry Number Search Press the Select button to edit the name for the contact. Menu item Search Criteria Window Blocked Fax List Number Action Use the keypad to the appropriate place in the phone book. The list automatically scrolls to enter a number. The number...
User Guide
Page 56
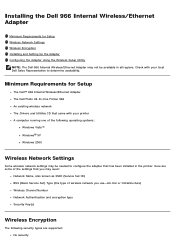
.... Installing the Dell 966 Internal Wireless/Ethernet Adapter Minimum Requirements for Setup The Dell™ 966 Internal Wireless/Ethernet Adapter The Dell Photo All-In-One Printer 966 An existing wireless network The Drivers and Utilities CD that came with your printer A computer running one of the following operating systems: Windows Vista™ Windows® XP Windows 2000 Wireless...
.... Installing the Dell 966 Internal Wireless/Ethernet Adapter Minimum Requirements for Setup The Dell™ 966 Internal Wireless/Ethernet Adapter The Dell Photo All-In-One Printer 966 An existing wireless network The Drivers and Utilities CD that came with your printer A computer running one of the following operating systems: Windows Vista™ Windows® XP Windows 2000 Wireless...
User Guide
Page 70
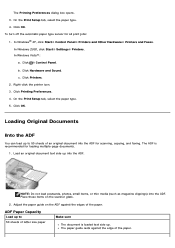
... text side up into the ADF. NOTE: Do not load postcards, photos, small items, or thin media (such as magazine clippings) into the ADF. In Windows 2000, click Start® Settings® Printers. Click Printers. 2. The Printing Preferences dialog box opens. 3. Click Printing Preferences. 4. On the Print Setup tab, ...select the paper type. 4. Adjust the paper guide on the scanner glass. 2. b. Right-click the printer icon. 3. In Windows® XP, click Start® Control Panel® Printers and Other Hardware® Printers and Faxes. c.
... text side up into the ADF. NOTE: Do not load postcards, photos, small items, or thin media (such as magazine clippings) into the ADF. In Windows 2000, click Start® Settings® Printers. Click Printers. 2. The Printing Preferences dialog box opens. 3. Click Printing Preferences. 4. On the Print Setup tab, ...select the paper type. 4. Adjust the paper guide on the scanner glass. 2. b. Right-click the printer icon. 3. In Windows® XP, click Start® Control Panel® Printers and Other Hardware® Printers and Faxes. c.

User Guide
Page 75
... 2. Load plain paper. 2. To align the ink cartridges from the printer software: 1. Press the Select button . 4. In Windows Vista: a. c. Press the Select button . b. In Windows 2000, click Start® Settings® Printers. Click ® Control Panel. Lower the printer unit until it is completely closed...and Sound. 9. Load plain paper. You may also need to Maintenance. 3. The ink cartridges align when the page prints. In Windows XP, click Start® Control Panel® Printers and Other Hardware® Printers and Faxes. Press the up or down Arrow ...
... 2. Load plain paper. 2. To align the ink cartridges from the printer software: 1. Press the Select button . 4. In Windows Vista: a. c. Press the Select button . b. In Windows 2000, click Start® Settings® Printers. Click ® Control Panel. Lower the printer unit until it is completely closed...and Sound. 9. Load plain paper. You may also need to Maintenance. 3. The ink cartridges align when the page prints. In Windows XP, click Start® Control Panel® Printers and Other Hardware® Printers and Faxes. Press the up or down Arrow ...


